Cannabis Heat Stress: How to Spot, Prevent, and Treat It

Most of you know how important it is to control the temperature in your weed garden. You also understand that when it’s too hot for too long, the plants will begin to suffer and show you exactly what’s wrong with them. The trick is knowing where to look. In this post, we’ll talk about how the symptoms of cannabis heat stress look like so that you don’t mix’em up with other issues and take proper action right away.

  • you can notice symptoms of cannabis heat stress on both leaves and buds
  • leaves start to cup (curl up) and later become brown and burned
  • in flower, buds may start to foxtail
  • control the distance from the light and set up proper ventilation
  • maintain the right temperature in the root zone

    top view of a 3 week old weed plant with cupping leaves due to cannabis heat stress
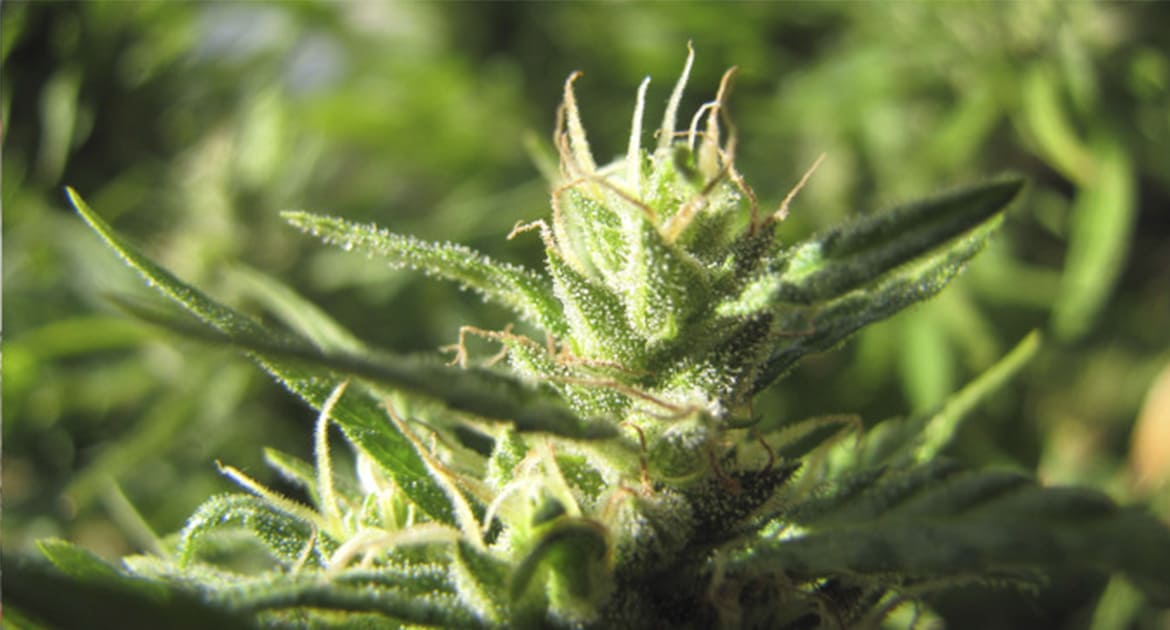
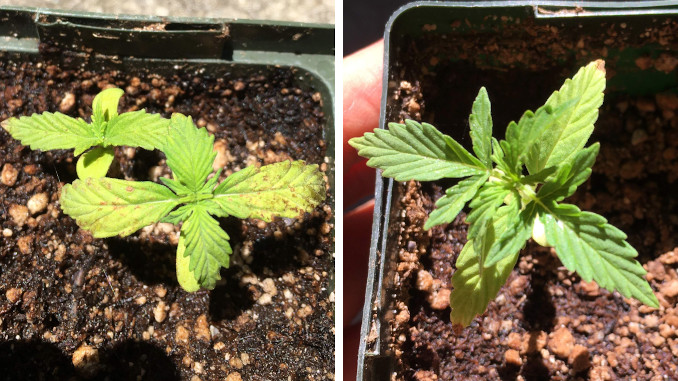
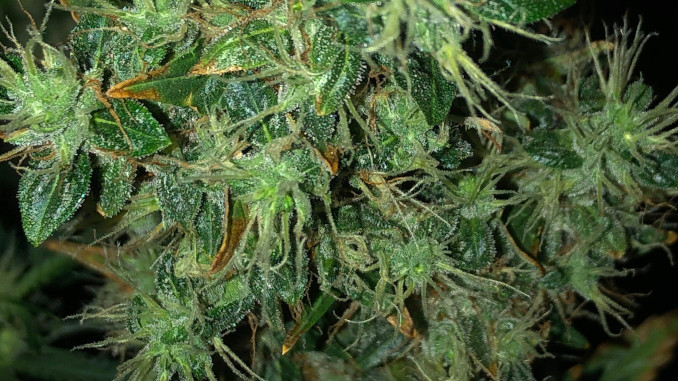
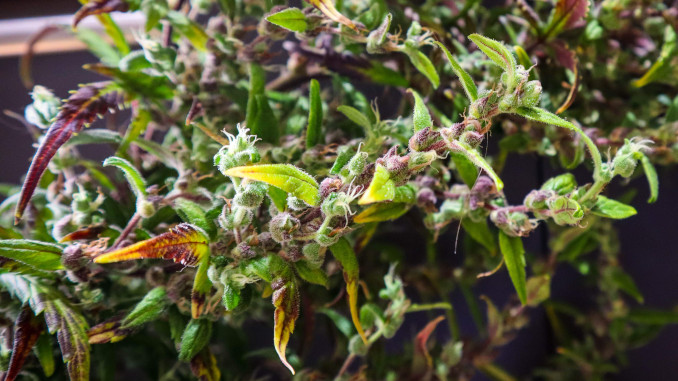
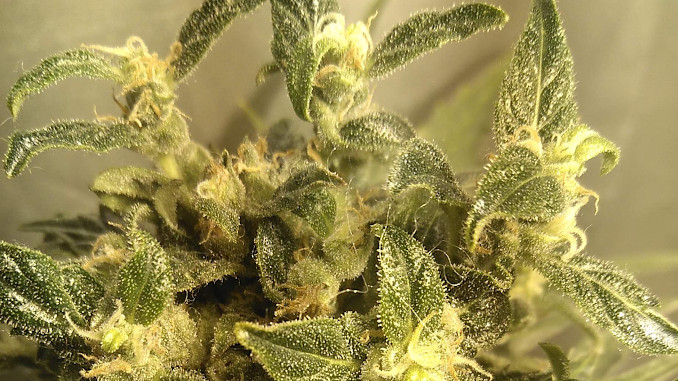
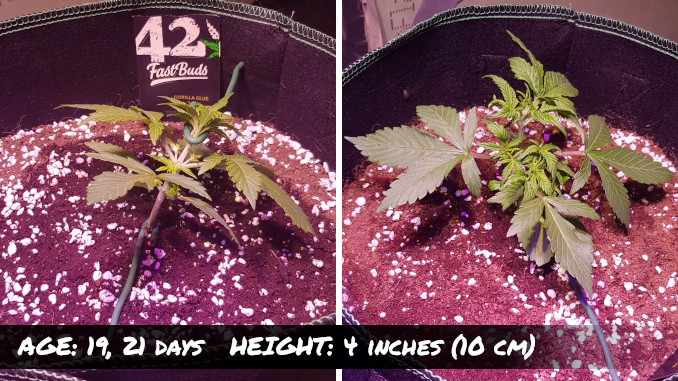
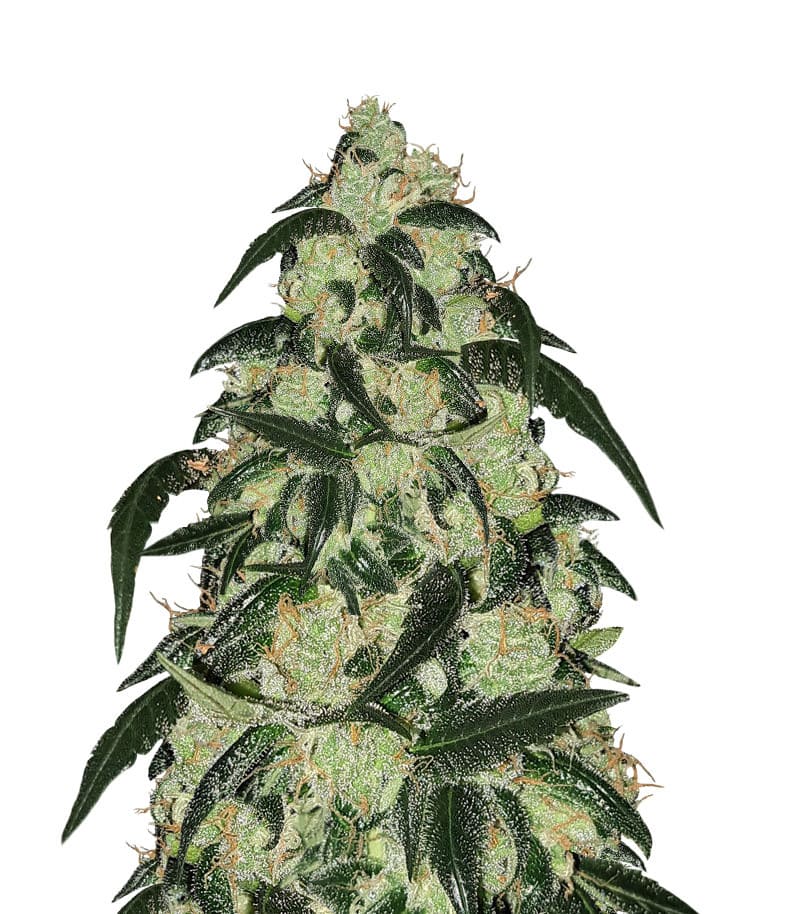
    A young plant suffering from heat stress. © Growdiaries © Sandero

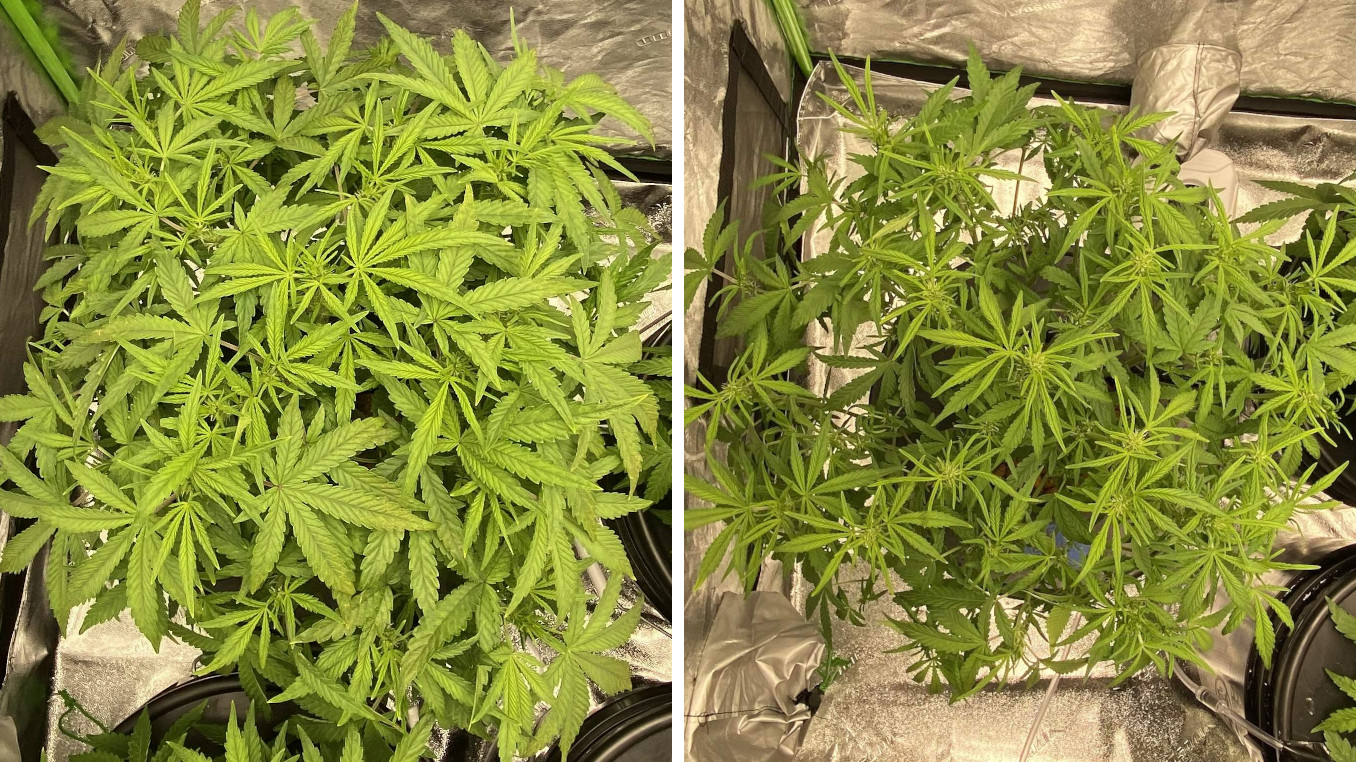
Experienced cannabis growers recognize signs of heat stress right away. Heat stress may affect leaves as well as buds.

Symptoms of Heat Stress on Leaves

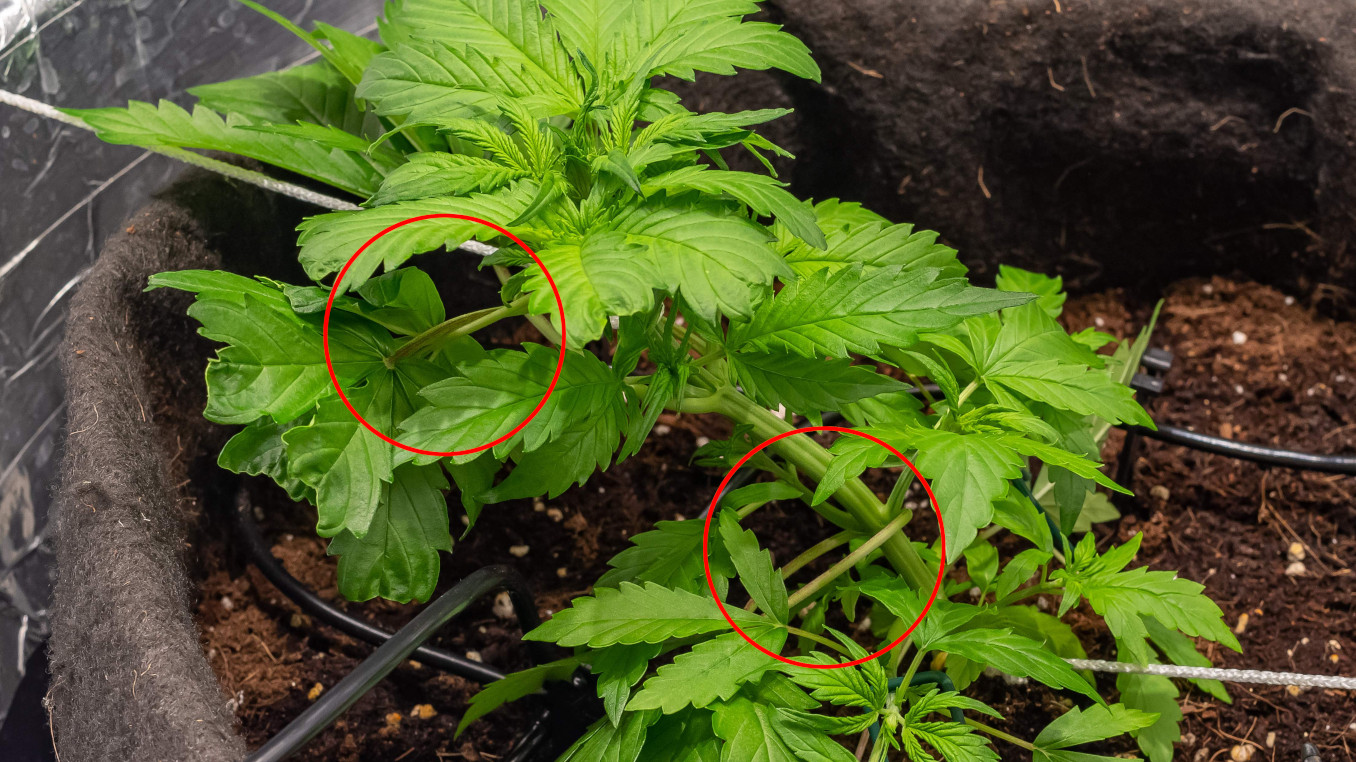
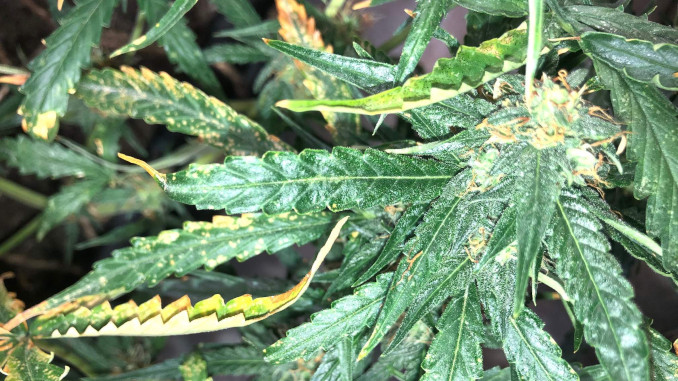
It all starts when those sharp points on the leaf edges begin to curl up. Thereby, the plant tells you that it has become too hot.

A side view of a 3 week-old cannabis plant with points on edges curling up
Serrated edges on the leaves start to point up. © Growdiaries © misterb

And if you don’t resolve the heat issue soon, the leaves curl up even more and start to look like tacos.

A small stunted autoflower with heat-stressed cupping leaves
Cupping leaves and stunted growth due to heat. © Growdiaries © misterb

It’s hard to say why it happens. Maybe that’s how the plant tries to reduce the surface that receives light.

In an indoor setup, leaf cupping often happens on the parts of the plant that are closest to the bulb. It’s because they receive too much radiant heat from the light. And farther down the stem, leaves may remain normal.

And sometimes, only SOME of the upper leaves show these symptoms — where the light creates hot spots.

Of course, during a heatwave, your whole grow room can get too hot. Then you may notice signs of heat stress on both upper and lower leaves.

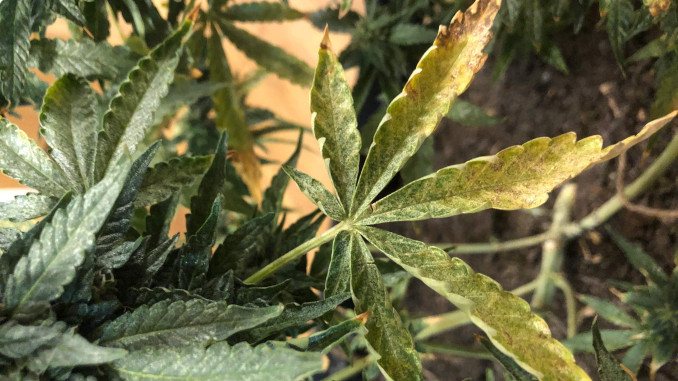
Let the problem persist, and you’ll see the situation get much worse. The leaves may get yellow and then brown. The discoloration starts at the tips and along the edges. Later, the heat burn spreads to the whole leaf, and eventually, the leaf becomes dry and crispy.

A top view of flowering cannabis tops with cupping, yellow, and scorched leaves
Here, the heat-related issues got out of hand. © Growdiaries © sndwich

Don’t Confuse Cannabis Heat Stress and Calcium Deficiency

It’s easy to confuse the signs of cannabis heat burn and the symptoms of calcium deficiency. Calcium-deficient leaves also have brown spots and may become dry and brittle at the tips and along the edges, but they also twist in every direction.

Cannabis leaves getting yellow, brown, and twisted
Brow, dead, distorted leaves are signs of calcium deficiency. © Growdiaries © sndwich

Of course, there are situations when plants have both these issues at the same time. Calcium deficiency makes the plants more vulnerable to heat stress, and heat stress makes the calcium-deficient leaves dry out faster.

Droopy Leaves

Droopy leaves aren’t a sign of heat stress. Rather, they indicate that the plant is thirsty. So, if you see that the leaves on your cannabis hang lifeless, maybe it’s time to water your garden. And don’t forget to water more often when the temperature in your grow room rises.

Several cannabis plants in a big grow tent with drooping leaves after the lights have been turned off
These plants probably get less water than they need for transpiration. © Growdiaries © stumay111

Btw, droopy leaves aren’t a very specific symptom. So, it’s easy for inexperienced growers to confuse underwatered wilting and overwatered “claws”. Besides, leaves may slightly droop every evening (before lights-out), and it’s perfectly normal.

Light Stress

Both light stress and heat burn often stem from the same problem — the light being too close to the plant tops. Though these two may manifest at the same time, they are different issues. With good ventilation, you may have an ideal air temperature in the grow tent (and no heat stress), but your plant tops will still suffer from too much light.

Light stress starts with the yellowing of the leaves. Please note that usually, it’s not the youngest leaves on the very top that start to yellow, but the ones just below them. It’s because they have been exposed to light a day or two longer and so get affected earlier.

Light stress is a very common issue in seedlings. Growers often think it’s potassium deficiency and try to treat it as such, but all they need to do is raise the light.

Cannabis seedlings with the yellowing of cotyledons and the first pair of true leaves due to light and heat stress
The scorching Californian sun isn’t kind to these seedlings. © Growdiaries © misterb

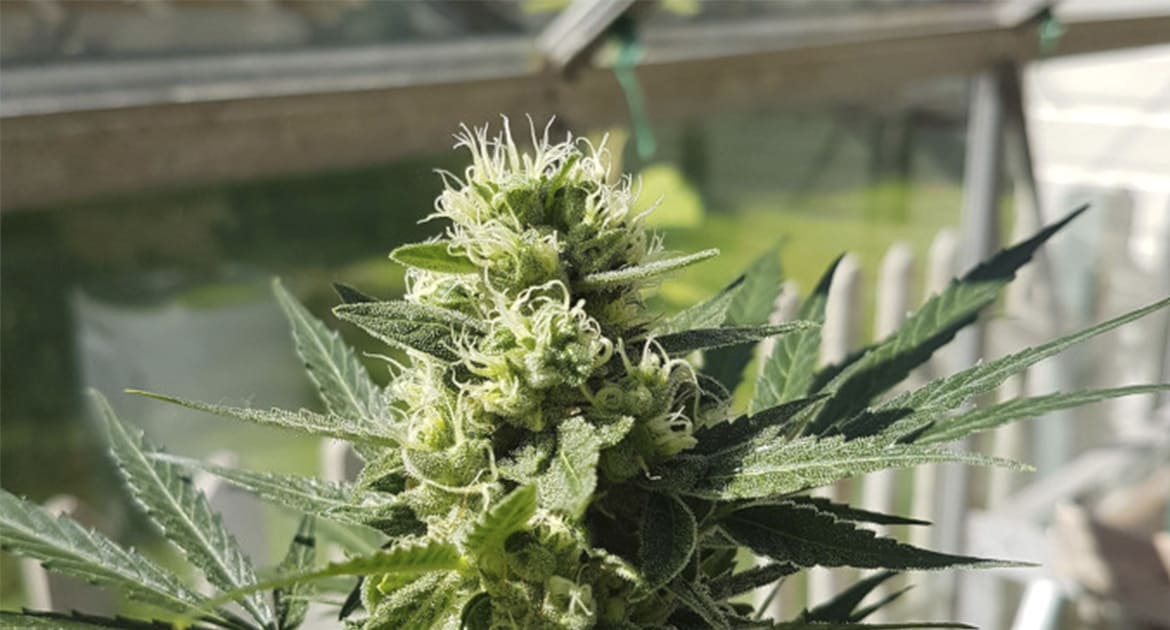
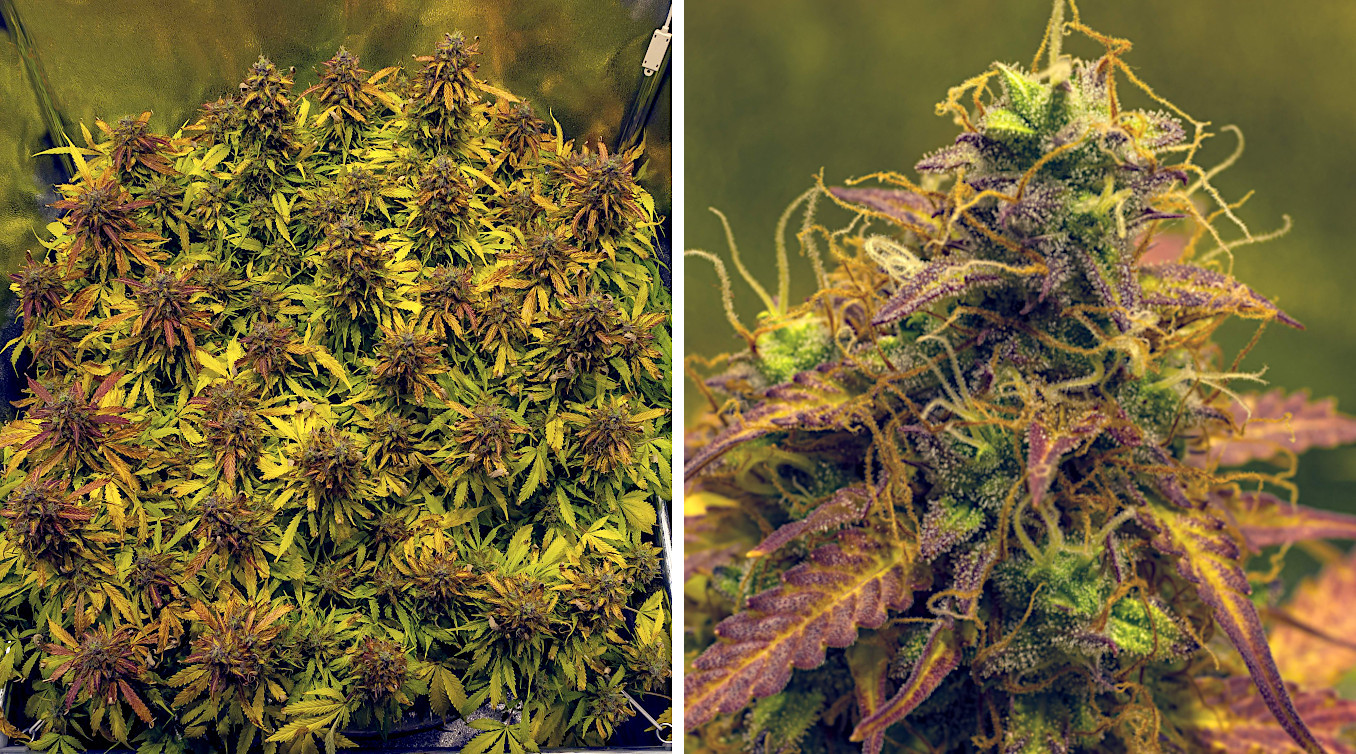
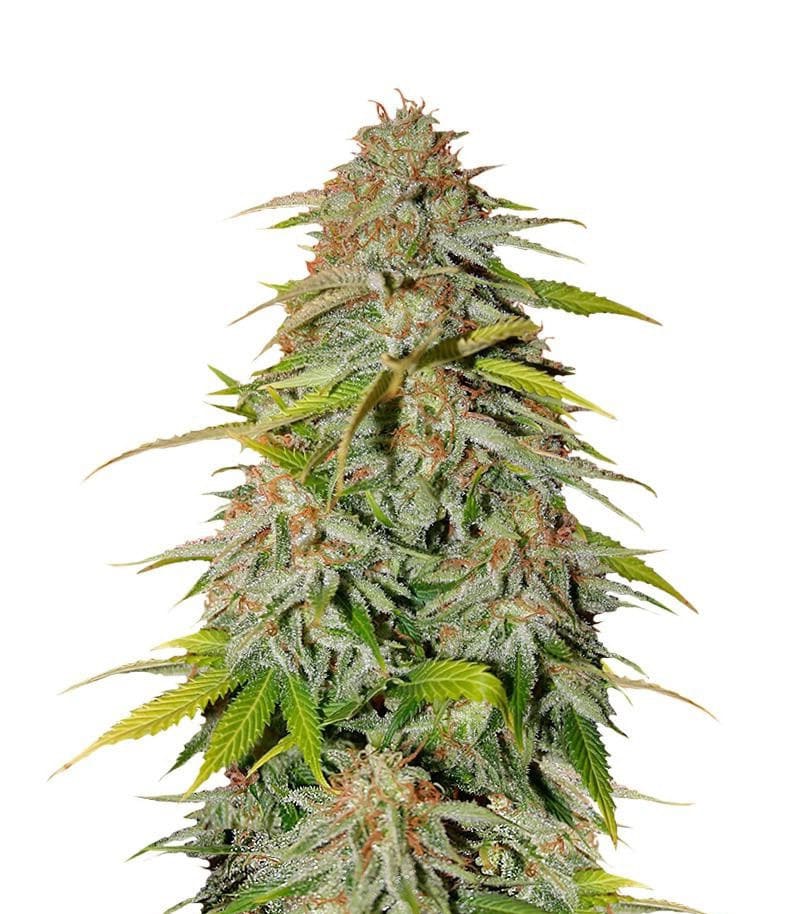
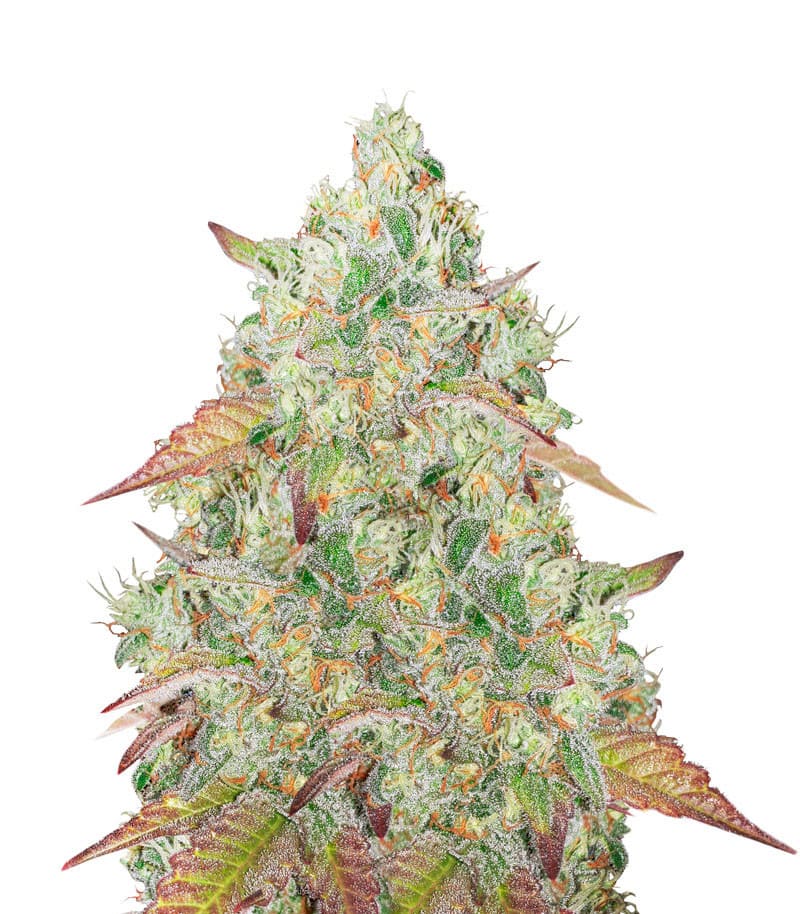
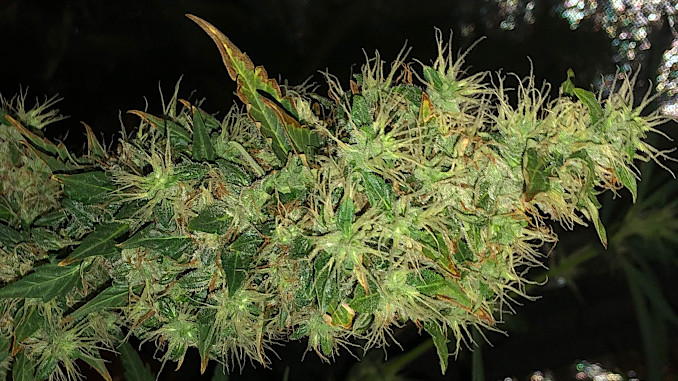
Symptoms of Heat Stress on Flowering Buds

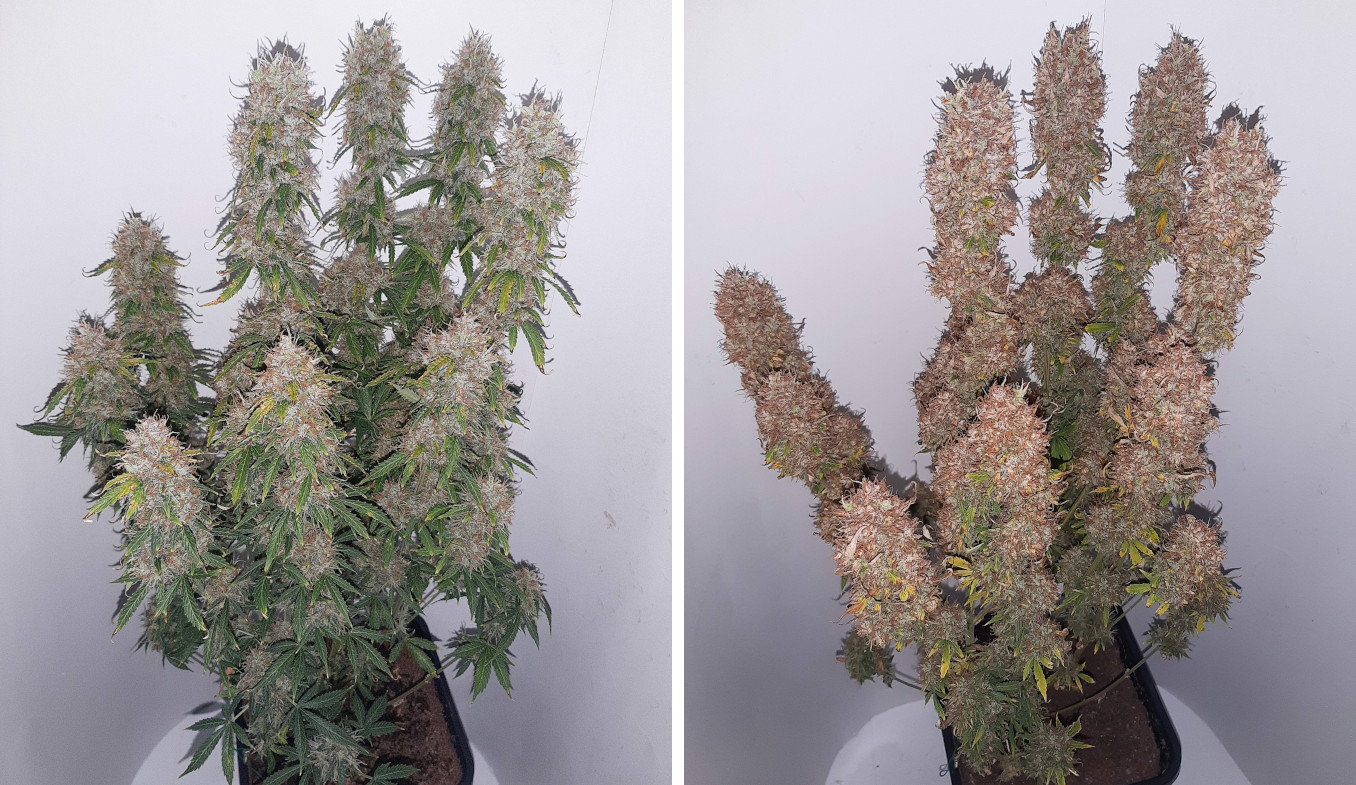
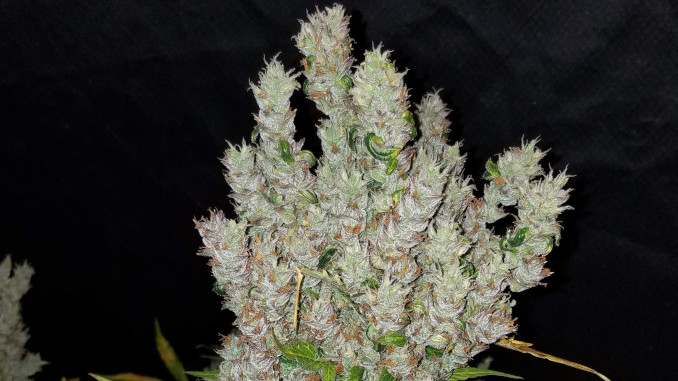
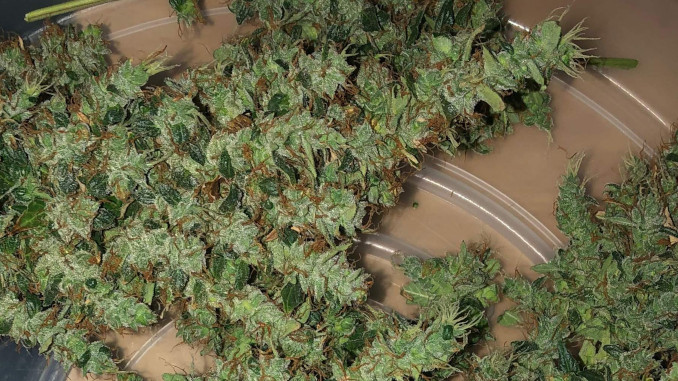
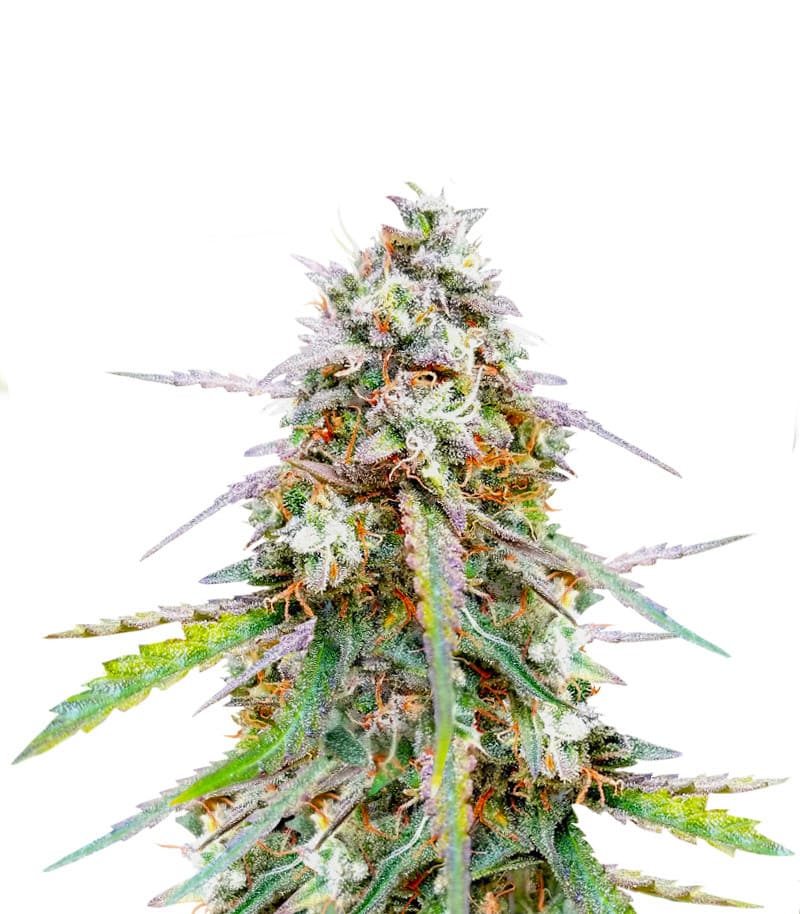
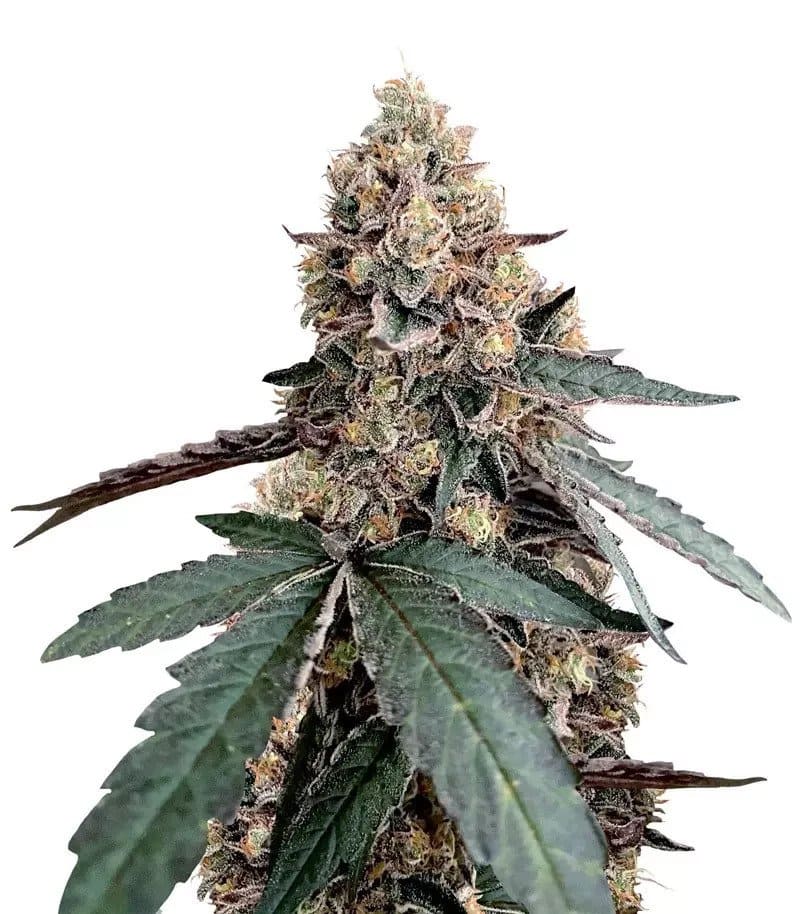
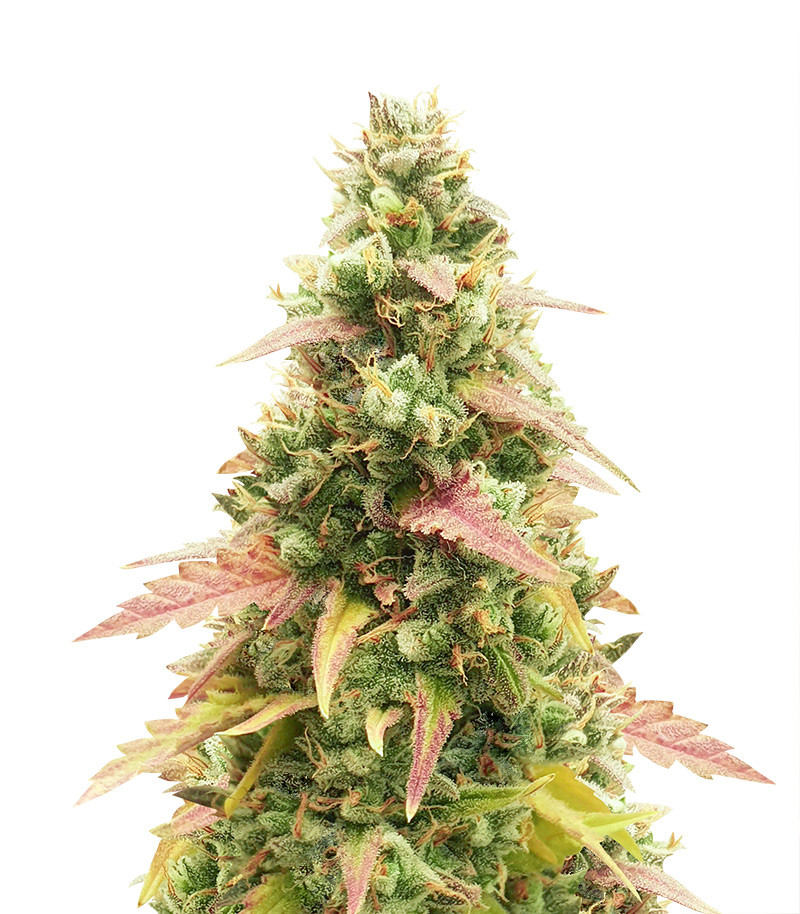
Extreme temperature can damage flowering weed plants in several ways. It can interfere with the production of THC and terpenes, making your smoke less potent, aromatic, and flavorful. It can also lead to lower yields because heat prevents buds from filling out and they remain airy and spongy. In a worst-case scenario, buds start foxtailing, especially if you grow one of the strains with a tendency to foxtail.

Foxtailing and leaf cupping due to extreme heat
This Critical Purple Auto grown on a rooftop in NorCal displays both the foxtailing and the taco-ing of the leaves. © Growdiaries © misterb

If the heat is extreme—even for a short period of time—the pistils may change their color from white to brown prematurely. Pistils are the female hairs on cannabis buds. It’s normal for them to become amber or brown at the end of the life cycle when the buds are already big and dense. But if the flowers have only begun to form, they should have white pistils.

How Much Heat is Too Much?

Just like humans, marijuana plants can tolerate very high temperatures for a short time. The problems begin when the temperatures are consistently above optimal levels. You may ask: what are those optimal levels?

Well, we’ve covered that in another article where we cite available research on the topic. In a nutshell, aim for 77-86°F (25-30°C) during the day and 10°F (8°C) lower at night. When the temp levels creep above the allowed maximum, photosynthesis slows down and you begin to notice stunted growth and heat stress symptoms.

And there’s one more thing we didn’t mention earlier: cannabis pests LOVE hot and humid environments and multiply in great numbers.

Fan leaves of cannabis yellow and dry due to heat, pests, and other problems
A lot of tiny spots on the leaves point to some pest infestation. © Growdiaries © sndwich

How to Take Care of Heat Indoors

First of all, don’t plan any indoor growing for the summer months. Otherwise, your grow tent will turn into an oven when a heatwave comes. Second, try to use lights that generate less heat. This means LED quantum boards instead of HPS bulbs.

A very clever trick is to run your lights during night hours—when it’s generally cooler—and turn them off for the day. The only issue could be light leaks. They don’t matter if you grow autoflowers, but with photoperiod strains, make sure there are no light leaks at the seams. Otherwise, they can disrupt flowering.

You can also try and raise the levels of CO2 to help cannabis deal with heat stress. For example, you can place CO2 bags in your grow tent. Please bear in mind that this method is controversial. Available research in other crops draws a very complicated picture. Sometimes, more CO2 is helpful in dealing with high temps, and sometimes it hurts plants even more.

Clearly, the most important thing is ventilation. Your extractor fan should refresh the air inside your grow space at least once every 3-5 minutes. And if you think problems with heat are possible, make it every minute. The same goes for small grow tents. The smaller your tent is, the easier it is to overheat.

So, calculate the volume of the grow tent in cubic feet, write down this number, and buy a fan with the same CFM (the cubic-feet-per-minute capacity).

Also, install an oscillating fan that will blow just above the canopy level. It will help protect your plant tops from heat burn.

Related Post  Autoflower Temp and Humidity: With Real-Life Examples

The Temperature in the Root Zone

Hydroponic growers know very well the importance of keeping the roots nice and cool. If the temperature of the nutrient solution gets way above the recommended 65°F (18°C), problems begin. The levels of dissolved oxygen go down, and the pathogens thrive.

The temperature in other mediums, such as soil or coco, is just as important, but soil growers often forget about it and learn how important that is the hard way.

So, when growing weed under powerful bulbs indoors, make sure to shade your pots from the light. Especially if the pots are black and thus absorb the radiant heat easily. For the same reason, it’s safer to use terracotta containers with thick massive walls than thin plastic ones. And when watering your plants, be sure to use water that is not too warm.

Important! Even if the temperature of the air is way off the mark but the temperature in the root zone is within the ideal range, the plants will be perfectly healthy and show no signs of cannabis heat stress.

Measures Against Cannabis Heat Stress Outdoors

Outdoors, you can help your weed garden deal with heat in three ways:

  1. Keep the roots cool.
  2. Shade the plants from the sun during the hottest part of the day.
  3. Help them survive a heatwave with regular watering.

If you grow cannabis outdoors in pots (rather than on beds), make sure the containers themselves don’t receive any direct light. And when the plants grow in the ground, use a lot of mulch to cover the ground and thus insulate it from heat.

In a hot and sunny climate, plant your cannabis in a spot where trees or walls shade them for a couple of hours in the afternoon. However, a more efficient way is to plant your garden in an open spot and spread shade cloth over it when necessary. And if you grow weed in pots, you can move them around, chasing either the sun or the shade as needed.

Watering your garden generously each morning will help the plants deal with the heat. And if the water is cool, it will not only provide moisture but also lower the temperature in the root zone.

Can You Revive a Heat-Stressed Plant?

In most cases, all you need to do is adjust the temperature and simply wait for the plant to get better. However, some growers propose more hands-on approaches.

Silica (Silicon Dioxide)

Many nutrient manufacturers offer supplements that contain silica. They claim that silica makes cell walls tougher, and tougher cell walls—among other things—make sure leaves lose less water during extreme heat and drought. There are also other mechanisms of silicon’s effect on heat resistance.

The good news is that research on crops other than cannabis, such as rice and tomatoes, fully supports these claims. Silica really makes higher plants more tolerant of heat.

And this is a list of cannabis growing supplements that contain silica:

  • Advanced Nutrients Rhino Skin,
  • True Plant Science Silica Gold,
  • Botanicare Silica Blast,
  • B.A.C. Silica Power,
  • NPK Industries RAW Silica,
  • Cyco Platinum Series Silica,
  • Advanced Hydroponics of Holland Advanced Silica.

Humic Acid

There is ample evidence that humic acid enhances heat tolerance in plants. Researchers have observed these effects in Arabidopsis, tomatoes, and oats. The first of these studies even suggested the exact mechanisms of how humic acid makes plants more heat tolerant. Namely, it regulates several relevant genes, including Heat-Shock Protein (HSP).

Cannabis growers widely use humic acid which is a part of the following products:

  • Green Buzz Liquids Humic Acid Plus,
  • NPK Industries RAW Humic Acid,
  • Earth Juice Rich Humic,
  • Guanokalong Black,
  • Humboldt Nutrients Hum-Bolt and FlavorFul.

Seaweed Kelp Extract

Seaweed contains plant growth regulators, aka plant hormones. As their name suggests, these molecules can regulate many important aspects of plant growth. So, growers use seaweed to boost germination and rooting and to increase yields. Some say seaweed kelp extracts help cannabis recover from environmental stresses, including heat and drought.

However, in her review of the available scientific literature, Dr. Linda Chalker-Scott notes a huge disproportion between aggressive marketing of this “wonder supplement” and its middling benefits. In other words, you’ll end up overpaying for something that in fact doesn’t do much.

With that said, here are a few seaweed kelp products that weed growers use:

  • Kelpak Seaweed Extract ~ Vegetable Fertiliser,
  • Technaflora Soluble Seaweed Extract,
  • Gaia Green Soluble Seaweed Extract,
  • Platinium Hydroponics Engrais Seaweed Extract,
  • Greenleaf Nutrients Kelp Extract,
  • Maxicrop Liquid Seaweed / Liquid Seaweed Plus Iron,
  • Plant Magic Catalyst.

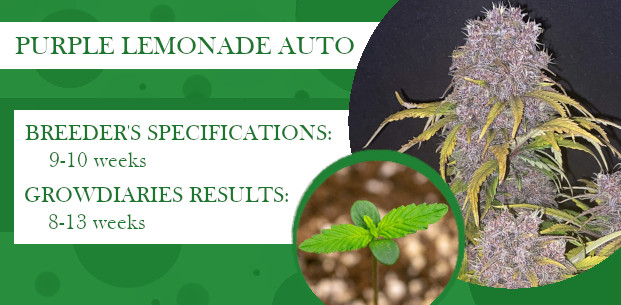
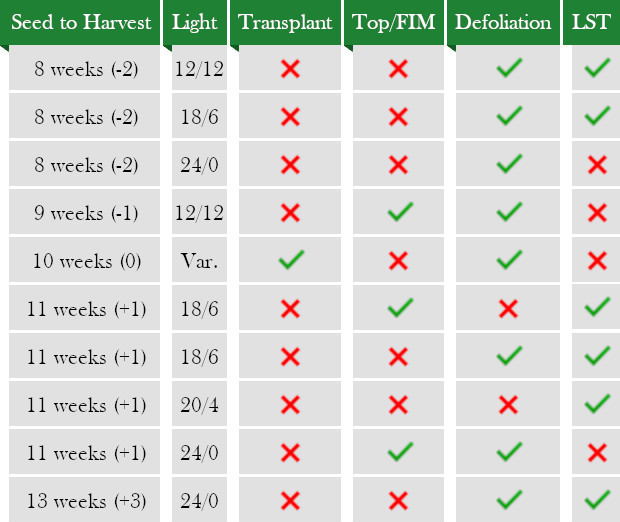
Well, this wraps it up. Now you know how to diagnose, prevent, and treat heat stress in cannabis. And if you live in a hot climate or your grow setup has permanent temperature problems, try cannabis strains that are resistant to heat.


Foxtailing Strains 2022. With Pictures and Statistics

Article Highlights

  • The tendency to foxtail is most common among tropical sativas
  • Some varieties, like the Trainwreck family, are notorious foxtailers
  • Some of the “purple” or “blue” genetics may tend to foxtail
  • Even if a strain is prone to foxtailing, not every phenotype will foxtail on you
  • Even “normal” strains may foxtail as a response to heat/light stress
  • The 11/13 light cycle increases the expression of foxtailing genes, too
cannabis flowers with calyces looking like a string of pearls
This Devil Cream Auto is an example of extreme foxtailing.

In a separate article, we talked about the reasons your buds may foxtail. The usual suspects are heat and light stress. It means that either your plant tops are too close to the lights or there’s been a heatwave that raised the temperature in your growing space.

In yet another post, we also mentioned that keeping your photoperiod strains under 11/13 in flower may result in foxtailing. It’s because foxtailing is a sativa trait and the 11/13 light cycle leads to the expression of sativa traits.

And sometimes you have absolutely no control over foxtailing because it’s genetic. So, if you hate to see your buds foxtail, avoid the strains in the list below. And if you want to grow foxtailing weed, prepare to be patient. When growing cannabis from seeds, you’ll see several phenotypes in the same strain and not all of them will foxtail.

I have personally seen foxtailing in my grow room on a few occasions, but for this post, I needed a bigger sample. So I did a thorough search through the Growdiaries community to find marijuana strains that foxtail more often than others.

Foxtailing in Sativa Strains

You have bigger odds of seeing foxtailing if you grow strains that are pure sativas or have a very high percentage of sativa genes in them. A good example is any strain with “Haze” in its name.

Mature flowers of Dr Grinspoon looking like strings of pearls
A close up of a Super Lemon Haze bud with a spire on top and bullet-shaped calyces on the sides
A view of a grow tent with huge foxtailing colas and a closeup of a cola with many spires
Thin tapering tops of very frosty buds
Two Acapulco Gold buds: an indoor and outdoor one, both showing mild foxtailing
Mature swollen buds with signs of foxtailing
Closeups of cannabis buds with huge swollen calyces
A gloved hand holding a huge, mildly foxtailing marijuana cola
Very mild foxtailing on fat and dense marijuana buds

Dr. Grinspoon (Barney's Farm) © Growdiaries

Super Lemon Haze (Green House Seeds) © Growdiaries

G13 Haze (Green House Seeds) © Growdiaries

Hawaiian Snow (Green House Seeds) © Growdiaries

Acapulco Gold (Barney's Farm) © Growdiaries

Laughing Buddha (Barney's Farm) © Growdiaries

A.M.S. (Green House Seeds) © Growdiaries

Tangerine Dream (Barney's Farm) © Growdiaries

Neville's Haze (Green House Seeds) © Growdiaries

next arrow
previous arrow

Swipe to see all images in the gallery.

Frankly, it’s not always clear if sativa buds are foxtailing or not. Sativas often have thin, spear-like colas. Or the buds may explode in every direction, become very fat but remain spongy at the same time. So, there were quite a few borderline cases, but I tried to do my best. Here are the results.

Strain, Sativa/Indica
Breeder
Foxtailing
None Mild Strong Extreme
Dr. Grinspoon, 100/0
Barney’s Farm
1 6 9 2
Super Lemon Haze, 70/30
Green House Seeds
16 6 4
G13 Haze, 80/20
Barney’s Farm
8 4 1
Hawaiian Snow, 80/20
Green House Seeds
3 1
Acapulco Gold, 70/30
Barney’s Farm
13 3
Laughing Buddha, 80/20
Barney’s Farm
19 3
Super Silver Haze, 70/30
Green House Seeds
4 2
A.M.S., 40/60
Green House Seeds
1 2
Tangerine Dream, 60/40
Barney’s Farm
20 2
Neville’s Haze, 90/10
Green House Seeds
1
Pineapple Haze, 30/70
Barney’s Farm
2 1
Arjan’s Haze #3, 70/30
Green House Seeds
4 1

The Trainwreck Line

Whenever people start to discuss foxtailing genetics, the name “Trainwreck” pops up every time. Indeed, I managed to find a couple of examples where Trainwreck buds foxtail in a big way.

Extremely long spires on Train Wreck autoflower
Many protruding shoots on K-Train colas
Long spear-like marijuana bud with many white pistils

Train Wreck Auto (King Crop Seeds) © Growdiaries

K-Train (Green House Seeds) © Growdiaries

Dark Ghost Train (Rare Dankness) © Growdiaries

next arrow
previous arrow

Swipe to see all images in the gallery.

Unfortunately, I only found a few grows, so the sample is very small. Anyway, these are the results:

Strain, Sativa/Indica
Breeder
Foxtailing
None Mild Strong Extreme
Train Wreck Auto, 60/30/10
King Crop Seeds
2 1 1
K-Train
Green House Seeds
1 1
Dark Ghost Train
Rare Dankness
1 1
Trainwreck Auto, 55/45
FastBuds
8 1

Purple or Blue Genetics

When I was searching for foxtailing strains on Growdiaries and on different forums, I was surprised to see foxtailing in such varieties as Blue Cheese, Critical Purple Auto, and Devil Cream Auto. All these strains don’t have much sativa in their DNA, but they’re all purple.

Then I asked myself what comes to mind when I think of purple buds. Well, I picture them either bloated and loose, or with huge dense calyces that shoot in every direction and almost resemble bullets. And sometimes purple buds look like a bunch of grapes or even a string of pearls.

Buds looking like a bunch of frosty pearls
A purple weed bud with many fat tapering offshoots
A weed bud untrimmed and displaying very strong foxtailing and the same bud trimmed
Two different foxtailing colas: one with several side spikes, the other with a spear-like top
Big and lumpy purple buds before harvest

Devil Cream Auto (Sweet Seeds) © Growdiaries

Dark Devil Auto (Sweet Seeds) © Growdiaries

Black Cream Auto (Sweet Seeds) © Growdiaries

Blue Cheese (Royal Queen Seeds) © Growdiaries

Purple Punch (Barney's Farm) © Growdiaries

next arrow
previous arrow

Swipe to see all images in the gallery.

Well, it’s just a theory of mine that many purple genetics tend to foxtail. You can check it yourself, and below, you can find a few examples. Please note that Sweet Seeds Devil Cream Auto turned out to be the second most foxtailing strain in our review. And both of its parents—Dark Devil Auto and Black Cream Auto—have this tendency, too.

Strain, Sativa/Indica
Breeder
Foxtailing
None Mild Strong Extreme
Devil Cream Auto, 20/80
Sweet Seeds
10 5 2 3
Dark Devil Auto, 60/40
Sweet Seeds
9 7 1
Black Cream Auto, 5/95
Sweet Seeds
11 5 1
Blue Cheese, 40/60
Royal Queen Seeds
5 4 1
Critical Purple Auto, 0/100
Growers Choice Seeds
14 2
Purple Punch, 10/90
Barney’s Farm
29 4

That’s it for now. Later, I may add other genetics to this list. And if you have encountered foxtailing strains in your grows, please share in the comments.

Foxtailing Buds: Good or Bad? Causes, Fixes, and More

Foxtailing buds have their fair share of fans. It’s evidenced by the fact that some growers look specifically for foxtailing strains when they shop for cannabis seeds. However, this is a niche demand, and most of you prefer their buds to be compact and dense, and not elongated, wispy, and airy. Unfortunately, this is exactly what foxtailing in weed leads to.

Foxtailing buds can be due to either genetics or stress, usually heat and light stress. While you can’t fight genetic foxtailing, you can and should do your best to reduce environmental stresses. It’s not just about the bag appeal of your buds, but about their weight, potency, and aroma as well.

What is Foxtailing in Plants?

We say that buds are foxtailing when they begin to elongate uncontrollably at the tip or grow a lot of tapering side shoots. The cola assumes a strange frilly shape that is not to everyone’s liking.

pointy buds on Green Crack Auto

This huge and high-yielding Green Crack Auto has very pointy buds © Growdiaries © Hawkbo

But let’s start with how cannabis buds normally develop. Flower clusters in cannabis consist of many calyces. A calyx is where the seed develops if the buds catch some male pollen. Calyces usually stack up very close to each other, forming those compact fat colas that we love so much.

However, if you happen to grow some naturally foxtailing Sativa or it’s too hot in your garden, calyces may grow far apart, with noticeable spaces in between. Then the cola may indeed remind you of a fox’s tail. (Interestingly, cola means ‘tail’ in Spanish.)

In the most severe cases, each calyx may grow on its own separate ‘stick’, but mostly a string of calyces just grow on top of each other, forming thin tapering spires.

harvested and trimmed foxtailing buds in a glass bowl

This Zkittlez Auto was flowering during a heatwave, hence the foxtailing. © Growdiaries © Treighfunky

Quite often, you will also see a lot of small, roundish, deep-green, and not very sugary-looking ‘sugar leaves’ growing between the calyces of a foxtailing plant. They look like the plant has second thoughts of reverting back to veg. In short, foxtailing weed is something you can’t miss.

sugar leaves on foxtailing buds

‘Sugar leaves’ on foxtailing buds have a strange shape and color. © Growdiaries © Treighfunky

What Causes Foxtailing Buds?

There are two main foxtailing causes — the plant’s genetic makeup and its specific reaction to environmental conditions. We’d say these two are closely related, and we’ll shortly explain why.

Let’s start with the second one. Why does foxtailing happen if nothing in its genes makes it particularly prone to this issue? Most marijuana growers agree that what causes foxtailing in weed is usually heat stress. Frankly, we couldn’t find any research linking bud foxtailing to heat stress in cannabis, but the issue was studied in other species.

There is the example of heads of cabbage not forming in the tropics. Tropical heat turns a cabbage plant into a tall stick with every leaf on it growing separately. At least, that’s what they told us in school. The same thing happens when people try to grow temperate-zone pines in the tropics. Individual shoots may each become several feet long without any side branching.

In cannabis, this reaction to heat may be a defense mechanism. In the tropics, heat goes hand in hand with high humidity which may spoil the buds if they are too solid. That’s why Sativa buds are generally airier than Indica buds. And foxtailing is one way to achieve that. This would explain why tropical Sativas have more predisposition toward foxtailing.

Is Foxtailing on Weed Bad?

The answer depends on genetics. If your strain of weed has genes that tell it to foxtail, you may not like the looks of the buds, but they may turn out to be outstanding in every other respect. The potency, the character of the high, as well as the aroma and the flavor may be like nothing you’ve ever experienced.

In this case, foxtailing isn’t good or bad per se. It’s just the strain’s feature, and you’ll have to accept it. Or choose another strain for the next time and move on.

The Dr Grinspoon strain is a perfect example of genetic foxtailing

The Dr Grinspoon strain is a perfect example of genetic foxtailing. © Growdiaries © DreamCatcher

But if foxtailing is not genetic, treat it as a sign of trouble and adjust your environment accordingly. People often wonder: “Does foxtailing affect potency?” Foxtailing itself doesn’t, but its UNDERLYING cause—be it heat stress or light stress—certainly does. Excessive heat also leads to the evaporation of terpenes, making your buds less aromatic and flavorful. And yields may also suffer.

So, while foxtailing weed isn’t bad, it’s also not the best bud you can hope to grow. It’s blander, less potent, to say nothing of its reduced bag appeal.

How to Fix Foxtailing Buds?

More often than not, the cause of foxtailing on buds indoors is the wrong distance of lights from the plants. You can tell that this is the case if all of the fox tailing is on the tops closest to the light. So, to stop foxtailing, simply raise the light.

Devil Cream Auto foxtailing in week 9 from seed

Devil Cream Auto foxtailing in a bad way in week 9 from seed. © Growdiaries © scotch_egg

For traditional HPS bulbs, try the back-of-your-hand test. Place your hand under the lights on the level of plant tops, palm down. If you feel a burning sensation on the back of your hand, the light is too close. It means that the buds receive too much heat radiation, and this indeed may be the reason why they foxtail.

LED lights can cause foxtailing on weed, too, but testing the distance with the back of your hand may not work. However, most LED lights worth using in a cannabis garden come with instructions. Follow them and watch how your plants react. If the distance is too short or the light operates at full power, you will see symptoms of light stress and heat stress. If the light is too far off or dimmed too much, you may see an unusual amount of stretch. Try to find the ‘Goldilocks zone’ and stay within it.

The Importance of Ventilation

Sometimes, heat radiating from the light affects not just the top buds but causes the temperature to increase throughout the tent. It happens a lot in summer, especially during a heatwave. In this case, you may see the foxtailing affect not only the tops but the middle and lower bud sites, too. A good extractor fan may help the matter, but using an oscillating fan is also important. By constantly moving the air inside the grow space, it will make sure there are no heat pockets.

stacked calyxes on the Auto Kaya 47 bud

For this Auto Kaya 47, the temperature was quite low in flower. So, the foxtailing is probably genetic. © Growdiaries © Marquise_ao_Sul

How to Stop Foxtailing Outdoors

A heatwave can wreak havoc on your outdoor garden, too. In a greenhouse, you can also use fans to lower the temps inside it, but outside, the only way you can help your weed plants deal with the heat is to shade them from the sun during the hottest hours.

If you live in the desert, your best option might be to plant your garden in a spot where trees or structures shade it from the afternoon sun. Or you may span the semi-transparent shade cloth over your plants.

Related Post: Outdoor Marijuana Temperature Range

READ NOW

Can Foxtailing be Reversed?

If you have caught foxtailing early on in flower, odds are that you can still get normal-looking buds at harvest. The plant simply has enough weeks of flowering to grow a bunch of normal flower clusters on top of those that were initially foxtailing.

But if the problem persists till late in flower, and buds keep foxtailing near harvest, there’s nothing you can do to change their looks for the better. So be proactive and don’t postpone resolving the issue till the end of flower.

When to Harvest Foxtailing Buds?

In contrast to normal flowers, foxtailing buds have this unfortunate feature: they take forever to mature. You just see more and more calyces forming, with more and more white pistils on them. And when you watch the trichomes on this new growth, they are clear, meaning not ready for harvest. This is another reason to not let your buds foxtail.

Zkittlez Auto foxtailing before the harvest

It may not look it, but this foxtailing bud has actually been 8 weeks in flower. © Growdiaries © Treighfunky

Other than that, the general rule applies. Harvest foxtailing buds when the majority of the trichomes or all of them are milky and some are starting to turn amber. And if you don’t have a magnifying glass to inspect the trichs, wait at least until all of the pistils (female hairs) wither and turn brown. In either case, the constant emergence of fresh growth on your foxtailing buds will try your patience.

The Good, the Bad, and the Ugly

The bottom line is that fox tailing weed can be a good thing if it’s a genetic feature of some exotic tropical Sativa. But it’s bad if the foxtailing is due to stress.

Stress can do so much more damage to your cannabis than simply spoiling the appearance of your buds. It can negatively affect yields, flowering time, potency, smell, and taste. So, if you see any sign of stress—whether the foxtailing or anything else—act quickly and try to create for your weed the optimal conditions it deserves.


The Best Cannabis Srore

Price: from $5

Pack: from 1 seed

Shipping worldwide

Price: from $15

Pack: from 1 seed

Fast ship US only - 1 day

Price: from $80

Pack: from 5 seeds

Shipping US only

Price: from $50

Pack: from 5 seeds

Shipping worldwide


Autoflower Clones: Don’t Try to Find Them for Sale. Here’s Why

Cloning cannabis is a very convenient way of plant propagation. And buying clones, where it’s legal, is probably the easiest way to start a grow. The other thing that makes the life of an amateur grower so much easier is using autoflowering genetics. You put two and two together, you want autoflower clones. But does anyone sell them?

While autoflowers CAN be cloned, what you can’t do is keep them from flowering. Autoflower clones may begin to flower even before they have rooted. And, once in flower, you can’t revert them back to veg. As a result, autoflowering clones will stay small and yield very little.

autoflowering clones: a very small autoflower in a pot right before harvest and a dry resinous bud held between fingers
This is what your harvest will look like if you grow your weed from autoflowering clones. © GrowDiaries

So your best bet is to grow autos from seeds. Luckily there are enough online vendors that will deliver them right to your door. Click this link if you want a reliable seed shop that has shipped close to a million orders to practically all the countries in the world, including the U.S. and the UK.

Why Buying Autoflower Clones is Virtually Impossible

The reason is that you want two mutually exclusive things from these autoflowering cuttings:

  • you want them to flower automatically,
  • you DON’T want them to flower automatically, at least not till they’re big enough for your needs.

Autoflowers are a special kind of cannabis. The presence of Ruderalis genes in their DNA makes them ignore the light cycle. It doesn’t matter if you’ve planted them in spring or summer or fall. They simply don’t care for how long the days or the nights are.

a small flowering weed plant in a plastic pot and its trimmed buds on the scales
Another example of a small autoflower with very little yield. © GrowDiaries

And indoors, they don’t care for the light schedule. Whether 12/12 or 18/6 or even 24/0 or anything in between, it doesn’t change their timeline. They come up out of the soil, have short but vigorous veg, and then enter the flowering stage which doesn’t last very long either.

And when you take cuttings and root them as autoflower clones, the transition to flowering doesn’t slow down. Well, maybe for a couple of days compared to the main plant. So your autoflowering clone will be nothing but a rather small branch with a handful of flowers on it. It will never have a chance to develop into a large multi-branch bush.

Compare this with the results of a most unremarkable, run-of-the-mill Gorilla Glue Autoflower grow. You simply don’t want to purchase clones if you can buy seeds like these.

Cloning Early Versions and Fast Versions

When browsing seed shops, you may come across varieties that have ‘fast version’ or ‘early version’ added to their names. These strains are photoperiod-dependent, but they have enough autoflowering genes in them to start and finish flowering (outdoors) a couple of weeks earlier than normal photoperiod strains. A very handy feature for climates with short summers. You CAN clone these genetics and keep them in veg indefinitely. We’d say offering fast/early version clones for sale would make sense.

Taking Autoflowering Cuttings from Superautos

Superautos isn’t an official term or anything. These plants are supposed to be normal autoflowers, but, for some reason, they don’t start to flower automatically. When dealing with a superauto, the grower may need to change the light schedule to 16/8, 14/6, or even 12/12 before the plant transitions to the flowering stage. You can clone such genetics, too.

Well, that wraps it up. Stop looking for autoflowering clones. Nobody sells them. Or if they do, they shouldn’t. Autoflowers are a kind of genetics that are only grown from seeds, not clones.

All images in this post were taken from GrowDiaries, the world’s largest weed-growing community.


Can Autoflowering Plants be Cloned? Is It Worth It?

Cloning feminized seeds is a quite simple procedure, and many growers know how to do it. But what about autoflowers? Can autoflowering plants be cloned?

Technically, autoflowers can be cloned. You just choose a side branch that is long enough to take as a cutting and then root it. But the clone will start flowering soon after, so you can’t make it big and productive. And you can’t turn it into a mother plant.

Related Post  Autoflower Clones: Don’t Try to Find Them for Sale. Here’s Why

All this makes cloning an autoflower rather impractical. Why take a cutting if you can get better results just leaving the branch on the plant? Well, if you have extra room and some small containers to spare, you can try cloning an autoflowering plant in the following two scenarios:

  1. Your autoflower is too bushy, and you have to prune some of the branches. You can just throw them away, or you can root and grow them next to the main plant.
  2. You have accidentally topped an autoflower while training it. It will certainly put a dent in your final yield, but, if you make the cutting root and flower, you may redeem a few grams.

Can Autoflowering Plants be Cloned? This Grow Says They Can

A grower from the Growdiaries community who calls himself StickyFingah420 kindly shared his experience of cloning an autoflower. He resorted to this technique because he had accidentally broken a branch on his FatsBuds Zkittlez Auto.

In his case, the result was spectacular. But most probably, his overall yield would be better if not for this accident. Just check out this Gorilla Glue Autoflower grow journal to see how modern autoflowering genetics perform if nothing goes wrong.

So, the grower fimmed his Zkittlez Autoflower in week 3 from seed. This resulted in 8 potential side shoots from the main stem. The accident happened in week 5 from seed as the grower put too much strain on one of the branches in the second pair and it snapped. So instead of 8 potential side shoots, only seven remained on the main stalk.

zkittlez auto fimmed in week 3
zkittlez auto growing 6-8 side branches in week 4
Can Autoflowering Plants be Cloned: The site of the accidental topping in week 5
zrittlez auto getting dense and bushy in week 7
zkittlez auto pre- and post-harvest

Fimming in the third week. 4 side shoots are there, another 4 have yet to develop.

The 4th week. 6 bigger branches and 2 mangled and tiny (in the center).

Week 5. Out of three shoots (left, central, and right) at the 2nd node, the right one broke off.

Week 7. A lot of secondary branches and a very dense canopy.

Zkittlez Auto in week 11 and after the wet trim. (Click here to buy these seeds.)

next arrow
previous arrow

Swipe to see all images in the gallery. © Growdiaries

The plant recovered from the stress, grew many more side shoots, got dense and fat, and produced 42.7 g (1.51 oz) of dry bud. Now let’s look at how the cutting was doing.

The Cutting

The grower put the cutting into a yogurt cup filled with soil. He cut the fan leaves in half to reduce their evaporation area. Zkittlez Auto seems to have very strong genetics because not every strain would root in soil.

Can Autoflowering Plants be Cloned: Zkittlez Auto clone in week 6, rooted and repotted
can autoflowering plants be cloned: zkittlez auto clone starts filling out in week 8
Can autoflowering plants be cloned: Zkittlez Auto clone at harvest in week 11

Week 6. The clone rooted and transplanted into a bigger pot.

Week 8. The buds are starting to form.

Week 11. The Zkittlez Auto clone at harvest. (Click here to buy these seeds.)

next arrow
previous arrow

Swipe to see all images in the gallery. © Growdiaries

When it became evident that the clone was alive, it was transplanted into a 2.5-3-liter plastic pot and kept in the same grow tent as the main plant. It was in the pre-flower mode soon after re-potting and then began to flower and finished just a few days later than the main plant.

The grower didn’t say what the yield was, but you can guess it by just looking at those fat and seemingly dense flowers. The broken branch certainly didn’t go to waste.

To Recap

This is for those of you who like to scroll down to the end of the post to see the bottom line.

Can autoflowering plants be cloned? Yes, they can. Just don’t do it on purpose. Because it won’t increase the yield. And there’s no way you can keep the autoflower genetics you liked by taking a clone and making it into a mother plant. Autoflowers simply don’t work that way. You’ll need feminized seeds for this.


Micro Grow Yield in a 1’x1’ (30×30 cm) Growbox

Not every weed grower can afford a full-fledged indoor grow-op. And not all of us need XXL yields. Sometimes, our best or only option is a micro grow. The question is how much such a micro grow can yield.

Based on our analysis, the average micro grow yield in a 1’x1’ (30 cm x 30 cm) space is 28.5 grams (1.01 ounces). The median micro grow yield is 25.5 g (0.9 oz). To come to these figures, we have reviewed several grow cycles performed in one and the same Ambient Q30 growbox.

We took all the data and pictures from Grow Diaries, the world’s largest online community of marijuana growers.

Micro Grow Yield Examples

As you can see from the table below, micro grow yield figures are all over the place. Some of the harvests are just puny, but a few grows show very respectable results. It’s these successful grows that we are going to describe in some detail so that you can maybe replicate them.

Strain Light Weeks Yield
Tutankhamon
Pyramid Seeds
75W LED
Unknown Brand
16
8 in flower
60 g
2.12 oz
Super Skunk Automatic
Sensi Seeds
75W LED
Invisible Sun
14
9 in flower
54.8 g
1.93 oz
Northern Lights
Expert Seeds
100W LED
Unknown Brand
17
8 in flower
35 g
1.23 oz
Zkittlez Auto
FastBuds
100W LED
FSGTEK
10
6 in flower
34 g
1.2 oz
Critical + 2.0 Auto
Dinafem Seeds
100W LED
Unknown Brand
10
6 in flower
17 g*
0.6 oz

* estimated dry yield (wet weight divided by 5)
** combined yield of two plants grown in the same run

Tutankhamon Grow Journal: Yield – 60 g (2.12 oz)

A grower with the nickname mr4ton chose to grow a photoperiod Tutankhamon in a micro setup. It took him 16 weeks from seed to harvest, but the yield was spectacular.

tutankhamon micro grow yield and other specs
tutankhamon micro grow: drip system and the seedling in week 1
tutankhamon micro grow: topping and pruning in week 3
tutankhamon micro grow: week 5 defoliation
tutankhamon micro grow: week 7 LST and defoliation
tutankhamon micro grow: week 8 mainlining
tutankhamon micro grow: week 10 flowering is underway
tutankhamon micro grow: week 13 almost ready for harvest

A homemade drip system. The seedling is 1 week old.

Topping and pruning in week 3.

Week 5. The grower prunes everything but some foliage on top.

Week 7. LST and defoliation.

Week 8. Another heavy pruning and defoliation.

Week 10. Flowering is underway.

Week 13. Harvest is near.

next arrow
previous arrow

Swipe to see all images in the gallery.

Carefully Planned Fertigation and Heavy Training

The grower used a 4.5-liter (1.19-gallon) pot which he filled with Ugro Rhizo peat/coco medium mixed with perlite. He gave his plant 60W in veg and 75W in flower on average. The dimmer on his LED light allowed him to ramp it up to 100W, but it was too much and leaf tips would start to burn. 70-75W would be just right.

The light schedule was 18/6 in veg, but in weeks 6 through 7, the guy began to gradually shorten the day: 18/6 -> 16/8 -> 14/10 -> 12/12.

For watering, he installed a homemade drip system and turned it on every morning for 15 minutes or until he saw some runoff.

For feeding, he used General Hydroponics nutrients: 3-in-1 Flora Series and some other supplements like BioRoot and Diamond Nectar. Sometimes, he also foliar-fed his bonsai plant with BioProtect. And during the flowering stage, he would use G.H. Bloom instead of Diamond Nectar.

The TDS readings were never very high: up to 600 ppm in veg and no more than 750 in flower. In the last couple of weeks of the life cycle, the grower decreased this number down to 400 ppm (when he was giving his micro bush GHE Ripen as her last dose of PK), and flushed the medium with tap water in the last 2 days before the chop.

Throughout the grow, the guy performed a lot of canopy management. It was a form of mainlining but done without any plan or schedule. He started with topping in week 3 and then was pruning and defoliating and topping all the way through week 6. In the end, he would have 7 colas with very fat flowers on top but with everything removed down below.

Super Skunk Automatic Grow Journal: Yield – 54.8 g (1.93 oz)

Autoflowering genetics are probably more suitable for micro grows than photoperiod ones, and this grow cycle by NanoGrow seems to be proof of that. This micro grow yield was almost as impressive as the previous one, but it took 2 weeks less to achieve this result.

super skunk automatic micro grow yield and other specs
super skunk automatic micro grow: ambient q30 tent and 1-week-old seedling
super skunk automatic micro grow: LST performed on a 2-week-old weed seedling
super skunk automatic micro grow: A 4-week-old weed plant
super skunk automatic micro grow: leaf tucking in week 5
super skunk automatic micro grow: lst and start of flowering in week 7
super skunk automatic micro grow: flowering underway in week 9
super skunk automatic micro grow: hermies in week 10
super skunk automatic micro grow: stem rot treated with H2O2 and candle wax in week 11
super skunk automatic micro grow: main cola cut in week 12
super skunk automatic micro grow: mature colas and trichomes in week 13

The Ambient Q30 tent and a 1-week-old seedling.

Week 2. The seedling tied down with a garden wire.

Week 4. The plant stays nice and compact without much training.

Week 5. Leaf tucking.

Week 7. LST and the start of flowering.

Week 9. Flowering is underway.

Week 10. A few hermies (male flowers) detected.

Week 11. Stem rot treated with H2O2 and candle wax.

Week 12. Main cola cut prematurely because of stem rot.

Week 13. Mature colas and a macro shot of trichomes.

next arrow
previous arrow

Swipe to see all images in the gallery.

The Only Issue Was High Humidity

The grower used a 1-gallon (3.8-liter) smart pot which he filled with an 80/20 coco/perlite mix. He also added some hydroton on top and in the drainage saucer under the pot to slow down evaporation.

He had to add a dehumidifier bag in week 6 and was glad to see the RH getting lower (40%) in week 10, just as the buds began to really swell up. Unfortunately, humidity started to creep up soon, and he discovered a spot of stem rot. The treatment with H2O2 and candle wax didn’t help. He had to cut off one side branch in week 11 and then the main cola in week 12.

Related Post  Autoflower Temp and Humidity: With Real-Life Examples

The grower was also combating high humidity with defoliation. He didn’t like removing more leaves than absolutely necessary. So he started with tucking them, but in week 9, had to defoliate those that were overlapping. The only other form of training was LST, and it was enough to give the canopy a perfectly flat shape.

He was watering the medium with 400 ml every other day, then (in week 5) switched to daily watering with 200 ml to reduce runoff. However, eventually (starting from week 6), the plant got thirsty and began to drink 450-600 ml a day without much runoff.

The staple of her diet was Bio Nova Coco Forte A & B which she received from week 1. And in flower, she additionally got P 20 (20% phosphorus) starting from week 6 and K 20 (17% potassium) starting from week 9. In the final 14th week, she was flushed with pH’d water.

Beyond high humidity and related problems, the only issue was a few male flowers discovered in week 10.

Northern Lights Grow Journal: Yield – 35 g (1.23 oz)

With the Northern Lights genetics, a grower calling himself YungSmoke was aiming at the ounce-per-square-foot target. And he made his micro grow yield even more.

northern lights micro grow yield and other specs
northern lights micro grow: a weed plant in a small plastic plant and the same plant in a small grow tent, weeks 4 and 5
northern lights micro grow: a cannabis plant in a 1x1 grow tent in weeks 6 and 7
northern lights micro grow: the top of a marijuana plant with the first pistils
northern lights micro grow: a small indoor weed plant in early flower
northern lights micro grow: a cannabis plant growing in a small tent with multiple fat colas
northern lights micro grow: automatic watering system for one small indoor plant
northern lights micro grow: a small indoor marijuana plant with multiple colas ready for harvest

Weeks 4 and 5. Started outdoors and moved inside.

Weeks 6 and 7. LST to keep the canopy flat.

Week 10. The first week of 12/12, and the first pistils are coming out.

Weeks 12 (left) and 13 (right).

Week 14. Flowers are stacking up.

Automatic watering system.

Week 16. Buds are fattening up, and leaves are fading.

next arrow
previous arrow

Swipe to see all images in the gallery.

Great Genetics Made This Run Trouble-Free

This grow started outdoors, and in week 4 the plant was rather lanky and had long internodes. (Low outdoor temperatures often have this effect.) The little plant was transferred indoors in week 5 and began to receive training right away. The goal was to keep the canopy flat and all the colas at the same distance from the light (a 100W LED). Besides LST, the gardener performed only very light defoliation, plucking some old leaves in the bottom part. Otherwise, he preferred the leaves to senesce and fall off on their own.

After long spring days outdoors, the light schedule in the tent was 22/2 for the whole of the vegetative phase, then, in week 9, the grower started to reduce light hours a couple of hours at a time. And starting from week 10, it was 12/12 till the end of the flowering stage which lasted 8 weeks.

Through most of the life cycle, the grower struggled with high temps, and the relative humidity was on a high side — around 50% during flowering. The gardener did not report any issues with mold or bud rot, but the heat resulted in some foxtailing closer to the harvest.

He used a very small (4-liter/1.06-gallon) plastic pot filled with soil with some coarse perlite mixed in and had to water every day. It was very inconvenient to do manually, so in flower, he installed an automatic drip system.

He started with no nutrients at all during the outdoor stage, then top-dressed the pot with some generic slow-release fertilizer. Finally, he started using the 3-part BioBizz nutrients: Bio-Grow from week 8, Bio-Bloom from week 9, and Top-Max from week 11. He dialed back Bio-Grow when the stretch slowed down in week 13 and then stopped altogether. And in the last week, he flushed the medium with tap water.

Zkittlez Auto Grow Journal: Yield – 34 g (1.2 oz)

The grower martiniii had to keep his Zkittlez Auto small for this micro grow, so he fimmed and then topped his autoflower and performed a lot of LST and defoliation. The guy was learning on the go, and there was some loss of bud due to mold, but overall the plant performed quite well.

zkittlez auto micro grow yield and other specs
zkittlez auto ambient q30 grow setup
a DIY 120 mm carbon filter
zkittlez auto fimmed and then topped in week 3 from seed
zkittlez auto begins to flower and stack up in weeks 5 and 6
Zkittlez Auto in midflower (week 7).
zkittlez auto micro grow: some serious flower power
auto zkittlez: from vibrant to almost dead in just seven days in week 10

The Ambient Q30 grow tent and the Zkittlez seedling in week 1.

A homemade carbon filter: the old and the updated versions.

Fimming, topping, and LST in week 3.

Zkittlez Auto begins to flower and stack up in weeks 5 and 6.

Zkittlez Auto in midflower (week 7).

Some serious flower power (week 9).

From vibrant to almost dead in just seven days (week 10).

next arrow
previous arrow

Swipe to see all images in the gallery.

A Lot of Equipment for Such a Small Grow

The grow began in the window, but in week 2, the Ambient Q30 tent was ready for use. The grower equipped it with a dimmable FSGTEK 100W LED quantum board and a 120 mm PC fan for ventilation (which he could ramp up or slow down to regulate the temperature and humidity).

He also fashioned a DIY carbon filter out of a 110-to-125 mm pipe reducer and a 35 mm layer of activated charcoal. Unfortunately, the PC fan did a poor job pushing the air through the filter. Probably because of too thick fabric.

So, the gardener had to rethink the design of his carbon scrubber. He used the casing of a PC fan and two dust filter meshes and filled the space between those with activated charcoal. This time it worked but was far from perfect. Sometimes, the humidity and temps got out of control, the filter needed to be removed, and this micro grow smelled up the whole room.

The guy planted the germinated seed in a 5.5-liter (1.45-gallon) fabric pot filled with an 85/15 soil/perlite mix. As a result, he had a 38 cm (15”) available distance from the pot to the light. A micro grow indeed.

He started with hand-watering the pot every 3-4 days, but in flower, he began to use an Arduino Uno automatic watering system. It would turn on a 5V DC pump every 12 hours when a sensor signaled that the soil was getting too dry.

Strong Genetics and Subpar Conditions

The grower had absolutely no idea what to expect from his setup. He used a smartphone app to measure the light intensity of his dimmable LED. And he probably didn’t dial it in perfectly because the plant was quite leggy from the start. He fimmed her in week 3 but didn’t like the result. So he soon removed the mangled leaves—making it a classical topping—and began to tie down the side branches.

The plant still had an open structure with long internodes and not too dense foliage, but luckily, she stopped stretching in the 2nd week of flowering, not quite touching the light.

She received BIOCANNA Bio Vega throughout the vegetative stage and 1 week into flowering and then Bio Flores from week 7. A very simple (and organic) grow.

It wasn’t so simple with the temperature and humidity control. It was constantly too hot, and the RH never dropped below 55%. In late flower, this led to mold, and the grower had to prematurely cut two fattest colas. Also, for reasons unknown, he let the plant dry out in the last week. These troubles probably affected the final yield very much.

Some Micro Grow Tips Gleaned From These Journals

Even a micro grow like this may require a carbon filter to get rid of the smell. And whether you make a DIY filter or buy a ready-made one, you’ll need an extractor fan that is able to push through enough air. And this means that even a micro grow can create some noise.

In most of the micro grows we’ve reviewed, the gardeners struggled with maintaining optimal temperature and humidity. This seems to be a drawback of a small grow space. One way to reduce humidity is to defoliate as it decreases the evaporation surface of the foliage. The other is to cover the medium with some sort of mulch. Two of the growers used humidity bags, but at least one of them reported no difference.

A micro grow means the use of a small container. That’s why coco coir seems to be a better alternative to soil. When growing in coco, you can water/feed your plants very often, so you don’t need a large pot and a lot of medium. In other words, coco enables you to achieve the same yield with a smaller root structure.

Naturally, the smaller the pot, the more frequently you need to water your plant. That’s why your best bet is to use some basic automatic drip system.

As you have seen, a micro grow yield can be quite high. (If you do everything right, of course.) It can produce enough bud for a casual smoker. But if you smoke more than a half-ounce (about 15 grams) per month, a micro grow probably isn’t for you. You’ll find it more convenient and rewarding to choose a bigger setup. Happy growing!


Gorilla Glue Autoflower Grow Journal: 13 Trouble-Free Weeks

Gorilla Glue Auto is an insanely popular genetics thanks to its extreme resin production and other unique features that we’ve covered in our Autoflower Gorilla Glue review. In this post, we’ll describe the process of growing this strain based on an actual Gorilla Glue Autoflower grow journal.

Johnny Blaze (GrandMaster, 5257 likes, 51 diaries)

“This plant was really easy to grow. I topped it by mistake and it came out a beast..buds are big and super sticky made 1,5 grams of finger hash..”

Gorilla Glue Auto was grown in coco, under a 270W LED, and the whole grow cycle took 13 weeks (8 weeks of flowering). The grower performed LST and very light defoliation, and he accidentally topped the main cola. Nevertheless, the plant yielded 76 g (2.68 oz) of resinous buds.

Gorilla Glue Auto (FastBuds)

This particular type of plant can be easily managed, growing to heights between 60-100cm (24-39″). The suggested cultivation methods include low-stress training (LST) and defoliation. For indoor cultivation, it is recommended to use an LED 300W or equivalent light during both the vegetation and flowering stages. Using this technique, indoor grows may produce more than 70g/plant.

Setup Highlights

This small grow space conveniently houses 3 large autoflowers. © Grow Diaries

JohnnyBlaze is a long-time member of the GrowDiaries community, but this particular Gorilla Glue Auto diary appears to be his first attempt ever. As a grow space, he used a small (about 3’x3’) corner nook in his attic bedroom and hung a 270W LED light there. The only other equipment was an oscillating fan used for air circulation. A very basic setup indeed.

Surface Area Light
8.6 ft2 (0.8 m2) 270W
No. of Plants Overall Yield
3 7.62 oz (216 g)
Yield per Plant Yield per Watt
2.54 oz (72 g) 0.8 g

How to Grow Gorilla Glue Autoflower in Veg

Let’s have a look at this plant’s day-by-day progress through the vegetative stage and maybe glean some useful tips from it.

Week 1: Germinated in Coco

At the end of week 1, the Gorilla Glue seedling is quite big but not stretchy. © Grow Diaries

At the end of week 1, the Gorilla Glue seedling is quite big but not stretchy. © Grow Diaries

As a medium, the grower used a classic 70/30 coco/perlite mix. He decided to put the seeds straight into the medium, without pre-soaking or germinating them. All three, including one FastBuds Gorilla Glue Auto, emerged after 4 days.

Since this Gorilla Glue Auto grow was started in the middle of January, this was convenient in terms of temperature. In summer, an attic grow room would probably be too hot. As it was, the day/night temps were almost perfect:

Gorilla Glue Autoflowering grow journal, temp chart

Gorilla Glue Autoflower grow journal. Day and night temp for weeks 1-13.

Week 2: Good Progress so Far

By week 2, the Gorilla Glue Auto grow was thriving, with the seedling appearing appropriately sized for its age. Planted in an 18-liter smart pot, the grower faced a challenge in watering the young plant. As shown in the photo, the grower watered only a small area around the seedling.

Since most coco mediums don’t come pre-amended with nutrients, he had to add some from week 1. He chose the products by Advanced Nutrients which are kind of pricey but very popular among cannabis gardeners. Most probably, for a reason.


The second pair of true leaves spans wider than the first one, and the 3d one is developing. © Grow Diaries.

For the first two weeks, it was only the 3-part pH Perfect combo — Grow, Bloom, and Micro. These products contain all essential macro- and micronutrients. Later, the plants would get a calcium/magnesium formula—an absolute must in coco—and then a whole line of other supplements.

Gorilla Glue Autoflower journal, nutrient schedule

The nutrient schedule for the whole of Gorilla Glue Autoflower grow.

Week 3: The Start of LST

Low-stress training led to an immediate increase in branching. © Grow Diaries

Low-stress training led to an immediate increase in branching. © Grow Diaries

Toward the end of week 3, the plant was big enough for the low-stress training. The guy had never done LST before, and he was nervous. As we shall see soon, he was nervous for a reason.

This Gorilla Glue had never been a stretchy and lanky plant, but now, with LST, she was shaping up to be a very squat, dense, and bushy plant. We’d say that the guy also managed to find the perfect (or almost perfect) distance from the light, and this helped keep Gorilla Glue and two other autoflowers nice and compact:

Gorilla Glue Auto diary, light distance chart

The light distance chart for the whole Gorilla Glue Auto grow journal.

Week 4: Defoliation and Cal-Mag Sprays

Auto Gorilla Glue, 27 days, 10 inches

The plant looks extremely dense and stocky even after a bit of defoliating and pruning. © Grow Diaries

Week 4 was the last week of the vegetative phase in this Gorilla Glue Autoflower journal because, by the end of this week, the first pistils began to come out.

The flowering stretch was yet to begin, and the plant was so dense, the gardener found it difficult to train her. He decided to raise the light 4 inches (see the chart above) to make her expand a bit. He also performed light defoliation and pruned a couple of shoots that were completely shaded.

USE PROMOCODE GET 5% - WEEDKB5

GET 5%

Although none of the girls showed any signs of a deficiency, the gardener thought they would benefit from cal-mag showers. That’s why he was foliar-feeding them with a 6.2 pH solution of Advanced Nutrients Sensi Cal-Mag Extra. By the way, this formula contains not only calcium and magnesium but also iron.

Week 5: A Spurt in Growth

Autoflowering Gorilla Glue, 29, 35 days, 12 inches

One week’s progress of this Gorilla autoflower is remarkable. © Grow Diaries

With the first hairs having appeared in the previous week, this autoflowering Gorilla Glue was clearly in the pre-flowering stage by now. And she really exploded, gaining not so much in height but in girth. She was the second biggest lady in this grow cycle — right after a Blackberry (which would come out a very good producer).

Related Post: XXL Autoflower Strains 2023

READ HOW

Gorilla Glue Auto Flowering Stages

The next and final stage of this Gorilla Glue Autoflower indoor grow wasn’t especially short but quite trouble-free. Well, apart from the accidental topping in the very first week of flowering.

Week 6: The Main Top Gone for Good

Gorilla Glue Autoflowering, 38 days, 22 inches, accidental topping

The main cola snapped and bandaged but eventually removed. Gorilla Glue Auto quickly recovered after the accident. © Grow Diaries

Week 6 was the low point in this Gorilla Glue Autoflower grow journal because the main stem snapped during LST. The grower tried to salvage it with a splint and a piece of tape, but the damage was too great. The loss of the main flowering top stunted the plant, but this was strong genetics, and she quickly recovered. However, this accidental topping would negatively affect the outcome.

Topping an autoflower is a controversial subject. Follow the link if you want to learn more and see examples of successes as well as failures. But the gist of it is that modern autoflowers can be topped if they are healthy, vigorous, and haven’t begun to flower yet.

Now, that the flowering was already underway, the grower upped the doses of the staple nutrients and added two more Advanced Nutrients products:

  • Nirvana, 0.85% potassium (K); recommended for use starting from week 7 and till the final flush; stimulates bud formation by helping the plant with the accelerated turnover of carbohydrates during the bloom phase,
  • Big Bud Coco, 1.74% phosphorus (P) and 3.4% potassium (K) plus Ca, Mg, S, and iron (Fe) chelates; use it from the 2nd week of flowering and stop 3 weeks before harvest; makes the buds bigger and more potent.

Week 7: Practically on Cruise Control

Gorilla Glue Autoflower, 48 days, 25.6 inches

Auto Gorilla Glue is front right. She’s still the 2nd biggest lady in the garden despite an accidental topping earlier. © Grow Diaries

In the 7th week from seed, Gorilla Glue Auto was already 2 weeks into flowering and forming a lot of bud sites. She was still receiving the same diet as in the previous week — a rather rich cocktail of nutrients with TDS readings at around 1000 ppm. She didn’t show any issues, and the grower would raise the level to 1200 ppm for the last 4 weeks of the flowering stage. Again, with no nute burn, lockouts, or deficiencies.

Autoflower Gorilla Glue grow journal, weekly TDS readings

Gorilla Glue Auto: Week-by-week TDS values.

Week 8: Stretching Yet Some More

Auto Gorilla Glue, 53, 56 days, 31.5 inches

Gorilla Glue Auto has yet to finish her flowering stretch, but she has already started to stack up. © Grow Diaries

At this point in Gorilla Glue Autoflower grow journal, the grower noted how fast the girl had recovered from the snapping of the main cola earlier. Things like that are very traumatic, and it’s not every autoflower that can get better after them.

The flowering stretch was still very fast but almost over, and the plant would grow for only another week and reach her final height of 90 cm (35+ inches).

Gorilla Glue Auto grow journal, plant height chart

This chart shows the plant height throughout Gorilla Glue Auto grow.

Week 9: A Healthy Girl with a Good Appetite

Gorilla Glue Auto, 63 days, 35.4 inches

Swelling out, frosting up, and starting to smell strong. © Grow Diaries

In week 10, there were some troubles in the garden, but none with GG. She displayed no deficiencies (like Blackberry did) and looked much bigger and healthier than Cream Cookies. Her diet was still the same, and she seemed to like it.

Related Post: Where to buy the best Gorilla Glue

READ HOW

The grower definitely helped the matter with maintaining a very good pH. He probably kept it too high in the first 3 weeks but then decreased it to 5.6. This is within the acceptable 5.5–6.0 range for coco.

Autoflowering Gorilla Glue diary, pH levels for weeks 1-13

Gorilla Glue Auto pH levels for the entire grow cycle.

Week 10: Change of Diet to Fatten Things Up

Gorilla Glue Autoflowering, 68 days, 35.4 inches

The stretch is over, and the only thing that’s happening now is buds fattening up and getting frostier. © Grow Diaries

Week 10 saw a big change in diet because the grower had just received more nutrients by mail. He decided that his Gorilla Glue Autoflower grow would benefit from the following:

  • Overdrive, a PK formula to maintain the momentum of bud maturation (perfect timing for this one),
  • Rhino Skin, this source of silicon makes the branches more rigid and robust (for best results, start it from the first week of flowering),
  • Sensizym, this mix of enzymes helps break organics accumulated in the root zone (a questionable choice for this grow).

By this time, the Gorilla Glue started to smell really amazing and strong. Although there were two other plants in this indoor garden, the grower kept mentioning only the smell of GG.

Week 11: One More Nutrient Added to the Mix

Gorilla Glue Autoflowering, 76 days, 35.4 inches

This Gorilla Glue Autoflower had the chunkiest colas in the garden. And the frostiest. © Grow Diaries

In week 11, there was another change in the feeding regime. As the manufacturer recommends stopping Big Bud three weeks before the harvest, the grower replaced this supplement with Advanced Nutrients B-52 which contains kelp and seaweed extracts and can be used in two installments:

  1. in the first 2-4 weeks from seed,
  2. in mid- to late flower.

Now, all of the Gorilla Glue Auto nutrients amounted to 1200 ppm. The grower knew the harvest was approaching, and the buds looked fat, dense, and frosty. However, he didn’t have a magnifier to look at the state of trichomes. So, trying to decide when to harvest this sugary beauty was really a guessing game for him. He thought he’d give her another two weeks.

Week 12: In the Homestretch Now

Gorilla Glue Autoflower, 84 days, 35.4 inches

Autoflower Gorilla Glue is visibly approaching harvest time. © Grow Diaries

It seemed hardly possible the week before, but now the Gorilla became even more glittery with trichomes. The guy said he never saw so much resin on a plant in his life. And the buds kept filling out. Luckily, there were no issues with mold or bud rot although the grower failed to bring down humidity to the optimal level of 35-45% for the end of the flowering phase.

Autoflower Gorilla Glue grow journal, relative humidity chart

How to grow Gorilla Glue Autoflower: The relative humidity chart.

Week 13: A Five-Day Flush, Then Darkness Treatment

Auto Gorilla Glue, 92 days, 35.4 inches

The colas are deceptively white, but in fact, they are ready for harvest. © Grow Diaries

The grower finally purchased a loupe to inspect the trichs, and, since they were cloudy now, he started the flush with RO water pH’ed to 6.2. The buds kept swelling up even now, and after 5 days of flushing, Auto Gorilla Glue was put in darkness for 72 hours as a way to stress her into even more resin production.

The End Result

Gorilla Glue Auto, close-up of a dried bud

Just one of Gorilla Glue buds after drying and curing.

On day 95 from seed, this Gorilla Glue Auto grow journal was officially over. She yielded 330 g (11.64 oz) of wet-trimmed flowers and 1.5 grams of finger hash. The buds were hung to dry for 8 days — until the stems began to snap when trying to bend them. Then they went into glass jars for curing.

The 76 g (2.68 oz) of dry bud was a great outcome for a first-time autoflower grower, and the stuff was top-notch. It had an earthy smell with a pine background and sour and diesel notes. The effect was more on the body, with about a 40/60 sativa/indica ratio.

Related Post: The Best Cannabis Seeds

READ HOW

Main Takeaways from Gorilla Glue Autoflower Grow

The plant was easy to grow. In veg, she benefited from LST and became very bushy. She then stretched quite a bit at the beginning of flowering. We’d say not to top Gorilla Glue Auto (or any other autoflower) if you’re looking for yields. However, if you HAVE to top—for whatever reason—the plant will probably recover and still deliver a nice harvest.

Gorilla Glue Auto also loves high doses of nutrients and converts them into lots of oversized and frosty colas. With pH within the recommended range, there’ll be no issues with lockouts and deficiencies. At least, if you use Advanced Nutrients.

The resin production is WAY above average, and the smell is strong and extremely pleasant. Happy growing, everybody!

All images in this post were taken from GrowDiaries, the world’s largest weed growing community.

Autoflower Temp and Humidity: With Real-Life Examples

When you grow cannabis of any variety, either photoperiod or autoflower, temp and humidity are the number two and number three most important conditions. Number one is light, number four is CO2.

Autoflower temp and humidity requirements are practically the same as for cannabis plants in general. Autoflowers thrive with day temperatures around 23–28°C (73–82°F) and a drop of no more than 5–10 degrees at night. The humidity should be ideally between 40 and 60%. Ruderalis genes presumably make autoflowers more cold-resistant.

It’s important to keep temp and humidity in your autoflower garden within the acceptable range because otherwise plants slow down photosynthesis or stop it altogether. Cold stress or heat stress also shock weed and stunt its growth. So does very dry air, while the opposite—too much humidity—can cause issues with mold and bud rot.

Dealing with excess humidity is especially important during the flowering phase. When buds are getting fat and dense, mold and bud rot are very common problems. Novice growers don’t even imagine these problems exist—until they see their entire crop spoiled beyond salvation.

Mold (left) and bud rot (right) due to wrong humidity and temperature. © Growdiaries

Especially dangerous is the temperature drop when lights go off. The air quickly cools, can hold less vapor, and the excess vapor condenses as dew on every surface, including buds. Coupled with low temperatures, this creates a perfect environment for mold growth.

Btw, one way to fight mold is to defoliate your autoflower at certain moments and thus prevent stale air inside the canopy.

How to Control Temp and Humidity Indoors

Start with purchasing a thermometer and a hygrometer. Ideally with remote sensors so that you can place them inside the grow tent while keeping the monitor outside it. This will allow you to keep track of temperature and humidity without opening the tent. Both the thermometer and the hygrometer should be placed at canopy level.

Ventilation

Proper ventilation is the single most important thing that will take care of temperature and humidity, as well as a constant supply of CO2-rich fresh air. In most cases, an extractor fan alone is enough, especially if it has adjustable speeds. The more advanced extractor fans for grow rooms have temp and humidity sensors of their own. They can be programmed to keep environmental conditions at the desired level.

Air Conditioners and Heaters

Experienced growers may replace ventilation with air conditioning. In this case, a grow room needs to be hermetically sealed and requires a source of CO2, such as CO2 tanks. It’s doable but rather complicated for an amateur grow.

While too high temps are a constant worry for many growers—because grow lights generate a lot of heat—low temperatures are less frequent. Usually, this happens when people grow in a garage, attic, basement, and other such spaces.

It can get especially cold at ‘night’—when lights are off. However, with autoflowers, you don’t have to turn off lights at all. Most autoflowering strains can be raised from seed to harvest with a 24/0 light schedule. But if you feel like nighttime is necessary and are worried about a temperature drop, buy a thermostat-controlled electric heater.

Humidifiers and Dehumidifiers

If the air is too dry, you can use a hand mister to regularly spray some water on tent walls and other surfaces. Or even plants themselves although not during flowering, or else you’ll run the risk of mold.

You can use such a simple ‘device’ as a towel on a coat hanger with one end dipped in water. The towel will draw up water like a wick and then evaporate it. You can increase the rate of evaporation by making a fan blow on the towel.

However, a more serious approach would be buying an electric humidifier. It needn’t be very big. Even a bedside humidifier may be enough for a 3’x3’ grow tent.

If you have the opposite problem—the relative humidity in your grow room is too high—you can try and reduce evaporation by mulching or covering the surface of your pots. Also, make sure there are no open containers with water in the tent. However, the plants themselves create a lot of vapor in the process of transpiration, so you probably can’t do without an electric dehumidifier.

Related Post: Where to buy the best Gorilla Glue

READ NOW

Autoflower Temp and Humidity Changes from Seed to Harvest

We already mentioned the importance of decreasing humidity during the flowering stage. And also explained the reason. Now we can show more specifically how autoflower temp and humidity requirements change throughout a plant’s life cycle.

The table below shows just that, along with the issues you may have if your temp and humidity readings are way off the mark.

Germination Stage
Ideal Day Temp Ideal Humidity
22–25°C (71–77°F) 70–90%
Too Cold Poor germination rates
Stunted tap root
Fungi/Mold
Too Dry Seeds won’t germinate
Yellow/dry tap root
Seedling Stage
Ideal Day Temp Ideal Humidity
26–28°C (80–82°F) 60–70%
Too Cold Slow growth Too Damp Damping off
Too Hot Damping off (pythium)
Leaves taco-ing
Too Dry Slow growth
Vegetative Stage
Ideal Day Temp Ideal Humidity
22–26°C (71–80°F) 45–55%
Too Cold Slow growth Too Damp Slow growth
Too Hot Leaves taco-ing Too Dry Slow growth
Flowering Stage
Ideal Day Temp Ideal Humidity
20-25°C (68-77°F) 35–45%
Too Cold Mold/Bud rot Too Damp Mold/Bud rot
Powdery mildew
Too Hot Dry/brittle leaves
Lower Yields
Less potent buds
Terpene evaporation
Too Dry Slowed down bud growth
Drying & Curing
Ideal Temp Ideal Humidity
26-21°C (60-70°F) 55–65%
Too Cold & Damp Mold Too Hot & Dry Evaporation of terpenes
Smoke smells like hay

If you can’t keep your environmental values within the given ranges, don’t lose sleep over it. It’s not really an exact science. Just keep in mind two things:

  • Humidity should be higher at the start and gradually decrease by harvest time.
  • It should be warm throughout the life cycle but a bit cooler during flowering.

a weed seedling under a humidity dome for humidity control

Orange Sherbet Auto spending her first week under a humidity dome. © Growdiaries

Again, you may note that the flowering stage requires special attention in terms of autoflower temp and humidity. We already mentioned the risk of mold and bud rot due to low temperature and high humidity.

The other concern is the concentration of THC and terpenes (aromatic substances) in buds. Too high temps during flowering cause terpenes to evaporate, making your smoke bland and flavorless. And the same thing happens when you dry and cure your buds after harvest. As for THC, the heat either suppresses its production or ‘burns out’ what’s already there. In either case, buds grown in hot conditions tend to be less potent.

When Autoflower Temperature and Humidity Are Off: Examples

Monster Zkittlez affected by bud rot (botrytis) at week 11 and the temp and humidity chart for the flowering stage 
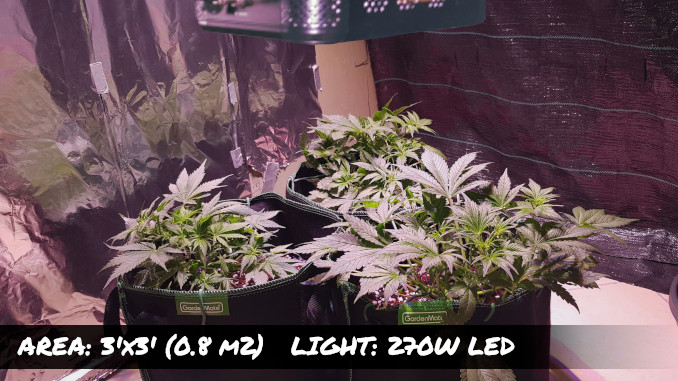
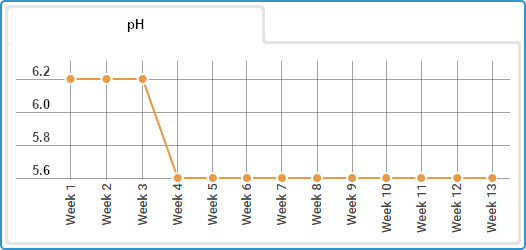
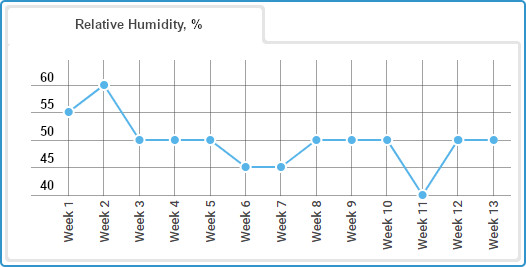
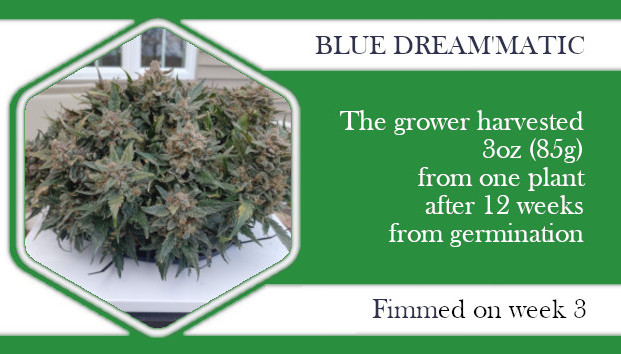
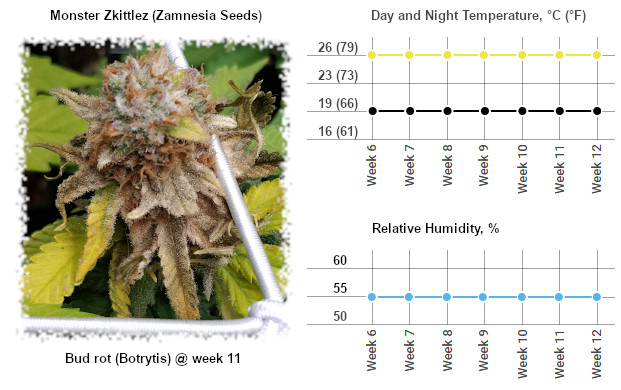
The grower kept the relative humidity too high (at 55%) in flower and discovered bud rot in week 11. Bud rot, or botrytis, is a kind of fungus that loves high humidity. As for temperature, botrytis thrives when it’s colder than normal or there is a sharp drop in temp between day and night. However, high temps coupled with high humidity may also cause bud rot.
mold in fat and solid autoflower bud 
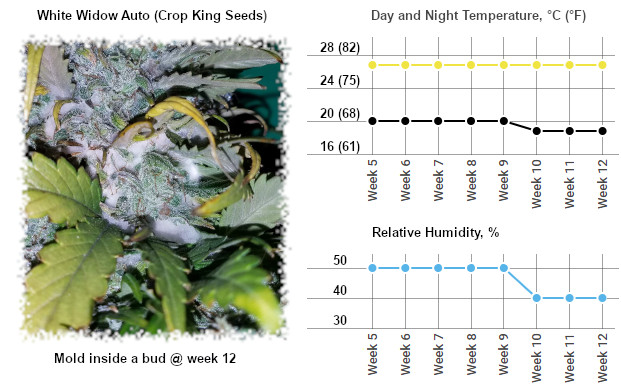
We can’t say that in this grow the temperatures and the humidity were really that wrong. The day temps might have been too high, and the difference between day and night too great. Also, the relative humidity could have been lower for the whole of the flowering stage, especially in the last couple of weeks. The mold probably appeared because the buds were so huge and dense, and the slightly wrong temp and humidity played their part, too.
leaf edges cupping like tacos because of hot summer temperature 
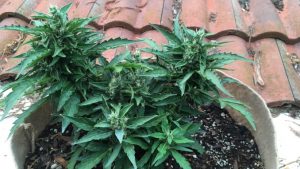
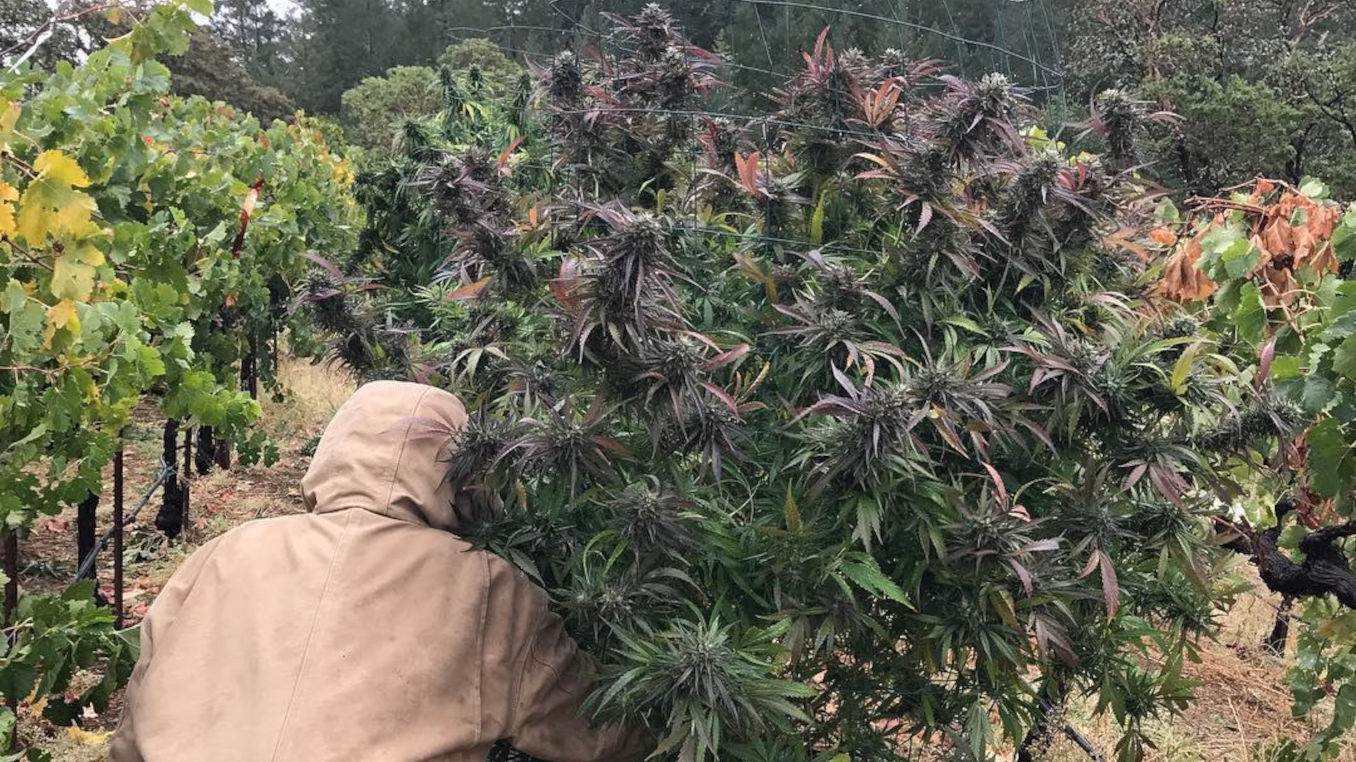
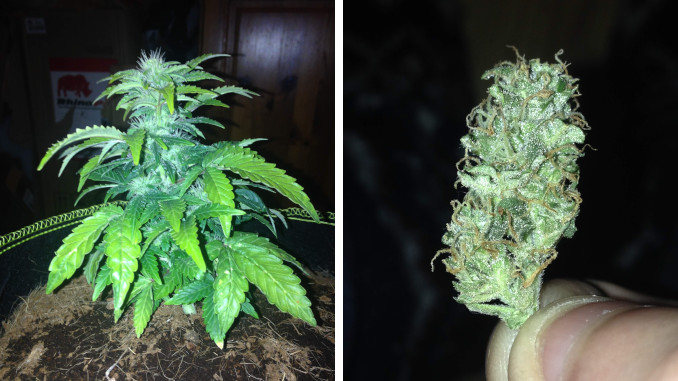
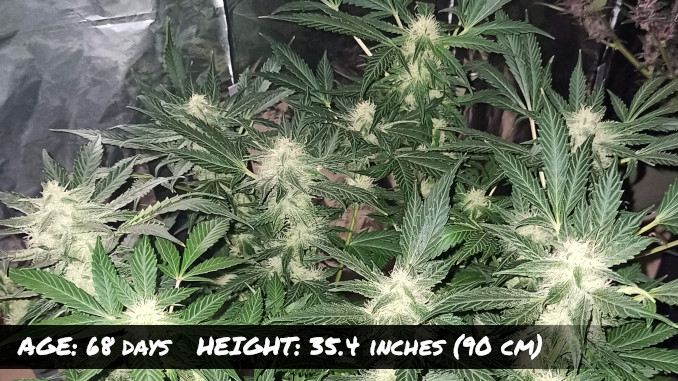
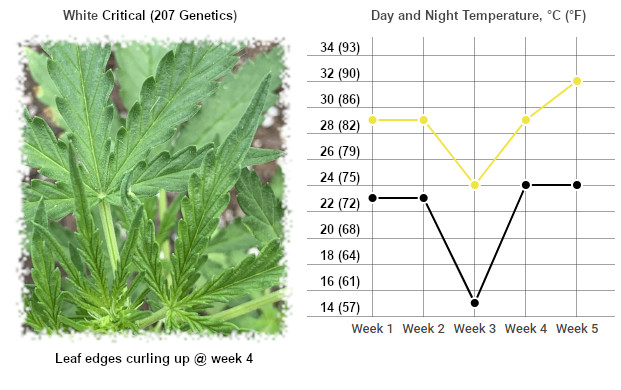
In this outdoor garden, there were several autoflowering and photoperiod strains, but only one plant reacted to summer heat with cupping leaves. This symptom is indeed very often the consequence of heat stress, but sometimes it is due to calcium deficiency. What is different about calcium deficiency is the presence of black spots on affected leaves.
Critical Purple Autoflower with foxtailing buds at week 12 and the day and night temperature chart for late flower 
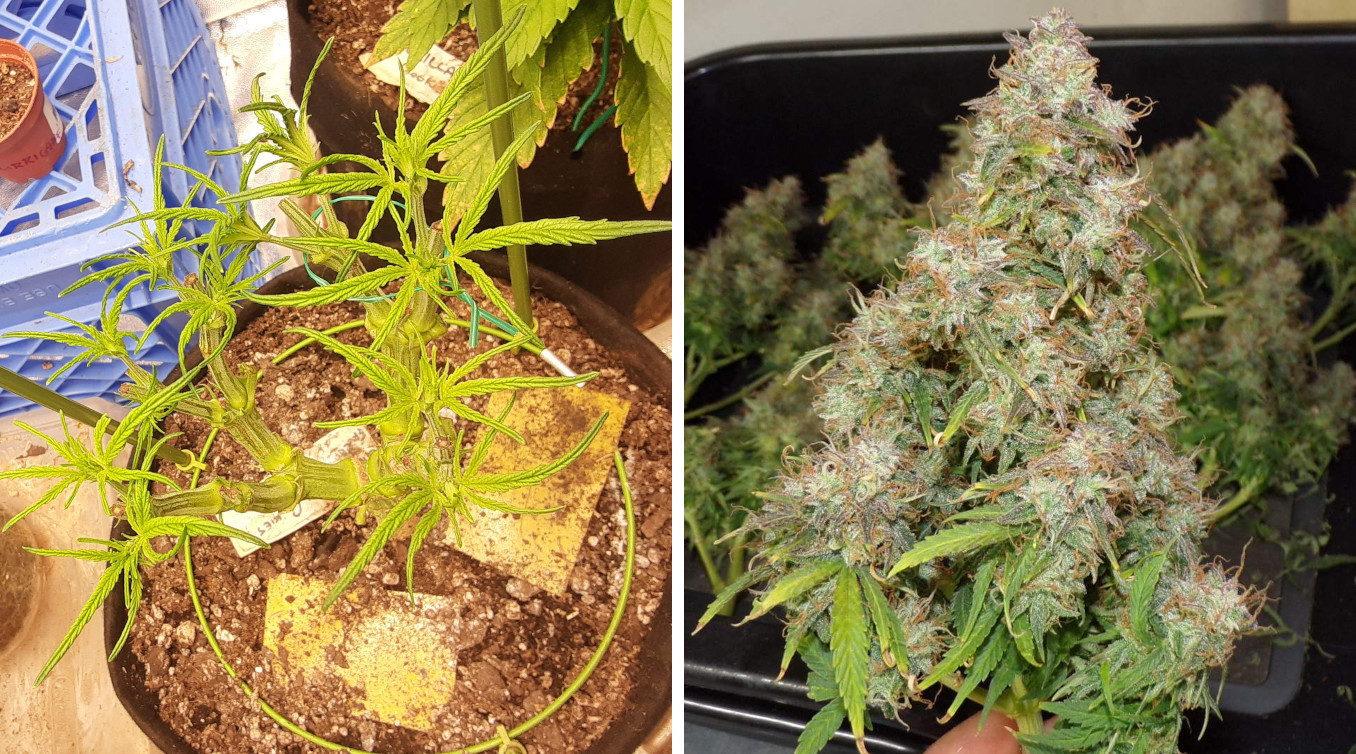
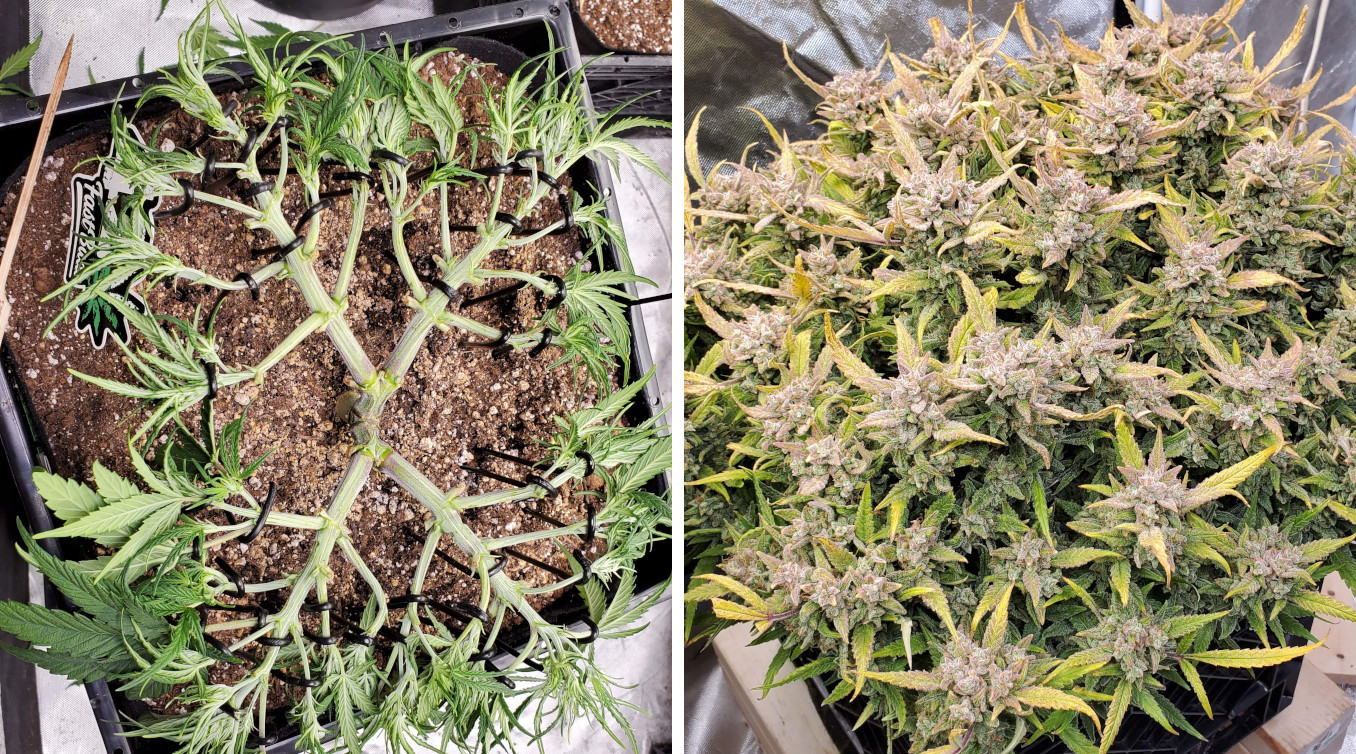
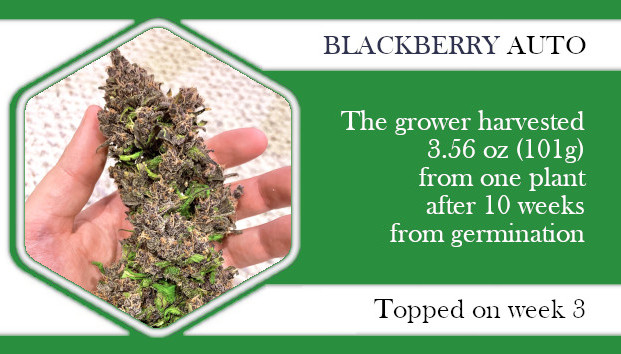
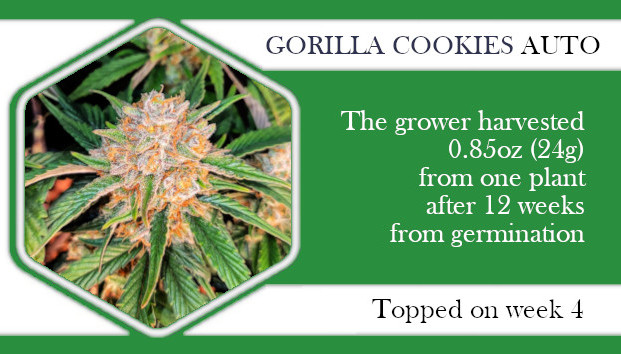
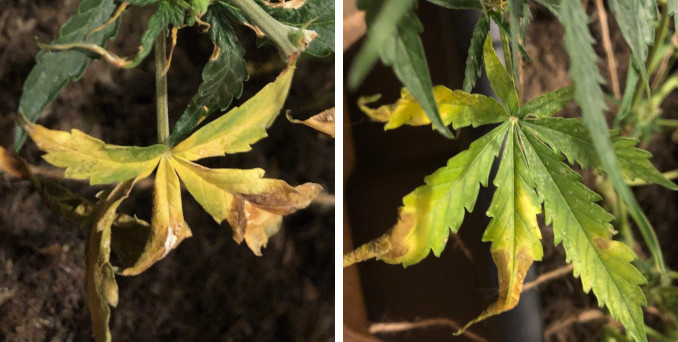
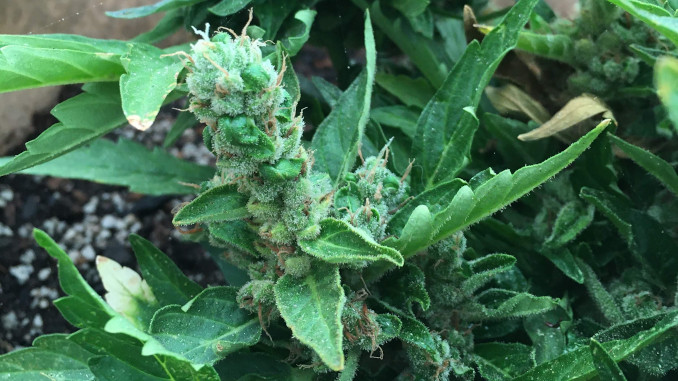
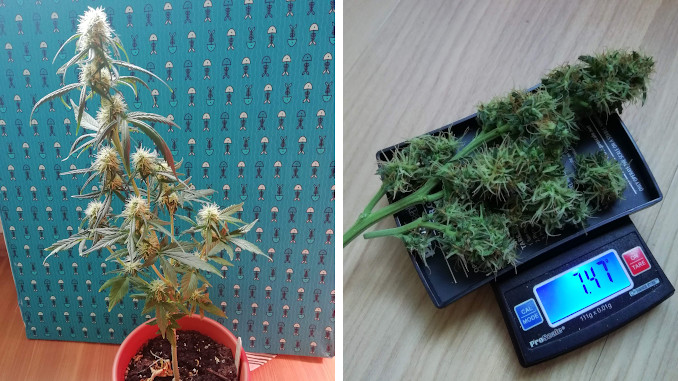
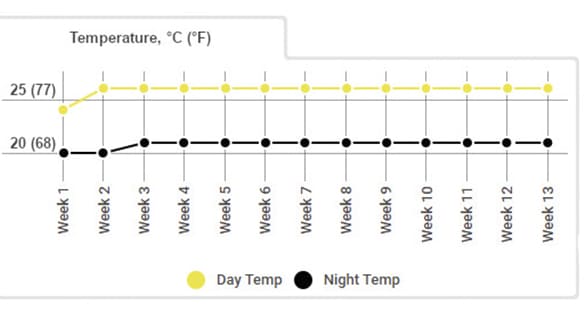
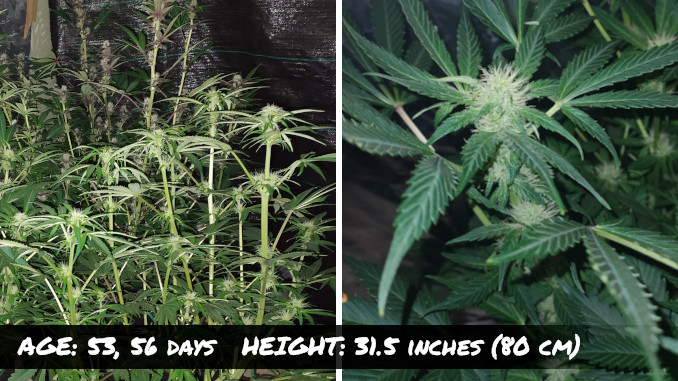
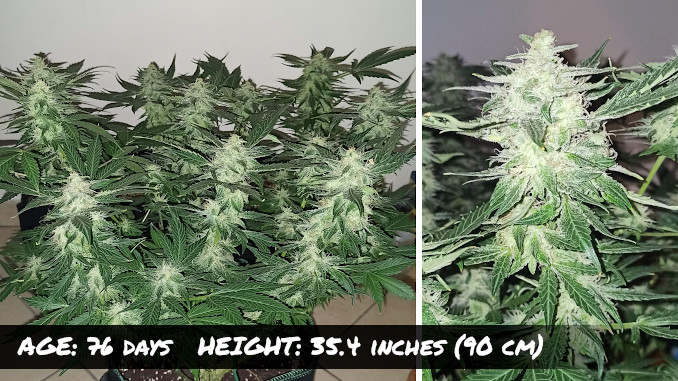
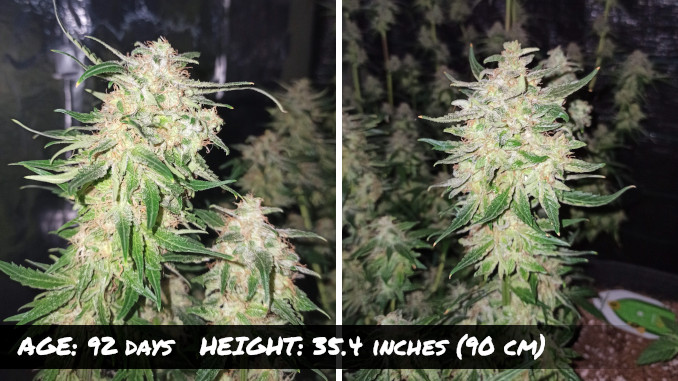
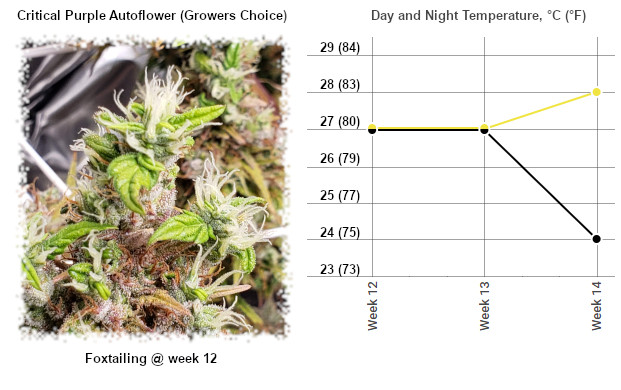
At the end of this grow, the temperatures ran out of control. Especially the night temperatures which were the same as day temps for two weeks. And that was the most likely reason for foxtailing which is the growth of new elongated shoots on maturing buds.
seedling fell over because of pythium (damping off) duw to temperature stress 
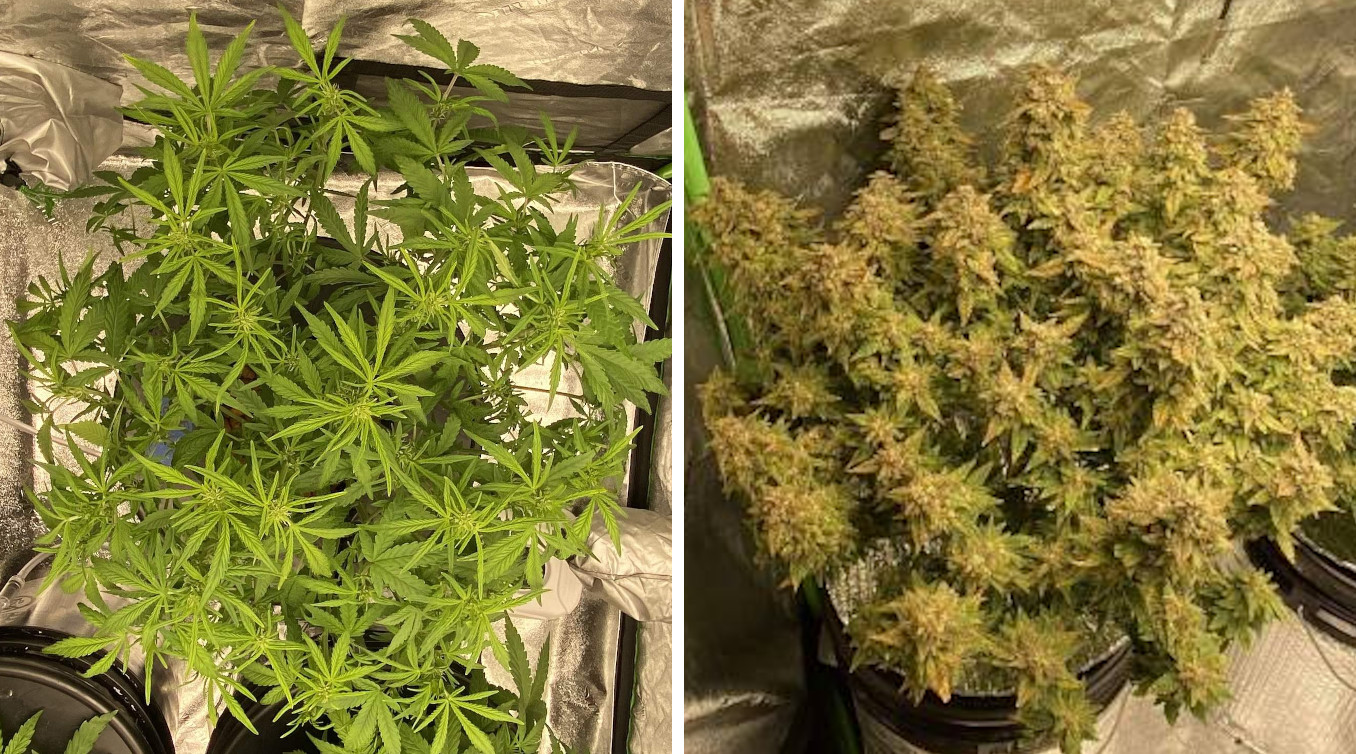
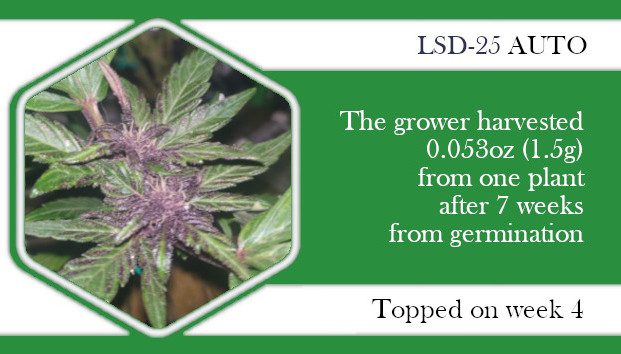
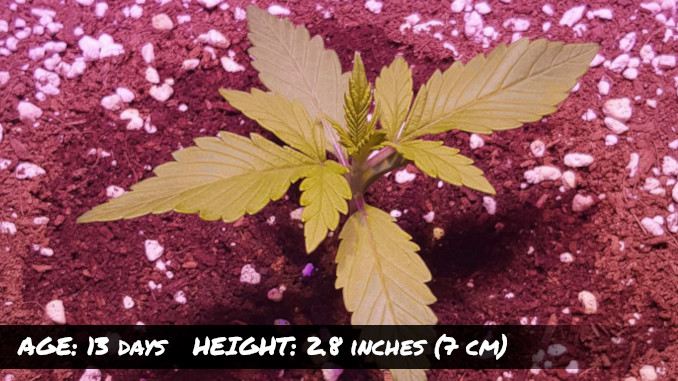
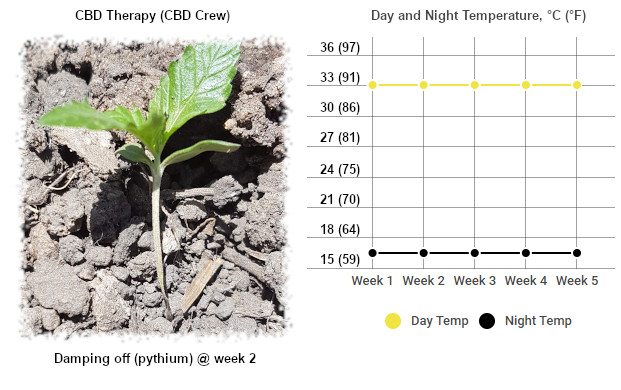
The grower made a mistake of planting his outdoor garden in the middle-of-July heat. At the same time, the nights were rather cool. This temperature stress weakened the seedlings and made them susceptible to pythium, aka damping off. As a result, the stems just above the soil thinned and the seedlings fell over.
powdery mildew spots due to cool nights and 100% humidity 
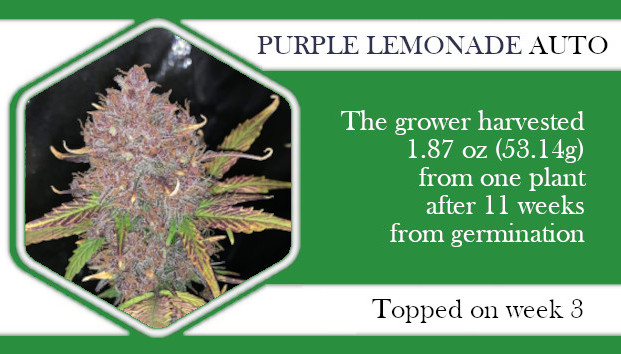
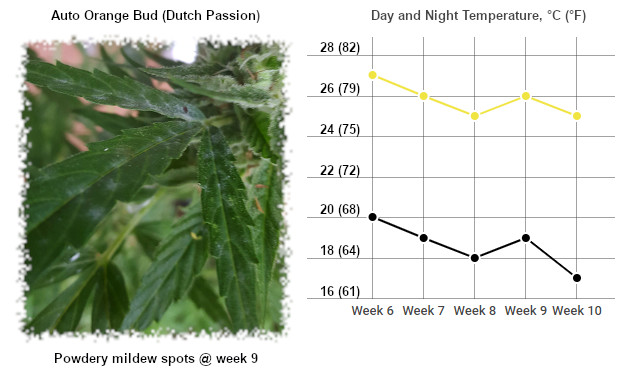
In this outdoor run, the autoflowers were finishing in the middle of autumn when warm days and cool nights led to the dew forming on leaves and causing powdery mildew. The grower didn’t monitor the relative humidity of the air, but it doesn’t matter. When the dew forms, it means the RH is 100%.

Temp and Humidity Requirements of Different Autoflower Genetics

Indicas and sativas have different genetic heritage, so keep it in mind when planning for your autoflower temperature and humidity.

Sativas Indicas
Originate in hot and humid tropics
Have open, well-ventilated bush structure
Buds are airy or drawn out
Are less susceptible to mold
Don’t like cold but are tolerant of humidity
Originate in the arid mountain climate
Have a dense, poorly ventilated bush structure
Buds are compact and hard
Are susceptible to mold and bud rot
Don’t like high humidity but tolerate cold

Frankly, if you grow autoflowers, all this is of minor concern. Most autos on the market today are more or less well-balanced hybrids with the indica/sativa ratio fluctuating in the 60-40 to 40-60 percent range. When buying such seeds, it’s a toss of a coin which phenotype you’ll get — indica-or sativa-leaning.

Autoflower Outdoor Temperature and Humidity

Outdoors, autoflowers are very rewarding because you can bring them to full maturity in any 2-3 months of the growing season. Even in very cold climates, there are at least 2 months of what may be called summer weather. And if the season is long enough, you can have several consecutive harvests. Or choose the optimal period in terms of temperature and humidity.

A closeup of a flowering top of a cannabis plant grown outdoors

Gorilla Glue grown outdoors. © Growdiaries

We’ve written a separate post about outdoor marijuana temperature (it has all the numbers you’ll need). Let’s stress just a couple of points here:

  • better start your seeds indoors and transfer them outside at 2 weeks from sprouts,
  • try not to expose young plants to day temps lower than 15°C (59°F) and night temps lower than 10°C (50°F),
  • make sure night temps never get below freezing point,
  • if possible, time the grow so that it’s not too hot during flowering.

Btw, transferring an autoflower outdoors can be stressful for its root system. Click the link below to learn just one hack of how to reduce transplant shock.

The Best Gorilla Glue for Outdoor

Gorilla Glue Auto (FastBuds)

The Gorilla Glue Auto strain from Glue Auto (FastBuds) is an autoflowering marijuana strain that boasts high potency, similar to its non-autoflowering counterpart. Its effects are long-lasting and strong, providing a well-balanced high that ranges from relaxing and happy to uplifting. With THC levels typically hovering at 24%, users can expect to feel the effects equally in their mind and body.

Greenhouse Could be a Better Alternative

In colder climates, it’s best to plant your autoflowers in a greenhouse which will protect them from cold weather, rain, and strong winds. A greenhouse can also extend your growing season by two whole months.

A closeup of a marijuana flowering top with white pistils grown in an amateur greenhouse

A greenhouse grow of Zkittlez OG Auto, week 10. © Growdiaries

The one mistake you should avoid is sealing your greenhouse completely for the night. The thing is that when the air inside the greenhouse cools down on a cold night, heavy dew forms on everything. A couple of nights like this and your crop will begin to rot, get covered by powdery mildew and what not.

So leave the greenhouse open for the night to let the excess moisture evaporate. It’s better when it’s very cold but ventilated than kind of cold and sealed off hermetically.

Final Thoughts

Although we were talking about autoflower temp and humidity, the general principles apply to any weed variety. If you want vigorous and healthy growth without any issues, try to always be in control of environmental conditions. If you manage to keep them within the given ranges, you’ll get tons of chunky heavy buds at harvest. Happy growing!

All images in this post were taken from GrowDiaries, the world’s largest weed growing community.


The Best Cannabis Srore

Price: from $5

Pack: from 1 seed

Shipping worldwide

Price: from $15

Pack: from 1 seed

Fast ship US only - 1 day

Price: from $80

Pack: from 5 seeds

Shipping US only

Price: from $50

Pack: from 5 seeds

Shipping worldwide

Can You Defoliate Autoflowers? Grow Questions Answered

A grower asks: “I have a Gelato Auto in my 2’x2’ grow tent, and she is 2 weeks into flowering, very bushy and quite tall. Can you defoliate autoflowers? I have already removed a few lower fan leaves but I think she needs a more thorough haircut in the middle.”

You certainly can defoliate autoflowers if this will improve light penetration and air movement inside the canopy. It’s safest to do selective defoliation — when you take off only the bare minimum of leaves. Heavy defoliation is possible with stronger autoflower genetics, but make sure you follow our guidelines.

Can You Defoliate Autoflowers in Flower?

In the situation described above, the grower can and probably should defoliate his autoflower because she’s tall and bushy. First of all, this means she’s healthy and can take some abuse without skipping a beat. Second, her being tall means that lower bud sites are probably too far from the light. If they are also shaded by fan leaves, they’ll never amount to anything worthwhile.

You either remove the fan leaves shading the lower buds or—if the distance from the light is too great—pluck off those lower buds as well. It’s better to make the lower portion of the bush completely barren and channel the energy to the tops.

the bottom part of an autoflower defoliated in week 6
Strawberry Banana Auto by FastBuds ‘lollipopped’ in week 6 from seed (right before the transition to flowering). © Growdiaries

If you need to do a lot of defoliation to expose every promising bud site to light, make sure you remove only mature leaves that wouldn’t grow any more. Also defoliate no more than one third of all the fan leaves in one go and wait at least a week before the next defoliation session. Usually, it’s safe to trim your plant in this manner until she stops her flowering stretch.

should i defoliate autoflowers in flower; week 2 of flowering, heavy defoliation
Purple Punch Auto by FastBuds on days 41 and 44 (the second week of flowering). © Growdiaries

After that—in late flowering—defoliation usually does more harm than good. You may admire the look of all those exposed frosty colas, but they would probably yield more if you didn’t trim them in late flower.

Related Post  Autoflower Defoliation Sweet Spot: When and How Much?

Do You Defoliate Autoflowers in Veg?

The question of how to defoliate autoflowers in the vegetative phase is also a common one. Again, it’s best to be very selective about it. Fan leaves are especially important in veg because they are solar panels that convert light into energy. They also store lots of nutrients that can be transported to other parts of the plant and used there.

So think twice about removing any of the fan leaves during veg. Here’s a quick checklist for you:

  1. Are fan leaves blocking light from lower side shoots?
  2. Will those side shoots grow more vigorously if they are not shaded?
  3. Is the canopy too dense to be properly ventilated?If you answer ‘yes’ to any of those questions, then maybe you should defoliate your autoflower by removing a leaf or two at a time.

If you answer ‘yes’ to any of those questions, then maybe you should defoliate your autoflower by removing a leaf or two at a time.

Some growers also apply high-stress training techniques, such as topping, on their autoflowers, and, as a result, they turn into a wide bush with a great number of flowering tops. Those tops are usually close together, and the foliage between them makes the bush impenetrable to light and very poorly ventilated. In this case, heavy defoliation before the start of flowering is almost a must.

how to defoliate autoflower in veg in week 6
Cream Cookies Auto by FastBuds defoliated rather heavily in week 6 from seed (in the pre-flowering stage). © Growdiaries

Just make sure the transition to flowering hasn’t started already. Otherwise, it’s too late to heavily defoliate now. You don’t want to subject your plant to even more stress at this point. So give her a week to begin flowering for real and then defoliate.

We hope this answers your questions. And if you have more, please refer to our more comprehensive article on autoflower defoliation.

All images in this post were taken from GrowDiaries, the world’s largest weed growing community. 


Autoflower Defoliation Sweet Spot: When and How Much?

Not long ago, people used to think of autoflowers as something fragile, finicky, tiny, and potentially low-yielding. The common stance was that anything could shock and stunt them. Hence, the autoflower defoliation was a big no-no, the same as transplanting and various high- and low-stress techniques. Luckily, that has changed.

Autoflower defoliation has become a standard canopy-management method, and we’ll show you how and when to perform it. Armed with these guidelines, you’ll learn to use autoflowers trimming as the means to achieve bigger plants and over-the-top production.

The Most Important Question — Why?

Autoflower defoliation shouldn’t be thought of as some devilishly clever way to cheat Nature. We don’t need to cheat. We just see a problem and help plants deal with it. If there’s no problem, we leave them alone.

So let’s look at the situations where you can benefit your autoflowers by trimming and defoliating them:

  1. Better canopy ventilation. If you’re afraid there’s a lack of air movement in the bottom part of the bush or inside it, remove the excess foliage. Or else you can run into problems with mold.
  2. Increasing light exposure. Probably the main reason for autoflower defoliation indoors. Make sure that fan leaves don’t shade any bud sites. And if they do, remove them.
  3. Getting rid of old leaves. When a plant has sucked all the juices out of lower fan leaves, there is no reason whatsoever to leave them on branches. If the lower leaves are still green, don’t shade anything, nor block air movement, it’s okay to leave them.
  4. Slowing down a particular branch. Sometimes one of the top shoots is growing too fast and is overtaking all the rest. One of the ways to curb its growth and allow the rest of the branches to catch up is to defoliate it.
  5. Reducing overall perspiration during drought. I used to do this in my guerilla growing days. I prefer to let my outdoor plants grow naturally, but during a heat wave I defoliate more generously. The less foliage, the less precious water the plant loses.
Related Post: XXL Autoflower Strains 2023

READ NOW

Drawbacks of Autoflower Defoliation

There are definitely quite a few cons to autoflower defoliation. Let’s look at them too.

  • Each leaf contributes to photosynthesis. Chemical reactions inside leaves produce building materials and energy to be used elsewhere in the plant. So defoliate only if you think that the benefits of defoliation outweigh the leaf’s contribution to photosynthesis.
  • Each leaf is a depo of essential elements. So-called mobile nutrients (N, P, K, Mg, and Mo) can be transported from older leaves to new growth as needed. So if you notice a deficiency of any of these nutrients, you’ll only make things worse by defoliation.
  • Slowed down growth due to stress. Autoflower defoliation, pruning, topping—they all produce a spike in jasmonic acid. It’s a kind of a stress hormone which makes plants temporarily suspend growth and direct the saved energy to wound healing. On the other hand, the right amount of stress can produce just enough jasmonic acid to actually make weed more potent, as one study suggests.
  • Risk of hermaphroditism due to stress. It’s not the worst kind of stress (not as bad as chaotic light cycle, for example), but in weaker genetics it can be enough to make female plants produce male flowers (hermies).

These drawbacks don’t give enough reason to forget about autoflower defoliation altogether, but you should always make sure the good outweighs the bad. And sometimes you might prefer a little less invasive and stressful procedure like leaf tucking.

Leaf Tucking: The Alternative to Autoflower Defoliation

leaf tucking

Red circles show where leaves were tucked and tied together instead of defoliation. © Growdiaries

If larger fan leaves are in the way but you think it’s best to leave them on the plant for now, you can tuck them under a branch. Let’s have a look at one way this can be done.

A skillful grower who calls himself Bloombuster obviously hates autoflowering defoliation and uses the ‘x-leaves’ technique instead. He takes two opposing fan leaves, tucks them under a branch and ties them together by their petioles.

At harvest, the plant is a monster. Maybe too leafy to some people’s taste, but a very generous producer.

Gorilla Cookies Auto (FastBuds)

The yield of this monster from FastBuds is 220 g (7.76 oz) from 1 plant. This indoor garden is actually just one autoflower, grown without heavy defoliation. © Growdiaries

Heavy Autoflower Defoliation as a Yield Boosting Technique

So far, we’ve only been talking about selective defoliation of autoflowers. You cast a critical eye on your plant and remove only those parts that don’t fit your vision.

However, many growers see defoliation (especially heavy defoliation) as a kind of a magic bullet As if it somehow could automatically transform your plant into a super producer. This view was given a boost by the rise of schwazzing, a form of extreme defoliation.

Schwazzing was popularized by the book Three a Light. The name obviously means ‘three pounds of dry bud per a 1000W light’. The book describes at what stages in a plant ‘s cycle heavy defoliation should be performed and how many days of rest to give your plants between sessions and what nutrients to feed them. People love clear and easy-to-follow guidelines like this.

Related Post: Where to buy the best Gorilla Glue

READ NOW

Btw, schwazzing was developed for photoperiod genetics, not autoflowers.

Nevertheless, some growers experiment with extreme forms of autoflower defoliation too. Obviously, they hope to come up with some step-by-step instructions that will guarantee bigger yields every time. We’d say it’s wishful thinking because every strain is different. Moreover, every batch of seeds in a strain and every seed in a batch are different. So it’s a flip of a coin how your particular autoflower will react to heavy defoliation

Having said that, we’ve compiled a short list of guidelines that most autoflower defoliation enthusiasts agree on:

  • don’t remove more than ⅓ of fan leaves at a time,
  • remove only those leaves that have stopped growing,
  • allow for at least a week between sessions,
  • you can defoliate in veg but not just before the transition to flowering,
  • it’s okay to defoliate during flowering (weeks 2-3) but only before the stretch is over,
  • never trim leaves in late flower (after approx. week 8 from seed).

A Sample Autoflower Defoliation Schedule for the Whole Life Cycle

Defoliation: Selective Heavy Pre-Harvest
Weeks 1
2
3
4
5
6
7
8
9
10

As you can see in the table above, a special case is defoliating an autoflower before harvest. If you do this right before chopping your plant or right before subjecting her to a dark period before harvest, it’s not really defoliation. It’s rather a form of wet trimming. You’re going to remove all fan leaves anyway, and often it’s more convenient to do this while the plant is still standing in her container.

LSD Auto (Barney’s Farm)

And even if you give her a day or two to mature under the light after this heavy trimming, it’s really okay. The stress might actually make buds even more potent. Grower ClubRiot removes all fan leaves and trim before harvest because it’s a convenient way to manicure buds. © Growdiaries

And even if you give her a day or two to mature under the light after this heavy trimming, it’s really okay. The stress might actually make buds even more potent.

A Few Examples of Heavy Autoflower Defoliation

Suboptimal Results

In our first example, a grower who calls himself chubbs decided to subject his autoflower to heavy defoliation in week 7. For many reasons, this auto hadn’t been growing vigorously from the start, and the heavy defoliation hardly helped. Besides, the guy chose to defoliate his autoflower before harvest a little too early — at least one full week before the chop. The yield wasn’t spectacular, but the quality of the buds was top-notch. Probably, thanks to the strong genetics.

Forbidden Runtz Auto (FastBuds)

The yield of this monster from FastBuds is 17 g (0.6 oz) from 1 plant. Heavy defoliation in week 7 and another radical one a week or two before harvest. © Growdiaries

Example 2. In addition to topping and mainlining a Girl Scout Cookies Auto by Fastbuds, the grower calling himself HobbitGDF defoliated her heavily in week 5. All these high-stress training techniques probably delayed the start of flowering—till week 7. As a result, the buds were only ready after a full 13 weeks from seed.

Girl Scout Cookies Auto (FastBuds)

71g (2.5oz) from 1 plant. The harvest pic looks nice, but it’s debatable whether heavy defoliation has helped with the yield. © Growdiaries

Lucky Outcomes

In our third example, the grower (Canamatoes) did multiple toppings and mainlining and performed a thorough defoliation on several occasions. The one in the picture is in week 6 (the second week of flowering). The Kosher Cake Auto by FastBuds responded great and yielded 261g (9.21oz) of top-shelf bud.

Kosher Cake Auto (FastBuds)

261g (9.21oz) from 1 plant. It’s not every genetics that can take so much abuse and still come out on top. © Growdiaries

And finally, the grower (Cali_Grown_420) used less stressful methods, such as FIMming, and defoliated more lightly and only once—in week 5 (the first week of flowering). In the picture, you can see one of three plants. All three have yielded 308g (10.9oz).

Cream Cookies Auto (FastBuds)

308g (10.9oz) from 3 plants. This gardener has chosen selective defoliation, and the result is spectacular. © Growdiaries

Don’t Get Carried Away!

Combing through Growdiaries, we have seen quite a few successful autoflower grows involving heavy defoliation. At the same time, many results were less than spectacular. Sometimes, it seemed that a simpler approach would lead to a more generous yield.

Often, when a grow journal shows a MONSTER bush at harvest, it’s impossible to find a picture where you can tell that the plant has just been defoliated. Because the grower defoliated only moderately, a few leaves here and there, nothing radical.

This smart approach to autoflower defoliation seems to work best. But maybe you have a different opinion. Tell us what you think in the comments.


The Best Cannabis Srore

Price: from $5

Pack: from 1 seed

Shipping worldwide

Price: from $15

Pack: from 1 seed

Fast ship US only - 1 day

Price: from $80

Pack: from 5 seeds

Shipping US only

Price: from $50

Pack: from 5 seeds

Shipping worldwide

How Long do Autoflowers Really Take vs What is Promised?

The reason autoflowers are so popular is the incredibly short time it takes them to fully mature. But, for many growers, it sounds too good to be true. Hence the suspicious question: how long do autoflowers really take?

The good news is that autoflower time from seed to harvest is more or less what seed breeders promise, that is not very long. You can scroll down right now and look at the infographics where we show how many weeks autoflowers take compared to their specifications.

Or, if you’re new to the game, let’s take a look at what makes an autoflower seed to harvest time so short.

Autoflowers Flower Time Doesn’t Depend on the Light Schedule

Let’s start with traditional cannabis strains. They are short-day plants, aka photoperiodic, or simply photoperiod. If they grow naturally, photoperiod varieties only start to flower at the end of summer or at the beginning of fall—when the days become short enough.

In indoor setups, the flowering begins only if you set your timer to 12 hours of day and 12 hours of night (12/12). And if the days are longer (e.g. 18/6), cannabis just keeps on growing and no flowering happens.

Seed producers have traditionally selectively bred cannabis for the earlier onset of flowering and shorter life cycle, but Nature beat them to it. That is to say, it ‘created’ Cannabis ruderalis, a small-statured feral plant that is adapted to very short Siberian or North European summers. Breeders have learned to add ruderalis DNA to traditional varieties to create autoflowers.

Autoflowers flower time and the whole life cycle are so short because they start to flower automatically in a couple of weeks from sprouts. Outdoors, they can be grown and harvested in any season (provided that the weather is warm enough):

  • in spring (when days become longer),
  • in summer (when days are the longest),
  • in autumn (when days become shorter again).

Moreover, in milder climates, you can even grow autos in winter. Just make sure that the day temperature is at least 15°C (59°F) and there are no night frosts.


Related Post  Outdoor Marijuana Temperature Range: Ideal, Okay, Extreme


And What About Indoors?

Indoors, you can use any light schedule from 12/12 and all the way to 24/0. Whatever is most convenient to you. It’s because longer light hours usually don’t affect autoflowers flower time.

This wasn’t always the case. Just a few years ago, it was a common complaint on forums that an autoflower keeps growing. Obviously, the expression of ruderalis genes in such a plant was too weak, so it wouldn’t flower at 24/0 or 20/4. Sometimes, even a 18/6 light cycle was too much. People were advised to switch to something like 16/8, 14/10, or even 12/12.

There’s even a term for this type of plants — superautos. Superautos tend to be big and high-yielding, but take forever if you treat them like normal autos. Today’s breeders do their best to create autoflowering varieties that never require any changes in light schedule.

How Long do Autoflowers Take in Different Conditions?

When planning how many weeks for autoflower you’ll need, take into account the following:

  1. Indoors or outdoors. In our experience, the same autoflowering strain usually takes a week longer when grown outside. This may be due to the less controlled growing conditions (see 2 and 3), or to the fact that outdoor weed is mostly grown in beds and not containers (see 4).
  2. Ideal vs subpar environment. The flowering in autos is triggered by size/maturity, rather than age. Obviously, plants reach the target size faster if the conditions are right and there’s no stress. And if the growth of an auto is stunted or slowed down for some reason, the start of flowering will be delayed.
  3. DWC vs soil. In hydroponics and soilless mediums (coco), seedlings tend to develop faster than in soil. This means that they’ll be several days faster to reach maturity and enter the flowering phase.
  4. Pot size. In smaller containers, autoflowers take less time. The reason is that when root tips reach the walls of a container, it gives plants a signal that there’s no more available space (and resources) and that they better switch to flowering.

Training an Autoflower: How Many Weeks This May Add?

When working on this post, we asked ourselves this question: how many weeks do autoflowers take if you use low-stress/high-stress training methods? So we have screened 60 grows for such techniques as topping/fimming, defoliation, and LST.

Frankly, we didn’t see any pattern here. Please look at the tables below for yourselves. As you can see, we have sorted all grows by the length of the cycle — shorter cycles first. If LST/HST methods really affected the length of the grow, they would cluster at the bottom of each table. This doesn’t seem to be the case.

In a separate post, we looked at how autoflower topping affects the yields. The findings were rather ambiguous, but interesting.

How Long Do Autoflowers Really Take?

For insights, we turned to Growdiaries which is a large enough growing community to contain many answers.

We took 4 most popular autoflower breeders, then 6 most popular strains from each breeder, and finally 10 finished grows from the top of each list. All in all, we’ve scraped the data from 240 grow journals.

So, to answer your question—how long do autoflowers really take—look at the distribution of dots on the infographic. Please note that the baseline (‘0’) is what a particular breeder promises. And you can mouseover on a dot to glean some more info.

How long Autos
Infogram

Interpreting the Results

As you can see, these 4 breeders specify autoflower time from seed to harvest more or less realistically. Many growers really do cut down their plants within the given timeframe, and for others, their autoflower seed to harvest time is even shorter. Nevertheless, there are many instances where growers had to wait several weeks longer.

Interestingly, the more cutting-edge auto genetics by FastBuds take longer than older strains by this same breeder. Obviously, they’re recently less preoccupied with speed than with size/yield of their creations.

A Still Deeper Look

We’ve gone into more detail with FastBuds and six of their strains. Our goal here was to find an answer to the following question: how many weeks do autoflowers take if you train them or transplant them and how do they react to different light schedules? As mentioned earlier, we found no correlation.

Key Takeaways

Autoflowers are the fastest marijuana variety on the market. Quite often, they finish as fast as a breeder promises, or even faster. And if an auto takes longer, it usually reaches greater size and brings in better yield.

Anyway, regardless of the time it takes them, no modern autoflowers depend on seasons/light schedule, and they always flower automatically.


Autoflower Topping: 10 Real-Life Examples & Results

There’s much controversy on the subject of autoflower topping. Only a few years ago, it was a no-brainer: topping an autoflower would lead to catastrophic results in terms of size and yield. Today, autoflowers have become so strong that topping and other forms of high-stress training often don’t hurt them.

Moreover, when you grow autoflowers indoors, it’s paramount to keep them short and spread-out, so that each flower top is at the same distance from the light. Often, it can be achieved with low-stress training (LST), but sometimes LST is not enough. In such cases, autoflower topping can give you more advantages (flatter canopy & more flowering tops) than drawbacks (the risk of stunted growth and longer life cycle).

Purple Lemonade Autoflower FIMming
A FIMmed autoflower, before and after.

In a separate post, we’ve described several grows of xxl autoflower strains, and some of the most amazing results there were achieved through topping. We’ve also investigated the autoflower seed to harvest time in actual grow reports and found—among other things—that topping doesn’t seem to affect the speed of autoflowering cannabis.

When to do Autoflower Topping

So you’ve decided that topping a autoflower would benefit your indoor grow. Here’s a list of conditions that will raise your chances of success:

  1. Your autoflower should be mature enough. You risk shocking a young seedling with an HST technique if you perform one too early. Look through the examples below to see at what age other growers did the topping.
  2. The plant should be healthy and vigorous. If it shows any deficiencies, suffers from a pest attack, or is growing slowly for some other reason, wait till it’s well again. Or give up the idea of topping altogether.
  3. There are no other radical changes in your garden. It’s best not to top an autoflower right after a transplant, or when you change nutrients, the type of light, or light schedule. Any change can be a stress factor, and stress factors compound. Together they can shock your plant into remaining a dwarf.
  4. Your auto hasn’t yet begun to flower. The start of flowering signals weed plants to begin stretching the available branches and maybe grow some new foliage, but stop anything else, like growing new roots and new side branches. So don’t expect your autoflower to become noticeably bushier in the blooming stage. And autoflower topping won’t make any difference, either.

What is Topping, Anyway?

We assume that you already know what ‘topping’ means and how it is performed. So, this is only a quick reminder. Topping means pinching off the plant top. It’s done to switch off apical dominance and direct energy from the top (apex) to the secondary shoots (side branches).

Please note that you can do several toppings on a single plant: first top the main stalk, then the side branches, and, when they fork, top again their apexes. By spreading flat these multiple branches, you can get a very short and symmetrical plant. This technique is called mainlining, or manifolding. There are a couple of examples of this below.

There are two ways of topping:

  • Topping proper, when you cut off the growing point completely. In this case, instead of one central cola, the plant develops two tops. They grow from the topmost node, just below the cut-off apex.
  • Fimming, when you DON’T cut off the growing point completely (hence the name of the method — FIM, or “Fuck, I missed!”). If you do this right, the mangled apex will recover and grow two additional shoots. There will be 4 equal-size tops instead of one central cola.

autoflowering topping or fimming

Autoflower Topping Results in Real-Life Grows

Initially, we wanted to take just one strain—Orange Sherbet Auto by FastBuds—and find enough grow reports where it was topped and where it wasn’t. The idea was to see how much autoflowers topping affects yields in the same genetics.

However, comparing topped vs. untopped autos of the same variety doesn’t give much insight. The final results are all over the place. So, instead, we compiled two sets of 5 strains each: in one set, the topping was successful, and in the other, not.

We hope you’ll have fun looking at these autoflower topping examples. Please pay attention to the names of the strains and the growers’ nicknames, too. Sometimes, one and the same strain or one and the same grower doing exactly the same thing result in totally different outcomes.

Successful Examples of Autoflower Topping

autoflowers topping Gelato I do love her, she will be topped, probably 3 times starting in about a week, pinned, lollipoped and defoliated regularly ..... Day 18, I topped her again yesterday and you wouldn't know it. She is on track growing and right where I think she should be. Not like her sister zkittlez ..... Day 28, the ocd kicked in again ffs and I topped everything again for the 4th time. Ive never done 4 so Im interested to see what happens ..... I gave her a boot camp that alot of plants don't survive and she never flinched or missed a beat. She is one tough cookie!

Canamatoes

Gorilla Cookies autoflower fimming Fimmed her on day 20 ..... She reacted well to training, quickly overcame the stress or repotting and fimming and is growing fine ..... FIM didn’t go as planned. However, the procedure significantly affected the development of the middle nodes and made the side branches grow vigorously. The plant grows quite fast

Bloombuster

Orange Sherbet autoflower topping Both plants have motored through initial training with LST and fimming without skipping a beat. I've read so many mixed opinions on topping / fimming autos, it was a hard decision to make. In the end, I decided to give it a try and find out for myself. If I'd had any concerns about the plants ability to cope, I wouldn't have done it, but if your plant is looking strong and healthy then it may be something to think about ..... for this grow right here? I think it was a good decision I'm extremely happy with the results.

GWSD82

Purple Lemonade autoflowering topping she seems to be doing fine with the topping still growing but seems to have slowed down vertically which is good cause my last purple lemonades were monsters at 36 inches from pot ..... I am hoping it will be more bush style instead of tree ..... it’s just super healthy no matter what I do it did seem to stretch a good deal this week but I think the topping helped slow it down ..... huge yield this time at 138 grams plant finished around 34 inches from pot

Kellosaurus

topping a autoflower Blackberry Day 16: Her 6th node was well enough established for me to squeeze in there with the clippers and top her above the 5th node ..... Day 17: It’s been one day since she was topped and she hasn’t slowed down one bit. Growth has been fantastic over the past 24h. She is strong!

Automaniac

Subpar and Disastrous Attempts

fimming Blue Dream'Matic Blue had a solid start right out of the gate. She grew nice thick, full leaves and was happy as a clam cake.... Until I decided to FIM ?‍♀️ ….. Blue didn't seem to like it all that much, and as she began to grow out I did a poor job of opening her up enough to get proper sub-canopy circulation ….. Looking back now, I should have done a better job at doing a bit more defoliation than I did - but I found myself holding back once I had realized the stress I caused the plant from the FIM. That was a mistake.

blazin_skywalker

Zkittlez Auto topped on weeks 2 and 3 I only wish she had stretched more, the 3rd topping did her in! Take notes ..... Please don't top this 3 times! I never will I can tell you lol! Maybe top once or just lst! This was the smallest plant I have ever grown in my life and I believe it was from over training.

Canamatoes

Purple Lemonade Auto topping gone wrong 12/12. She got topped today ..... 14/12. Day 20. She reacted very well to topping and started growing faster ..... The yield was low. She need to be tied down next time because she stretched a lot in no time.

Alwa26

accidental topping of gorilla cookies autoflower Accidentally broke the main branch while adjusting LST. It was a clean cut. I could have taped it together and see if it recovers but decided to just remove the entire broken branch and consider this plant has been topped. My rationale is rather than the plant wasting its energy on recovery, it could use that energy on developing the lower nodes ..... Total dry weight for plant 2 came to 24g. Rather disappointing. It didn't have enough time to recover from the accidental topping. It was too close to flowering.

myrceneCB1

catastrophic topping result I was wrong to top her ..... I wanted to induce stress to revert her back to veg, but she wanted to bloom ..... I smoked 1 joint after 2 months’ wait ..... Failed growing method

AlienScrOG

Final Thoughts

A useful tool in the arsenal of an experienced grower, autoflower topping isn’t a foolproof HST method. Use it when it’s really necessary and when some less invasive LST technique isn’t going to cut it (no pun intended).

Also, make sure the autoflower you choose is really strong and capable of handling the stress. The ones we used in this review are a good starting point. Click on a picture of a strain to find more about it and, possibly, buy it for your next successful grow.