Gorilla Glue Auto is an insanely popular genetics thanks to its extreme resin production and other unique features that we’ve covered in our Autoflower Gorilla Glue review. In this post, we’ll describe the process of growing this strain based on an actual Gorilla Glue Autoflower grow journal.

Johnny Blaze (GrandMaster, 5257 likes, 51 diaries)
“This plant was really easy to grow. I topped it by mistake and it came out a beast..buds are big and super sticky made 1,5 grams of finger hash..”
Gorilla Glue Auto was grown in coco, under a 270W LED, and the whole grow cycle took 13 weeks (8 weeks of flowering). The grower performed LST and very light defoliation, and he accidentally topped the main cola. Nevertheless, the plant yielded 76 g (2.68 oz) of resinous buds.
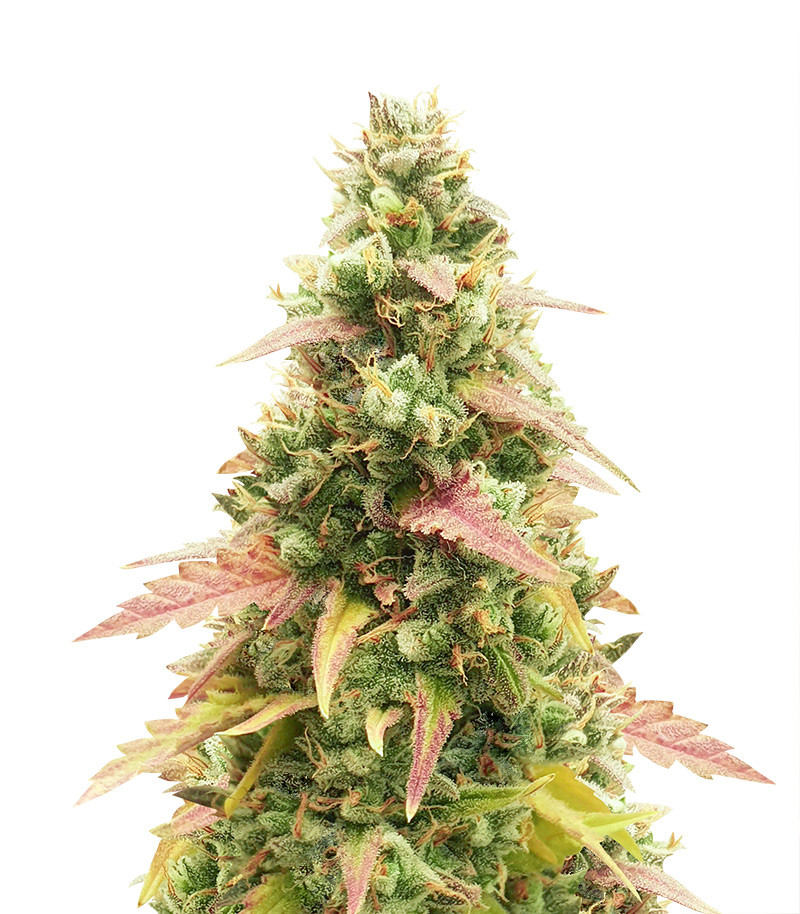
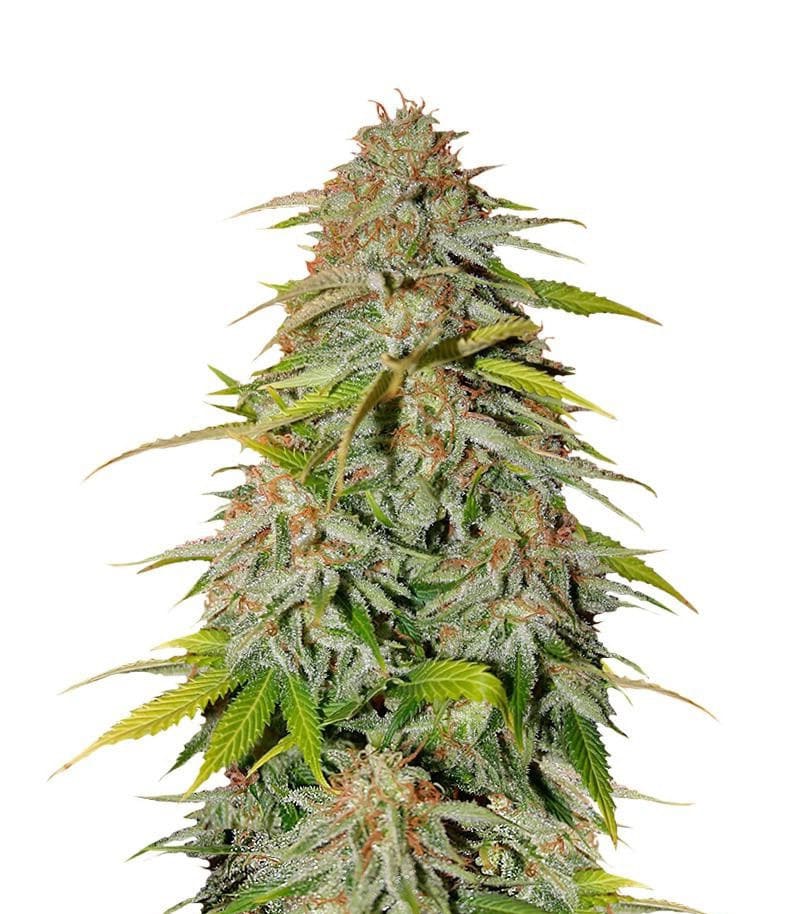
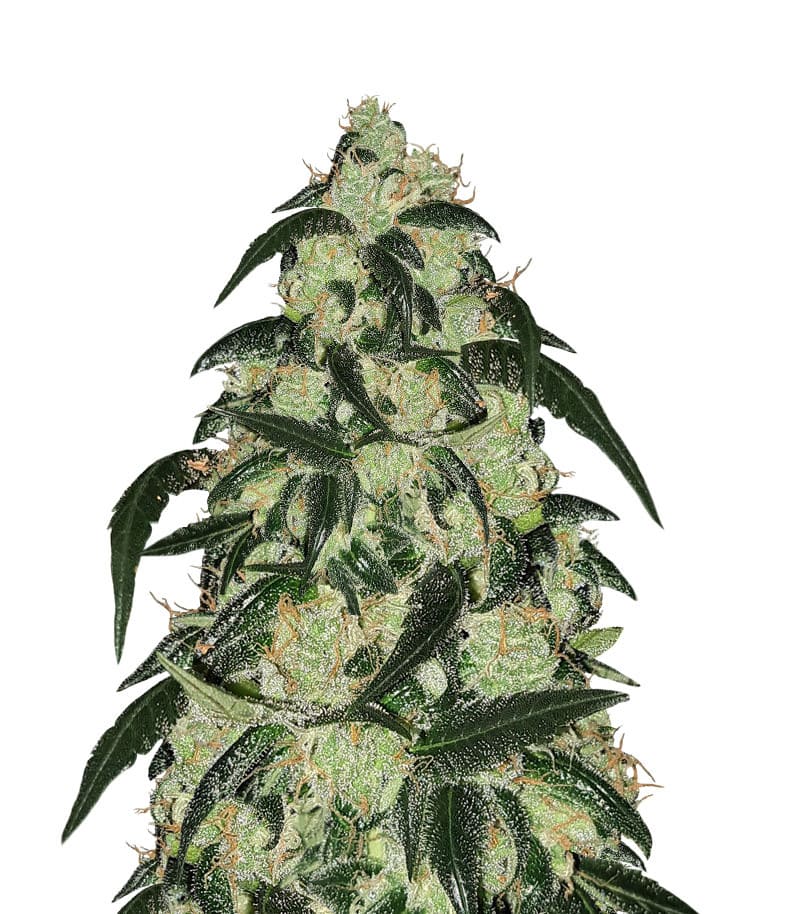
Gorilla Glue Auto (FastBuds)
This particular type of plant can be easily managed, growing to heights between 60-100cm (24-39″). The suggested cultivation methods include low-stress training (LST) and defoliation. For indoor cultivation, it is recommended to use an LED 300W or equivalent light during both the vegetation and flowering stages. Using this technique, indoor grows may produce more than 70g/plant.
Setup Highlights
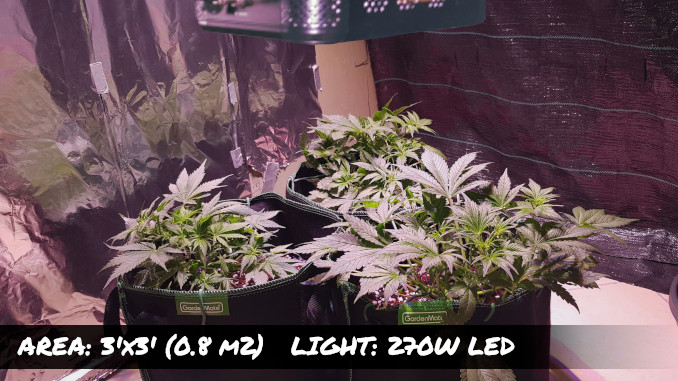
This small grow space conveniently houses 3 large autoflowers. © Grow Diaries
JohnnyBlaze is a long-time member of the GrowDiaries community, but this particular Gorilla Glue Auto diary appears to be his first attempt ever. As a grow space, he used a small (about 3’x3’) corner nook in his attic bedroom and hung a 270W LED light there. The only other equipment was an oscillating fan used for air circulation. A very basic setup indeed.
| Surface Area | Light |
| 8.6 ft2 (0.8 m2) | 270W |
| No. of Plants | Overall Yield |
| 3 | 7.62 oz (216 g) |
| Yield per Plant | Yield per Watt |
| 2.54 oz (72 g) | 0.8 g |
How to Grow Gorilla Glue Autoflower in Veg
Let’s have a look at this plant’s day-by-day progress through the vegetative stage and maybe glean some useful tips from it.
Week 1: Germinated in Coco

At the end of week 1, the Gorilla Glue seedling is quite big but not stretchy. © Grow Diaries
As a medium, the grower used a classic 70/30 coco/perlite mix. He decided to put the seeds straight into the medium, without pre-soaking or germinating them. All three, including one FastBuds Gorilla Glue Auto, emerged after 4 days.
Since this Gorilla Glue Auto grow was started in the middle of January, this was convenient in terms of temperature. In summer, an attic grow room would probably be too hot. As it was, the day/night temps were almost perfect:
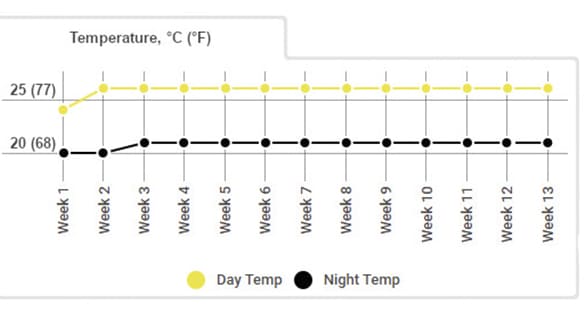
Gorilla Glue Autoflower grow journal. Day and night temp for weeks 1-13.
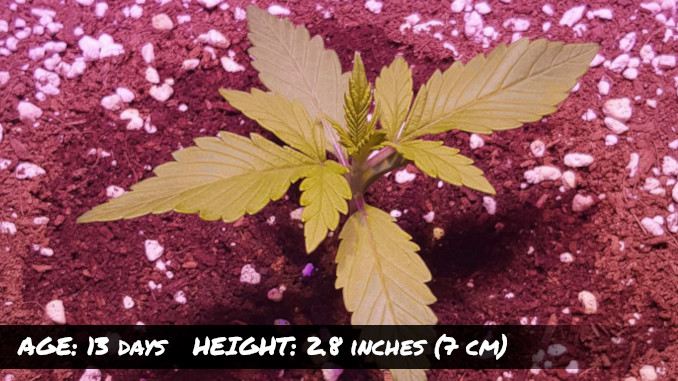
Week 2: Good Progress so Far
By week 2, the Gorilla Glue Auto grow was thriving, with the seedling appearing appropriately sized for its age. Planted in an 18-liter smart pot, the grower faced a challenge in watering the young plant. As shown in the photo, the grower watered only a small area around the seedling.
Since most coco mediums don’t come pre-amended with nutrients, he had to add some from week 1. He chose the products by Advanced Nutrients which are kind of pricey but very popular among cannabis gardeners. Most probably, for a reason.
The second pair of true leaves spans wider than the first one, and the 3d one is developing. © Grow Diaries.
For the first two weeks, it was only the 3-part pH Perfect combo — Grow, Bloom, and Micro. These products contain all essential macro- and micronutrients. Later, the plants would get a calcium/magnesium formula—an absolute must in coco—and then a whole line of other supplements.
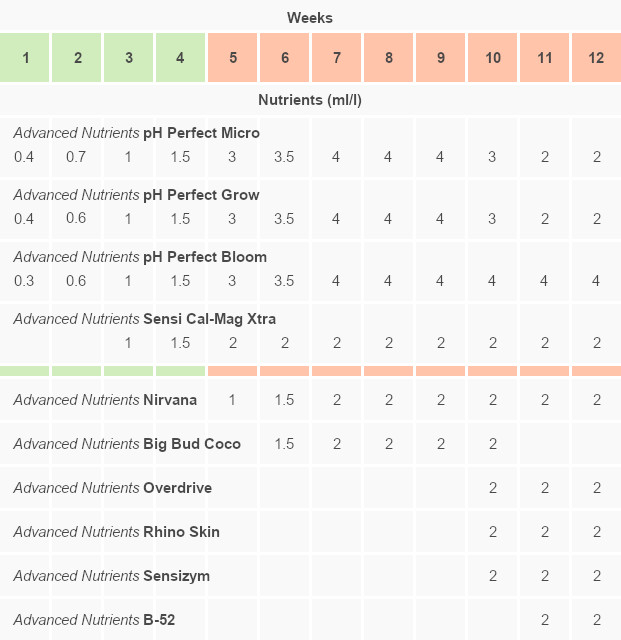
The nutrient schedule for the whole of Gorilla Glue Autoflower grow.
Week 3: The Start of LST
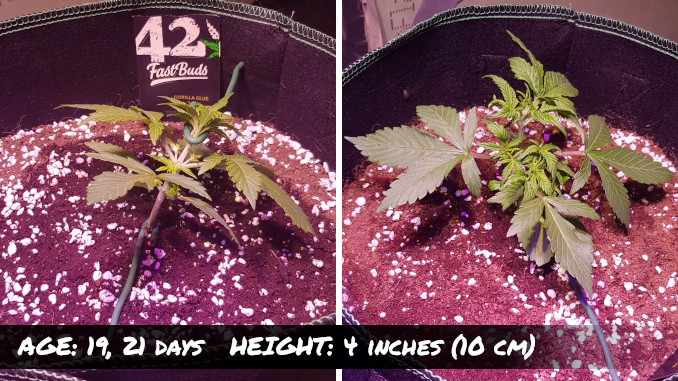
Low-stress training led to an immediate increase in branching. © Grow Diaries
Toward the end of week 3, the plant was big enough for the low-stress training. The guy had never done LST before, and he was nervous. As we shall see soon, he was nervous for a reason.
This Gorilla Glue had never been a stretchy and lanky plant, but now, with LST, she was shaping up to be a very squat, dense, and bushy plant. We’d say that the guy also managed to find the perfect (or almost perfect) distance from the light, and this helped keep Gorilla Glue and two other autoflowers nice and compact:
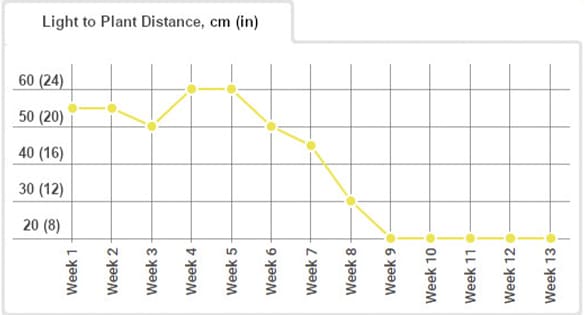
The light distance chart for the whole Gorilla Glue Auto grow journal.
Week 4: Defoliation and Cal-Mag Sprays
The plant looks extremely dense and stocky even after a bit of defoliating and pruning. © Grow Diaries
Week 4 was the last week of the vegetative phase in this Gorilla Glue Autoflower journal because, by the end of this week, the first pistils began to come out.
The flowering stretch was yet to begin, and the plant was so dense, the gardener found it difficult to train her. He decided to raise the light 4 inches (see the chart above) to make her expand a bit. He also performed light defoliation and pruned a couple of shoots that were completely shaded.

Although none of the girls showed any signs of a deficiency, the gardener thought they would benefit from cal-mag showers. That’s why he was foliar-feeding them with a 6.2 pH solution of Advanced Nutrients Sensi Cal-Mag Extra. By the way, this formula contains not only calcium and magnesium but also iron.
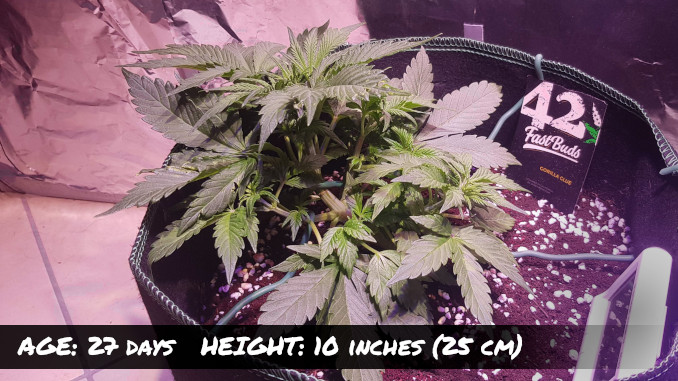
Week 5: A Spurt in Growth
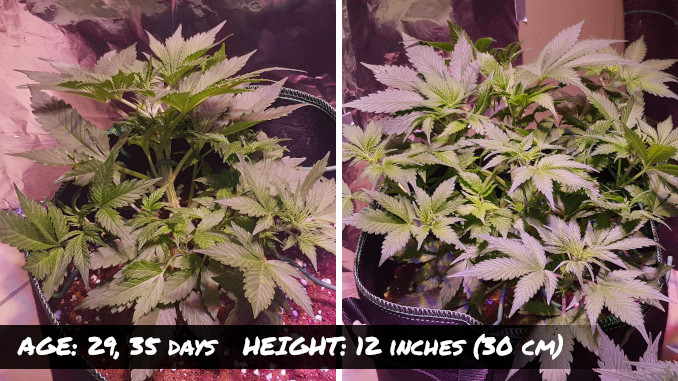
One week’s progress of this Gorilla autoflower is remarkable. © Grow Diaries
With the first hairs having appeared in the previous week, this autoflowering Gorilla Glue was clearly in the pre-flowering stage by now. And she really exploded, gaining not so much in height but in girth. She was the second biggest lady in this grow cycle — right after a Blackberry (which would come out a very good producer).
Gorilla Glue Auto Flowering Stages
The next and final stage of this Gorilla Glue Autoflower indoor grow wasn’t especially short but quite trouble-free. Well, apart from the accidental topping in the very first week of flowering.
Week 6: The Main Top Gone for Good
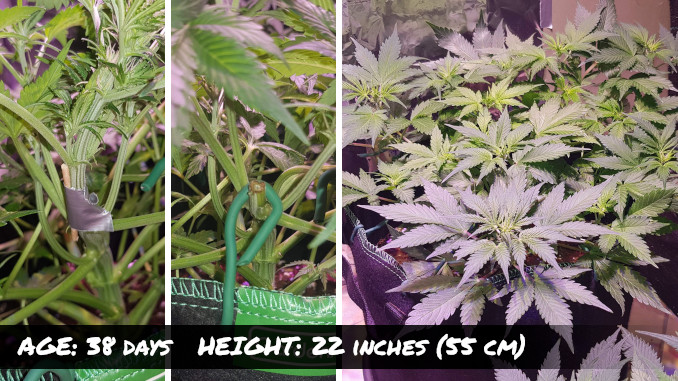
The main cola snapped and bandaged but eventually removed. Gorilla Glue Auto quickly recovered after the accident. © Grow Diaries
Week 6 was the low point in this Gorilla Glue Autoflower grow journal because the main stem snapped during LST. The grower tried to salvage it with a splint and a piece of tape, but the damage was too great. The loss of the main flowering top stunted the plant, but this was strong genetics, and she quickly recovered. However, this accidental topping would negatively affect the outcome.
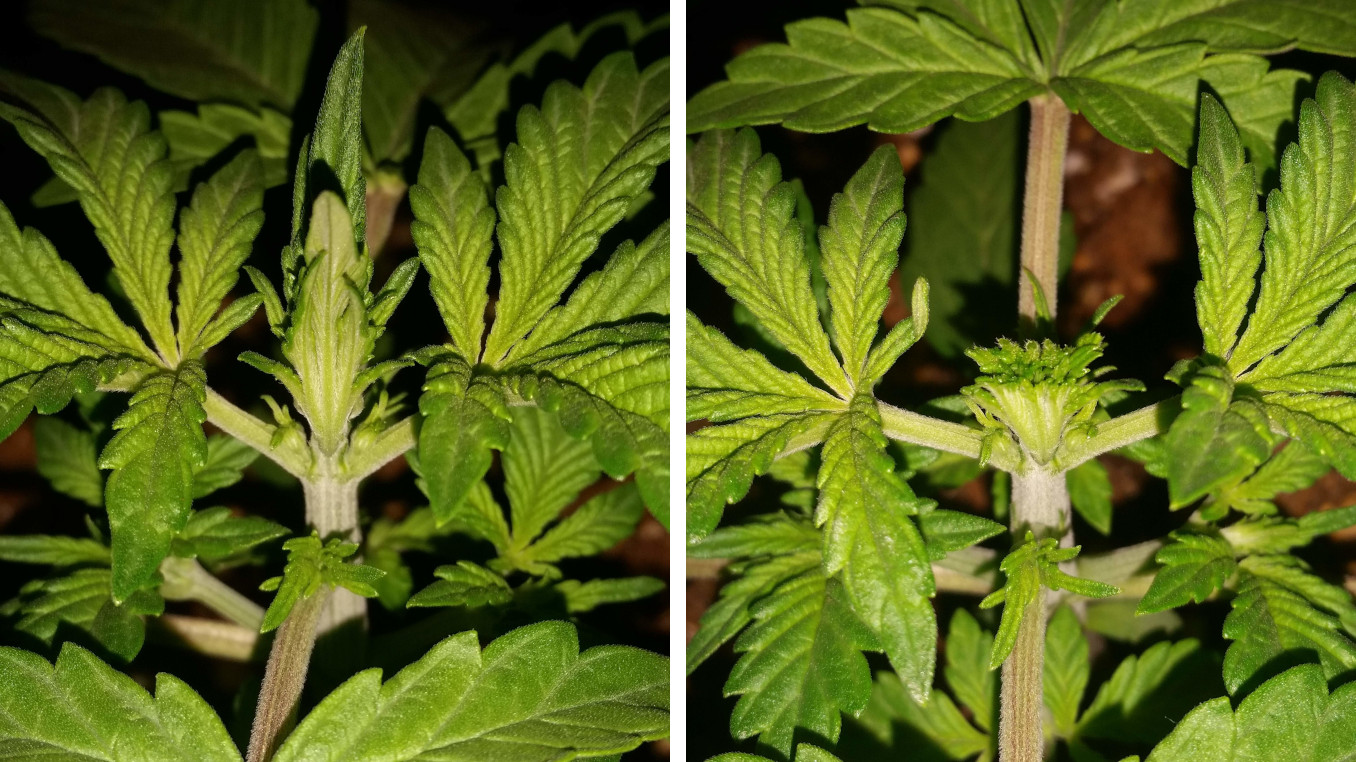
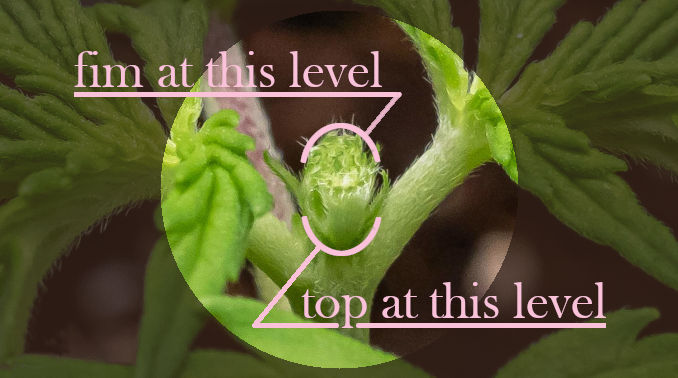
Topping an autoflower is a controversial subject. Follow the link if you want to learn more and see examples of successes as well as failures. But the gist of it is that modern autoflowers can be topped if they are healthy, vigorous, and haven’t begun to flower yet.
Now, that the flowering was already underway, the grower upped the doses of the staple nutrients and added two more Advanced Nutrients products:
- Nirvana, 0.85% potassium (K); recommended for use starting from week 7 and till the final flush; stimulates bud formation by helping the plant with the accelerated turnover of carbohydrates during the bloom phase,
- Big Bud Coco, 1.74% phosphorus (P) and 3.4% potassium (K) plus Ca, Mg, S, and iron (Fe) chelates; use it from the 2nd week of flowering and stop 3 weeks before harvest; makes the buds bigger and more potent.
Week 7: Practically on Cruise Control
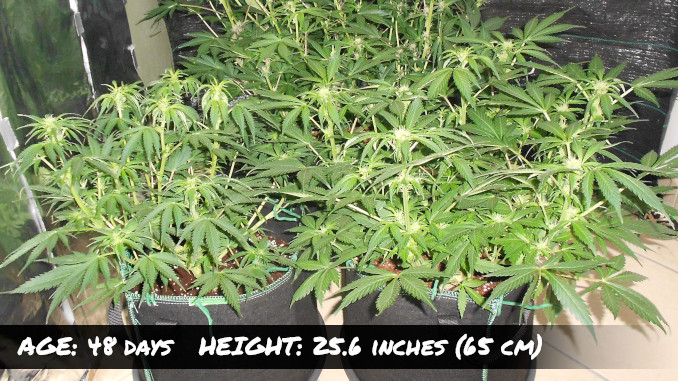
Auto Gorilla Glue is front right. She’s still the 2nd biggest lady in the garden despite an accidental topping earlier. © Grow Diaries
In the 7th week from seed, Gorilla Glue Auto was already 2 weeks into flowering and forming a lot of bud sites. She was still receiving the same diet as in the previous week — a rather rich cocktail of nutrients with TDS readings at around 1000 ppm. She didn’t show any issues, and the grower would raise the level to 1200 ppm for the last 4 weeks of the flowering stage. Again, with no nute burn, lockouts, or deficiencies.
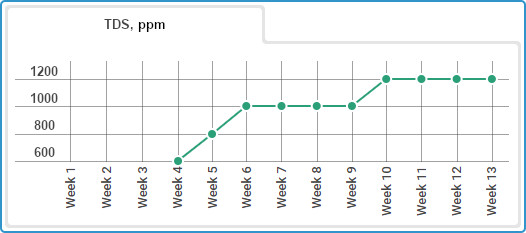
Gorilla Glue Auto: Week-by-week TDS values.
Week 8: Stretching Yet Some More
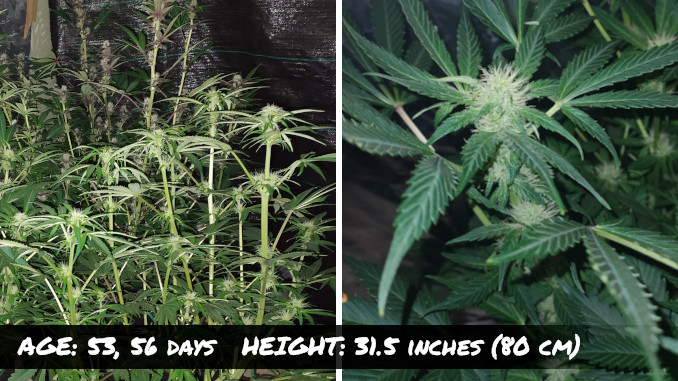
Gorilla Glue Auto has yet to finish her flowering stretch, but she has already started to stack up. © Grow Diaries
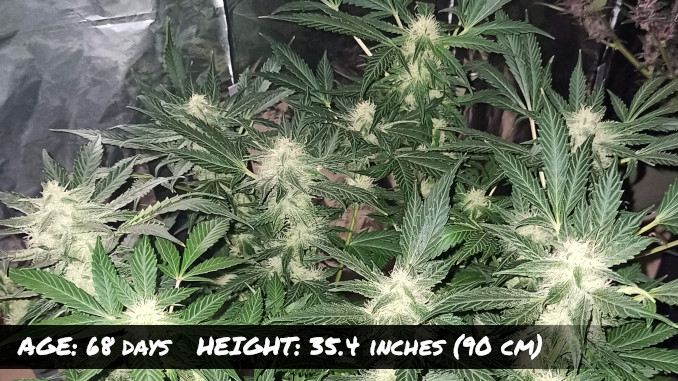
At this point in Gorilla Glue Autoflower grow journal, the grower noted how fast the girl had recovered from the snapping of the main cola earlier. Things like that are very traumatic, and it’s not every autoflower that can get better after them.
The flowering stretch was still very fast but almost over, and the plant would grow for only another week and reach her final height of 90 cm (35+ inches).
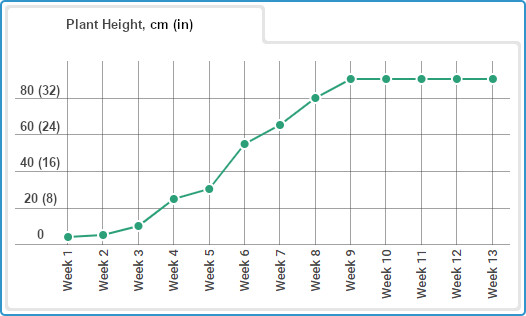
This chart shows the plant height throughout Gorilla Glue Auto grow.
Week 9: A Healthy Girl with a Good Appetite
Swelling out, frosting up, and starting to smell strong. © Grow Diaries
In week 10, there were some troubles in the garden, but none with GG. She displayed no deficiencies (like Blackberry did) and looked much bigger and healthier than Cream Cookies. Her diet was still the same, and she seemed to like it.
The grower definitely helped the matter with maintaining a very good pH. He probably kept it too high in the first 3 weeks but then decreased it to 5.6. This is within the acceptable 5.5–6.0 range for coco.
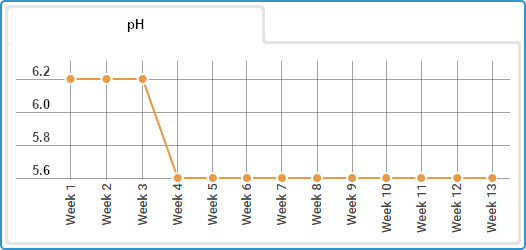
Gorilla Glue Auto pH levels for the entire grow cycle.
Week 10: Change of Diet to Fatten Things Up
The stretch is over, and the only thing that’s happening now is buds fattening up and getting frostier. © Grow Diaries
Week 10 saw a big change in diet because the grower had just received more nutrients by mail. He decided that his Gorilla Glue Autoflower grow would benefit from the following:
- Overdrive, a PK formula to maintain the momentum of bud maturation (perfect timing for this one),
- Rhino Skin, this source of silicon makes the branches more rigid and robust (for best results, start it from the first week of flowering),
- Sensizym, this mix of enzymes helps break organics accumulated in the root zone (a questionable choice for this grow).
By this time, the Gorilla Glue started to smell really amazing and strong. Although there were two other plants in this indoor garden, the grower kept mentioning only the smell of GG.
Week 11: One More Nutrient Added to the Mix
This Gorilla Glue Autoflower had the chunkiest colas in the garden. And the frostiest. © Grow Diaries
In week 11, there was another change in the feeding regime. As the manufacturer recommends stopping Big Bud three weeks before the harvest, the grower replaced this supplement with Advanced Nutrients B-52 which contains kelp and seaweed extracts and can be used in two installments:
- in the first 2-4 weeks from seed,
- in mid- to late flower.
Now, all of the Gorilla Glue Auto nutrients amounted to 1200 ppm. The grower knew the harvest was approaching, and the buds looked fat, dense, and frosty. However, he didn’t have a magnifier to look at the state of trichomes. So, trying to decide when to harvest this sugary beauty was really a guessing game for him. He thought he’d give her another two weeks.
Week 12: In the Homestretch Now
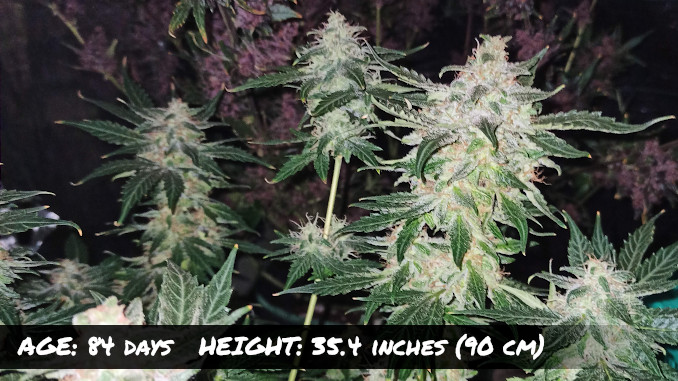
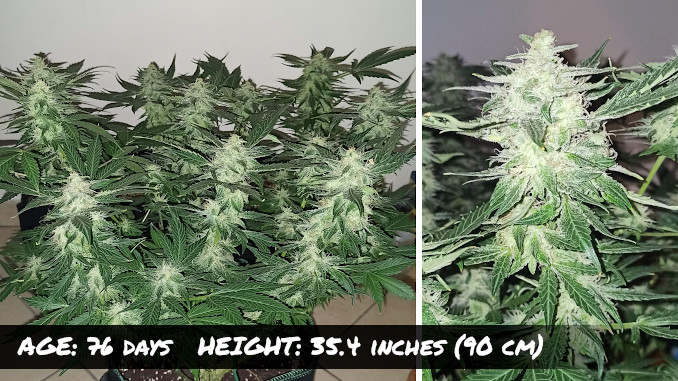
Autoflower Gorilla Glue is visibly approaching harvest time. © Grow Diaries
It seemed hardly possible the week before, but now the Gorilla became even more glittery with trichomes. The guy said he never saw so much resin on a plant in his life. And the buds kept filling out. Luckily, there were no issues with mold or bud rot although the grower failed to bring down humidity to the optimal level of 35-45% for the end of the flowering phase.
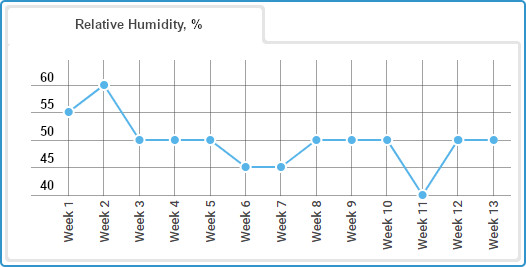
How to grow Gorilla Glue Autoflower: The relative humidity chart.
Week 13: A Five-Day Flush, Then Darkness Treatment
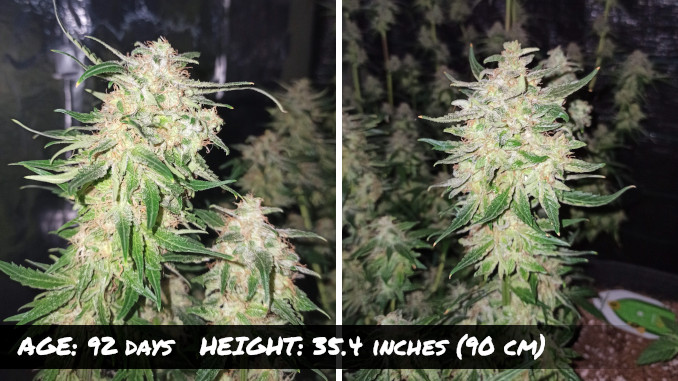
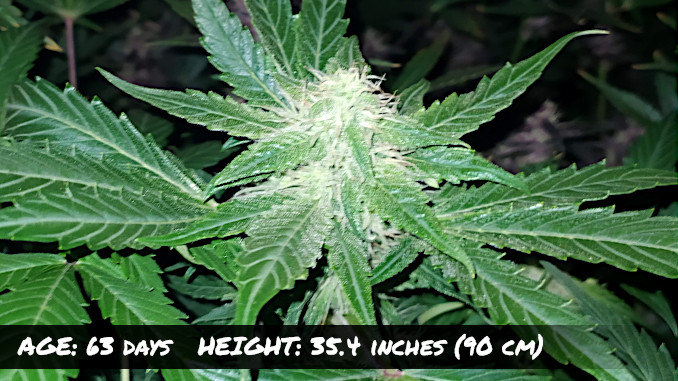
The colas are deceptively white, but in fact, they are ready for harvest. © Grow Diaries
The grower finally purchased a loupe to inspect the trichs, and, since they were cloudy now, he started the flush with RO water pH’ed to 6.2. The buds kept swelling up even now, and after 5 days of flushing, Auto Gorilla Glue was put in darkness for 72 hours as a way to stress her into even more resin production.
The End Result
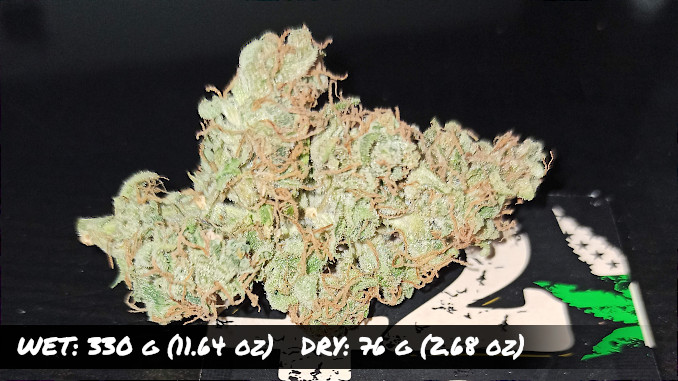
Just one of Gorilla Glue buds after drying and curing.
On day 95 from seed, this Gorilla Glue Auto grow journal was officially over. She yielded 330 g (11.64 oz) of wet-trimmed flowers and 1.5 grams of finger hash. The buds were hung to dry for 8 days — until the stems began to snap when trying to bend them. Then they went into glass jars for curing.
The 76 g (2.68 oz) of dry bud was a great outcome for a first-time autoflower grower, and the stuff was top-notch. It had an earthy smell with a pine background and sour and diesel notes. The effect was more on the body, with about a 40/60 sativa/indica ratio.
Main Takeaways from Gorilla Glue Autoflower Grow
The plant was easy to grow. In veg, she benefited from LST and became very bushy. She then stretched quite a bit at the beginning of flowering. We’d say not to top Gorilla Glue Auto (or any other autoflower) if you’re looking for yields. However, if you HAVE to top—for whatever reason—the plant will probably recover and still deliver a nice harvest.
Gorilla Glue Auto also loves high doses of nutrients and converts them into lots of oversized and frosty colas. With pH within the recommended range, there’ll be no issues with lockouts and deficiencies. At least, if you use Advanced Nutrients.
The resin production is WAY above average, and the smell is strong and extremely pleasant. Happy growing, everybody!
All images in this post were taken from GrowDiaries, the world’s largest weed growing community.
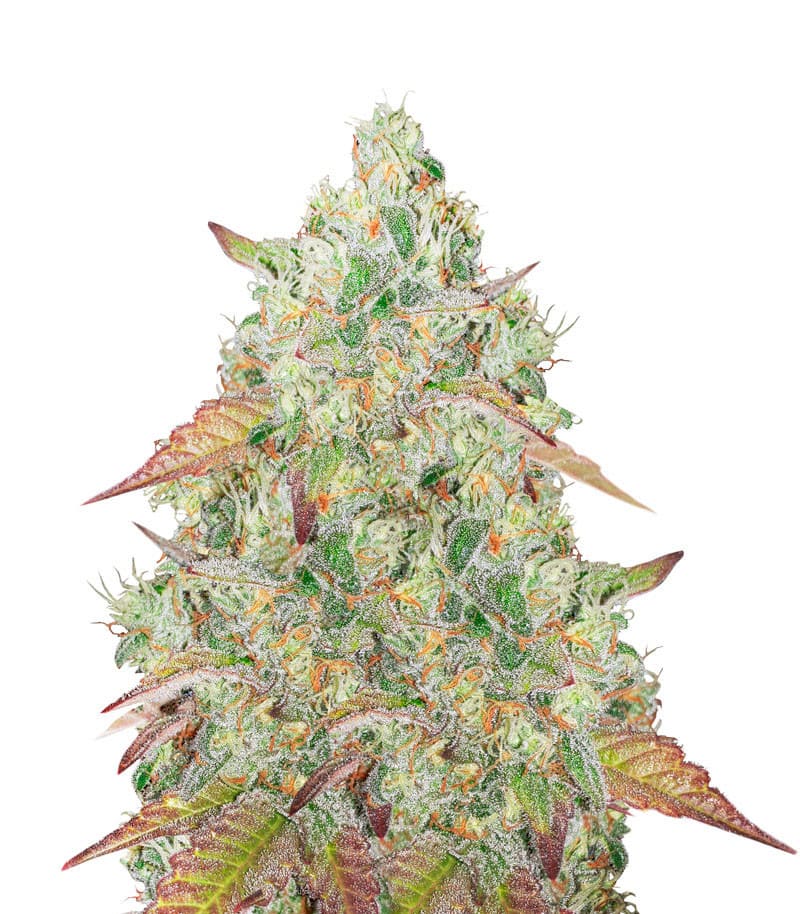
Ice Cream Cake
Learn more
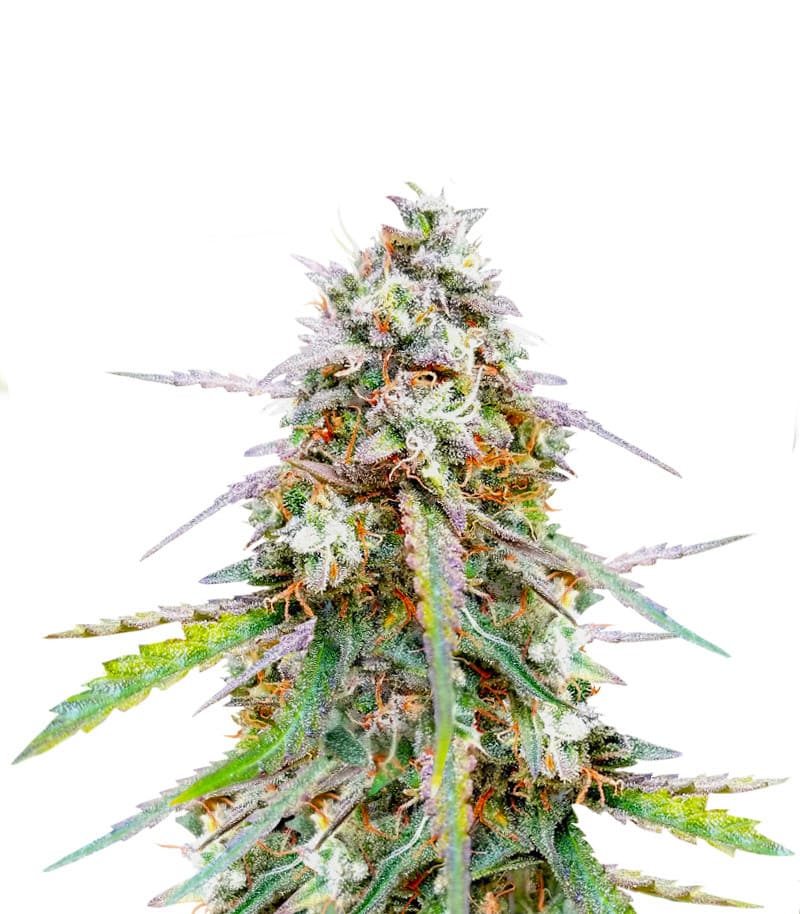
Granddaddy Purple
Learn more
Skywalker OG
Learn more
Wedding Cake
Learn more